ATV Light Handlebar Mount
prusaprinters
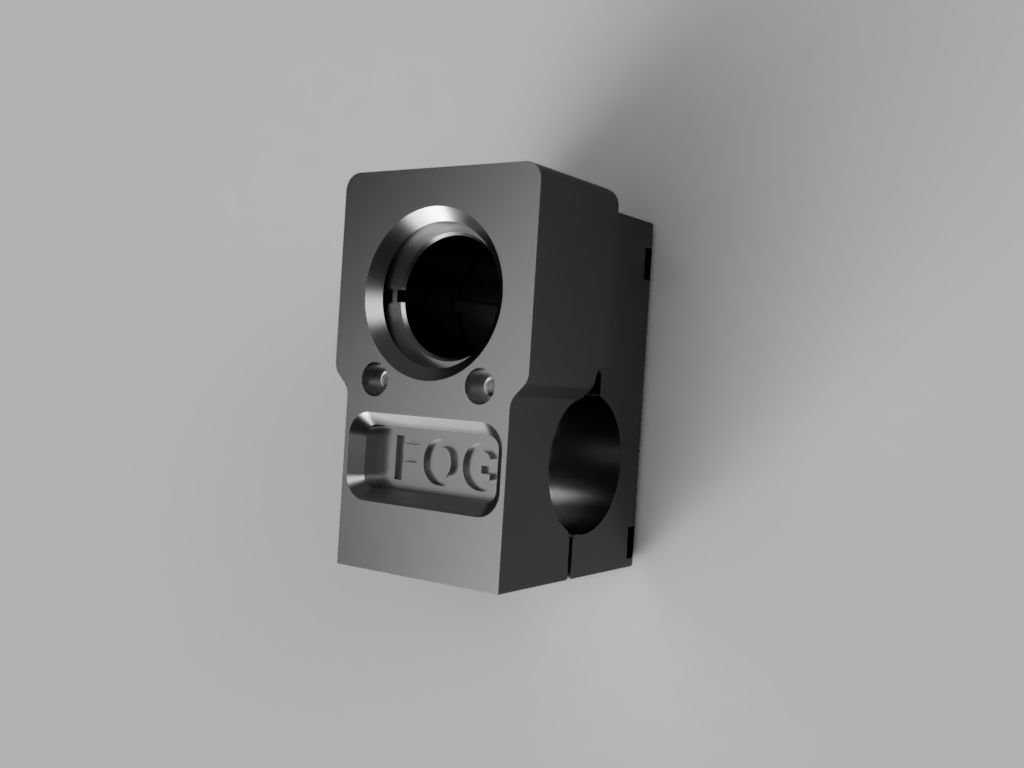
<p>My ATV (four wheeler for those in the southern US) is 30 years old. It came with a single halogen head lamp which left a lot to be desired.</p> <p>As a fix for this, I ordered a set of "Nilight 2PCS 4 Inch 18W Flood Led Light Bars" off Amazon. These ship with a wiring harness connected to a round rocker switch but no discernible way to mount the switch to the bike. This is the part I made in order to facilitate mounting the switch neatly to my handlebars.</p> <p>The link to the LED lights I used is here:<br/> <a href="https://smile.amazon.com/gp/product/B06XRPZF6Y/ref=ppx_yo_dt_b_asin_title_o03_s00?ie=UTF8&psc=1">https://smile.amazon.com/gp/product/B06XRPZF6Y/ref=ppx_yo_dt_b_asin_title_o03_s00?ie=UTF8&psc=1</a></p> <h3>Print instructions</h3><p>There is really nothing special. If you use my GCODE, it is for PETG on the MK3S. Pick either single color or two color. No need to print both. The two color version simply has two filament changes so that the lettering on the top piece has contrast. The single color one prints all the way through without stopping. If you use your own, I generally put supports in the cavities for screw heads when they are upside down just to keep them clean, but otherwise no supports are needed. I use PETG all the time and don't own any PLA. I'm certain PLA would work just as well for this thing though. If you have temps that melt PLA at the handlebar you need to run away anyway.</p> <p>Assembly is pretty straightforward. I used 4 x M3x35 cap head screws, 4 x M3 standard nuts, and 2 x M3x6 cap head screws for the guard.</p> <p>First, insert the nuts and test fit everything together to make sure no trash is in the way of the screws, etc. Then take it all apart again, leaving the nuts in their pockets.</p> <p>Then note the position of the wires on the switch, and disconnect them. Snap the switch into the top piece so that the tang in the 9 o'clock position is seated. Then you can route and reconnect the wires.</p> <p>Hold the back piece behind the handle bar and lay the front piece over it. You'll see that you can push the switch and wiring into the cavity in the back piece, allowing the wire to exit to the right and towards the center of the bike. It should lay in the recess between the two parts and feed out the notch.</p> <p>Squeeze the two halves together, seating the top part over and around the bottom. Then insert the screws, tightening them gradually in a rotating pattern so that even pressure is applied to the handlebar, and so the parts are seated together evenly.</p> <p>The guard is optional, but should help prevent a lot of accidental switch flipping. Since these are not switched with the key, it is possible to run your battery down by leaving them on while the bike isn't running.</p>
With this file you will be able to print ATV Light Handlebar Mount with your 3D printer. Click on the button and save the file on your computer to work, edit or customize your design. You can also find more 3D designs for printers on ATV Light Handlebar Mount.