ATX bench power supply
thingiverse
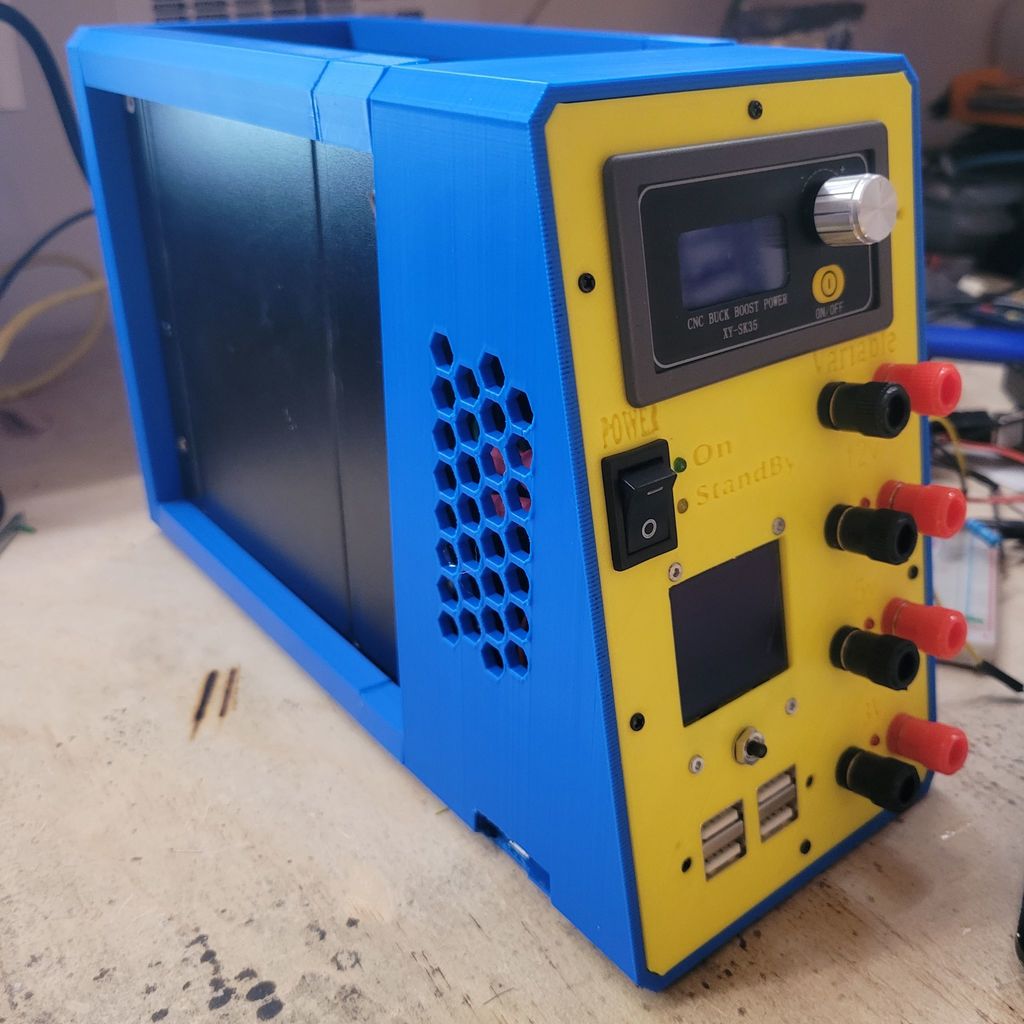
UPDATE August 13th , 2022: I'm currently working on a all INA260 for the 12v, 5v and 3.3v line when the become available. I'll post the changes in an other project when it will be ready. I also posted the code for the raspberry pi pico that use the INA260 for the 12v line and the INA219 for the 5v and 3.3v line. The new program name is "PowerBenchPicoV2.ino". UPDATE July 14, 2022: - I released and i should have tested more but without changing the shunt resistor on the INA226, the max amperage that it can read is 800mA. If you want to have more amperage displayed you will need to change the shunt resistor and modify the program. In the best world, I would have used all INA260 that is rated to 15amp. But for now I will post a new code for the Raspberry pi pico using the INA219 ( rated to 3.2 amp - https://www.adafruit.com/product/904 or search on aliexpress for INA219). Maybe in the future i will have all 12v, 5v and 3.3v outputs on a INA260. UPDATE July 12, 2022: - Added new JPEG for schematics. I did it in Paint and it's readable but at least show all the connections. Color coded to match the power supply cable colours. - Added the unmodified original pieces from the original project. ORIGINAL: 1st I must say that is a small great compact design that it was based on. Thanks to the original creator. What was added from the original is as follow: - Raspberry pi pico - CNC DC DC Buck Boost Converter: https://www.aliexpress.com/item/1005002784654577.html - 1.5 inch oled : https://www.aliexpress.com/item/1005002983198848.html - 1 INA260 : https://learn.adafruit.com/adafruit-ina260-current-voltage-power-sensor-breakout/overview - 2 INA226 : https://www.aliexpress.com/item/1005003065372229.html - fuses (5x20mm): https://www.aliexpress.com/item/32987605353.html - https://www.aliexpress.com/item/1005002813312567.html - 4 port USB connected to the 5 volt: https://www.aliexpress.com/item/1005002669769395.html - the stand by and power on led - Button to display the Voltage, Amps, Watt on the Led for the selected voltage. https://www.aliexpress.com/item/10000275031906.html i also got some great information from this Youtube video: https://www.youtube.com/watch?v=n_A-jkpjpcM Basically on start it display all 3 voltage on the screen (12, 5 and 3.3v). Then if you press the button it will display each individual voltage on a bigger resolution The raspberry pi Pico code is in the files. Also i used the Arduino library to compile the code. Links to libraries for raspberry pi Pico code: - Arduino core: https://github.com/earlephilhower/arduino-pico - SSD1327 : https://github.com/adafruit/Adafruit_SSD1327 - INA260 : https://github.com/adafruit/Adafruit_INA260 - INA226: https://github.com/wollewald/INA226_WE
With this file you will be able to print ATX bench power supply with your 3D printer. Click on the button and save the file on your computer to work, edit or customize your design. You can also find more 3D designs for printers on ATX bench power supply.