ATX power support cover with XT60/USB/PWR_ON
thingiverse
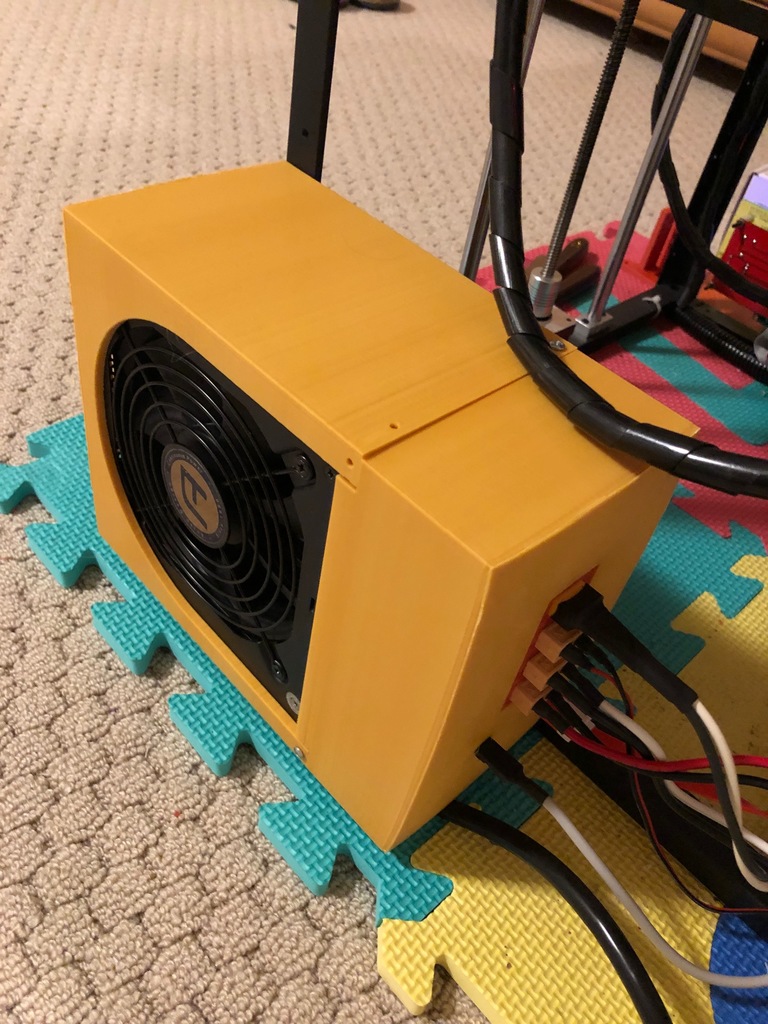
ATX power supply cover with XT60/USB/PWR_ON for Flying Bear P905 Update: 5/7/2019: Re-created with fusion 360 and added the step file This ATX power support cover has 4 XT60 connectors, a USB plug, and pin for PWR_ON and PWR_OK. The mount hole is adjusted to mount on the Flying Bear P905 frame. The XT60 is based on this https://www.thingiverse.com/thing:516420. The cover is baed on this https://www.thingiverse.com/thing:3443243. I deleted the original version of the cover plate and added v2 cover plate, USB, and Dupoint 3 pin models. With v2, the housing of USB and Dupoint 3 pin housing extend all the way out to the cover plate. This allows one to change/modify the USB and Dupoint 3 pin housing easily to their size. USB connector seems to have different size. Extra Materials: 1. An ATX power supply converted for 3D printer. (There are many video for this.) What you want are the 4 12V, 5V standby, PS_ON/PS_OK. If your PS has two 12V, use one for the bed and the other for the other 3. 2. An USB plug connector (you can buy a cheap iPhone USB plug and de-solder the connector) 3. Get 4 pair of XT60 connectors 4. Dupoint 3 PIN socket 5. 10 screw #6 1/2 inch 6. Two 3mm screw with washer and nut (if you want to mount on the frame) How to assemble: 1. Solder the 4 12V to XT60 (female side - the side with outer shell) 2. Solder the 5V standby to the USB connector 3. Crimp the PS_ON and PS_OK to 3 PIN dupoint connector. (I had the PS_ON on the two side and the PS_OK in the middle PIN) 4. Plug the USB connector into the ATX-usb-holder.stl housing. Then use hot glue. Make sure that it sticks out enough. 5. Plug the 3 PIN dupoint connector into the ATX-dupoint-3-pin-holder.stl housing and use hot glue. Make sure that it sticks out enough. 6. Plug the 4 XT60 connector into the ATX-XT60-holder-x4.stl housing and use hot glue. 7. Now, use the screw to screw the various connector housing to the ATX plate 8. Bolt the ATX cover into the Flying Bear P905 frame with Two 3mm screws 9. Assembly the ATX cover with the plate and screw 2 screws Note: If your ATX has two 12V, uses one for the bed and other for the rest. I have the first 12V2 for the bed and the second 12V1 for the LED, Hot end, and the electronic.
With this file you will be able to print ATX power support cover with XT60/USB/PWR_ON with your 3D printer. Click on the button and save the file on your computer to work, edit or customize your design. You can also find more 3D designs for printers on ATX power support cover with XT60/USB/PWR_ON.