Auger-based Cat Feeder

Auger-based Cat Feeder

thingiverse

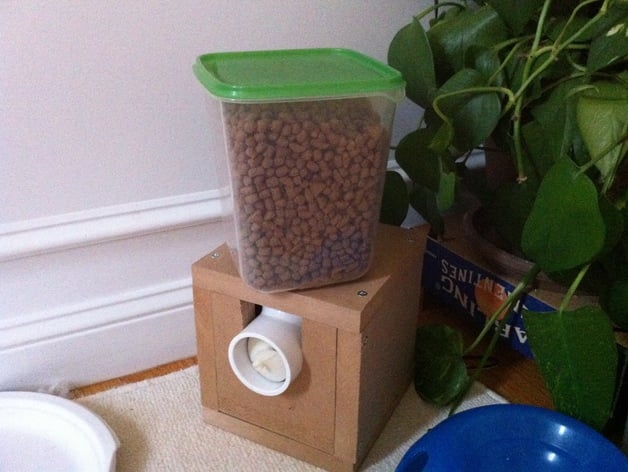
Automated cat feeder. Using tunell's idea as a starting point, I documented/experimented with different designs. This is the result of many trials... This is semi-parametric; mostly hardcoded numbers all over the place as I tweaked and got lazier. Instructions See the prototype in action (http://www.youtube.com/watch?v=V7uvNemqq40)! See the running machine (http://www.youtube.com/watch?v=D2iBL80wffA)! A simple/slapdash MDF housing to hold it all. The tube is held in by friction at the moment... This relies on the Thread_Library (http://www.thingiverse.com/thing:8793). Acquire: Continuous-rotation servo (sparkfun ROB-09347). 1.5" PVC T-joint tubing (chop ~1cm from one side). PVC solvent or acetone. Container to hold kibble (currently an old IKEA container). Arduino for control logic. Screws/etc. 12V 0.5A power supply. (0.3A didn't supply enough power to drive both the servo and arduino, so it kept resetting and constantly feeding the cats :) Construction: Print the "tubemount". It should be snug, but if it is too tight, sand until it fits the tube. Print "screwplate". Glue the halves together and sand the seams smooth. Check the fit of the "screw", "tubemount", and tubing. The "screw" should be able to rotate freely without binding against the "tubemount" when it is inserted into the tube. If your mounting screws are too long, print the "servoshim". Screw the servo to the "tubemount" (and "servoshim") with the servo rubber grommets and servo brass fitting in place (wide part of fitting flush against the "tubemount"). Make sure the servo is oriented so the axis is centered. Trim/sand the servo horn so that it is flush with the edges of the "screw" base. Attach the servo horn to the servo. Attach the servo horn (X-shaped) to the "screw". If you can't reach the holes, apply power and rotate the servo; there should be enough of a gap in the "tubemount" to reach. (I used #2 brass wood screws.) Programming (see "feeder.ino"). I have it written to feed ~0.5 cup every 8 hours, with a button press allowing intermediate feeding. (Eventually I'll add RFID sensing capability.) Attach kibble container in some manner (tape, platform, print a mount, etc). Make sure everything works! Then if you're adventurous, permanently affix the various pieces. Construct a housing. Get the cats used to it. Notes: You might be able to combine the two "screw" halves if you have a large print surface. The 1.5" T-junction is recommended. The smaller (1.0" junction) type will cause kibble to jam in the container hole. The larger size seems to allow gravity to do its job. When driving the servo, you may want to insert reversals at intervals to prevent stressing the servo if kibble gets jammed between the auger and tube. Your servo drive rate(s) may be different; I experimented much. KillAWatt says it's using 2W (0.14A at idle, 0.16A wile running). You may want a spout on the end (http://www.thingiverse.com/thing:28483) To Modify: Tweak "auger.scad"; yes, it should have been parametric... Export just auger() to "auger.stl". Export auger_import(), drivemount() as "auger_screw.stl". Export tubemount() as "auger_tubemount.stl". Tweak "augerslice.scad" to generate "auger_screwplate.stl".

Download Model from thingiverse

With this file you will be able to print Auger-based Cat Feeder with your 3D printer. Click on the button and save the file on your computer to work, edit or customize your design. You can also find more 3D designs for printers on Auger-based Cat Feeder.