Aurora A3 Fan Duct (Nozzle) - New & Improved!
thingiverse
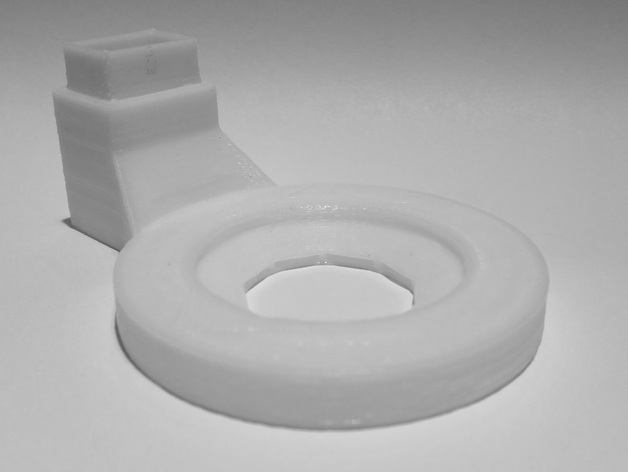
This is a custom Fan Duct/Nozzle for the hot-end of a Aurora A3 Prusa I3 printer. NOTE: This nozzle is as large as I could make it and does come very close to the hot-end and the bed adjustment knobs (when homed). Please be careful when using this duct, especially with the CraftWare Slicer, that it does not run into the bed adjustment knobs. I take no responsibility and you have been warned. After testing the previous (modified) Nozzle, Prusa I3 Fan Duct for Aurora A3 Printer, and finding that it failed miserably to improve my prints, I set out to design a new one and came up with this one. You can see the improvements in print this new nozzle makes in the photos above. The torus is now almost perfectly round and void of all but the smallest overhang blobs. Only the underside of the torus at the top shows any malformations from spanning that gap. And these were all printed without supports on the torus. While different Slicers can improve the print (CraftWare did a better job on this than Cura), both showed marked improvement in quality. You mileage may vary. I believe issues with the old design was inadequate air flow and direction: While the Fan has an opening of 135 sq mm, it is choked down to ~40 sq mm before entering the loop. Significant air flow and pressure is lost at that point. At the exit holes, the air flow direction is not well defined while the total opening size is ~50 sq mm. This increase is size further slows down air flow. My new design maintains an opening of over 120 sq mm at the entrance to the loop, maintaining significant air flow and pressure all around the loop. The vents are aimed directly at the nozzle's tip through a 7mm long, 7mm wide and 2 to 1mm long channel. The narrowing channel (from 2mm to 1mm) and its length, I believe accelerates the air flow and accurately directs it with equal volume all around the hot end nozzle. Indeed, when the nozzle fan kicks in after the first layer, the hot end temperature immediately drops by 5C (but reheats again after a few seconds). Immediately cooling and solidifying the PLA appears to keep the overhangs from curling and forming blobs as well as improve the finish of the part overall. Again, you're mileage may vary. Print Settings Printer Brand: RepRap Printer: AG Aurora A3 Prusa I3 Rafts: No Supports: No Resolution: .2mm Infill: 15% Notes: You do not need any support for this print. Required ones are already set inside the torus for the top. Most of the sides are only .5mm thick to gain maximum internal volume. Because of this, much of this object is a single wall print. If you have problems with gaps in your walls, bottoms or tops, you may wish to increase your Filament Flow to 105%-110% for this print. There is very little Infill in this object, so Infill is optional. How I Designed This Made with Sketchup I have provided the Sketchup file for this object in case anyone is interested in adapting this for their printer. Enjoy!
With this file you will be able to print Aurora A3 Fan Duct (Nozzle) - New & Improved! with your 3D printer. Click on the button and save the file on your computer to work, edit or customize your design. You can also find more 3D designs for printers on Aurora A3 Fan Duct (Nozzle) - New & Improved!.