Auto Nozzle Cleaning
thingiverse
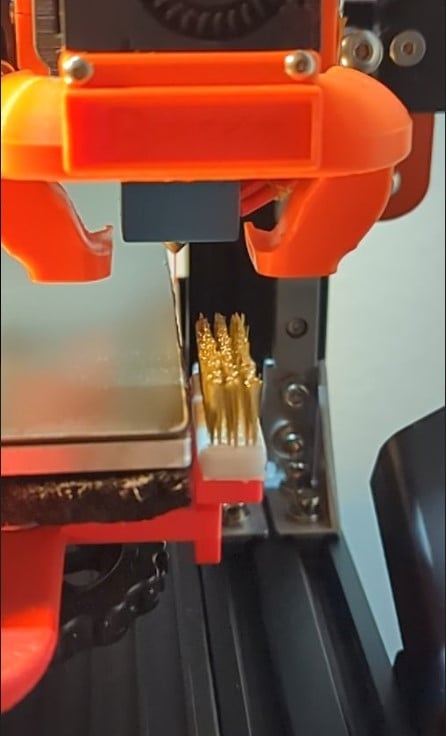
Automatic cleaning of nozzle for filament that has had time to ooze before printing begins. The cleaning is started just before printing begins, and you are free to sit ready with a cloth or something else to remove excess filament. The handle is a remix from #BunZo https://www.thingiverse.com/thing:4732962 I made the handle in 2 variations. One for 3mm Threaded Insert, and one where you can form the thread in the plastic with a 3mm Screw. Handles are made for 235x235 beds, with 170mm between the ajustment screws. Gcode used for purification process: Regarding your ofsets on your printer you may have to edit the gcode. Insert the Gcode as the last thing befor printing starts. Runing the Gcode is on your own risk. :-) Beaware the the nozzle hight in this example goes to Z=0.0 Gcode used: (Use of Gcode, on your own risk, as offsets can be different on your printer) ; ** CLEAN NOZZLE ** G1 X238.0 Y70.0 Z5.0 F7000.0; Nozzle Positioning G1 X238.0 Y50.0 Z0.0 F5000.0; Position Nozzle in Clean start position G1 X245.0 Y50.0 Z0.0 F5000.0; Move X + 10mm G1 X245.0 Y42.0 Z0.0 F5000.0; Move Y -8mm G1 X238.0 Y42.0 Z0.0 F5000.0; Move X -10mm G1 X238.0 Y34.0 Z0.0 F5000.0; Move Y -8mm G1 X245.0 Y34.0 Z0.0 F5000.0; Move X + 10mm G1 X245.0 Y26.0 Z0.0 F5000.0; Move Y -8mm G1 X238.0 Y26.0 Z0.0 F5000.0; Move X -10mm G1 X238.0 Y5.0 Z5.0 F5000.0; Move Y + 21mm and X + 5mm for Print Start ; ** END CLEAN NOZZLE ** The Brass Brush Holder, is made in 4 different variations. Which one you want to use, depends on where in X direction you want the Brass Brush to sit. Ajust the hight of the Brush, that i just touches your Fan Schroud lightly, To ajust this manually move your extruder to the Brass position, and lower the Nozzle gently to zero, with the Fan Schroud parked over the Brush. I used Double sided tape, to stick the Brush to its mounting surface. Brass Brush used in this exsample are from Amazone. https://www.amazon.de/dp/B08W51L2YX?ref_=cm_sw_r_cp_ud_dp_T2_T6M4F2NBC3VVKA1H4TD0 2022-04-06: Made a refinement in the Nozzle movement and uploadet a video with the movement change. It uses the hole Brush for cleaning. https://www.youtube.com/shorts/iFWdkXiTAcc Gcode used: (Use of Gcode, on your own risk, as offsets can be different on your printer) ;** CLEAN NOZZLE ** G1 X240 Y70,0 Z5.0 F7000.0 ; Nozzle Positioning (Nozzle and Bed heating and temp stabilization in this position) G1 X236.0 Y50,0 Z0.0 F5000.0 ; Position Nozzle in Clean start position G1 X236.0 Y45,0 Z0.0 F5000.0 ; Move into Brass Brush in Cleaning height Z=0 G1 X243.0 Y45,0 Z0,0 F5000.0 ; Move X +7mm G1 X243.0 Y40,0 Z0,0 F5000.0 ; Move Y -5mm G1 X236.0 Y40,0 Z0.0 F5000.0 ; Move X -7mm G1 X236.0 Y35,0 Z0,0 F5000.0 ; Move Y -5mm G1 X243.0 Y35,0 Z0,0 F5000.0 ; Move X +7mm G1 X243.0 Y30,0 Z0,0 F5000.0 ; Move Y -5mm G1 X236.0 Y30,0 Z0,0 F5000.0 ; Move X +7mm G1 X236.0 Y25,0 Z0,0 F5000.0 ; Move Y -5mm G1 X243.0 Y25,0 Z0,0 F5000.0 ; Move X +7mm G1 X243.0 Y20,0 Z0,0 F5000.0 ; Move Y -5mm G1 X236.0 Y20,0 Z0,0 F5000.0 ; Move X +7mm G1 X236.0 Y15,0 Z0,0 F5000.0 ; Move Y -5mm G1 X243.0 Y15,0 Z0,0 F5000.0 ; Move X +7mm G1 X243.0 Y10,0 Z5,0 F5000.0 ; Move Y -5mm and X +5mm To get free of Brass Brush ; ** END CLEAN NOZZLE
With this file you will be able to print Auto Nozzle Cleaning with your 3D printer. Click on the button and save the file on your computer to work, edit or customize your design. You can also find more 3D designs for printers on Auto Nozzle Cleaning.