Auto Pilot Panel with Stand
thingiverse
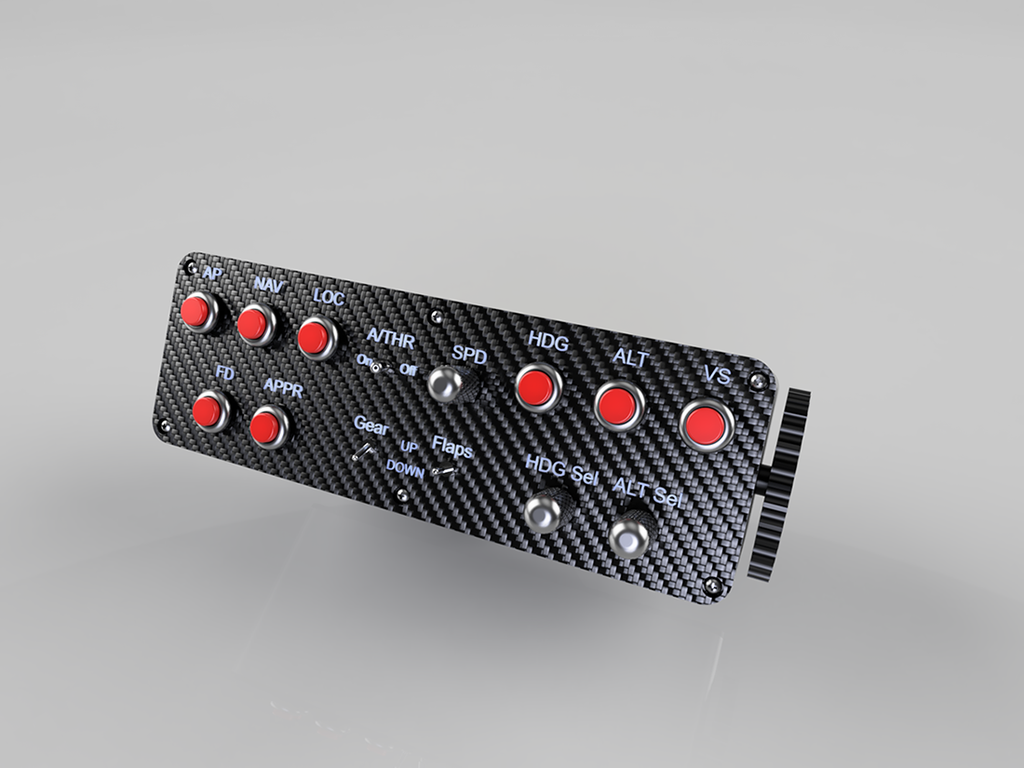
This is a general purpose auto pilot and control panel for use mainly with Microsoft Flight Sim, but can be used in any sim supported by Mobiflight. It has the most useful buttons and controls needed to use autopilot, as well as gear and flaps, in anything from a Cessna to an A320. Control functionality is provided by an Arduino mega2560 and MobiFlight software. You can use an Arduino Mega 2560 R3 or a Mega 2560 Pro Mini and other compatible cloned boards. Be warned the Pro mini is very small and will require good soldering skills. If you are unsure if your board is usable please check compatibility on the MobFlight website. https://www.mobiflight.com/en/index.html This project does not contain any files or details on how to wire this panel. The full list of controls and the button/switch used is provided in the Excel spreadsheet with links provided to a UK based retailer. These of course can be swapped out for any switch or button you wish. I have provided all the STL and f3d files for Fusion 360 so you can edit and remix the design if you want. I'm still learning best practices for Fusion so the component file structure might not be the best but everything is there. I have an Ender 3 Pro which is a little too small to print the main parts in one piece. So there are 3 files for each of the front and rear plates and the main body to enable those with smaller printers to print them in 2 sections and larger printers can just print the single piece files. Front and rear plate sections can be superglued together. Main body pieces can be bolted together with some M3/4 nuts and bolts. The desk stand is designed to slip over the front edge of my desk, sandwiching it top and bottom, with the top part sitting under my keyboard, making for a quick and easy setup for those of us without permanent flight sim setups. The Encoder clamp was designed to be a simple solution to securing the rotary encoders that don't have a nut & thread on the front face. Just use a bit of glue and slide the clamp onto the pillars on the rear of the front plate, covering the backside of the encoder between the pins. The front panel was intended to be covered in carbon fibre effect vinyl wrap to give it a really nice, cost effective finish. The USB connectors on Arduino boards are pretty strong and take some effort to insert and remove cables, over time this could easily weaken and eventually stop working. I designed the USB connection to work with a magnetic USB cable, with the small connector sitting flush to the rear panel. Magnetic USB cables are great for quick and easy dis/connection, especially if you move your setup often. I'll do my best to answer questions about the design but I will not comment on wiring or Arduino based questions. Please check Youtube, there is a wealth of really great videos that will explain it far better than I could. Be sure to double check all holes with the diameter of the switches and buttons you use. I don't have any real photos as I never actually built this and initially I wasn't going to share it, but I have started designing a v2 with an LCD screen and so thought I'd put this design out there for the community. This design is offered for free but only for non-commercial use and attribution is required.
With this file you will be able to print Auto Pilot Panel with Stand with your 3D printer. Click on the button and save the file on your computer to work, edit or customize your design. You can also find more 3D designs for printers on Auto Pilot Panel with Stand.