Auto Power Off / Shutdown with Front Switch - Ender 3 V2
prusaprinters
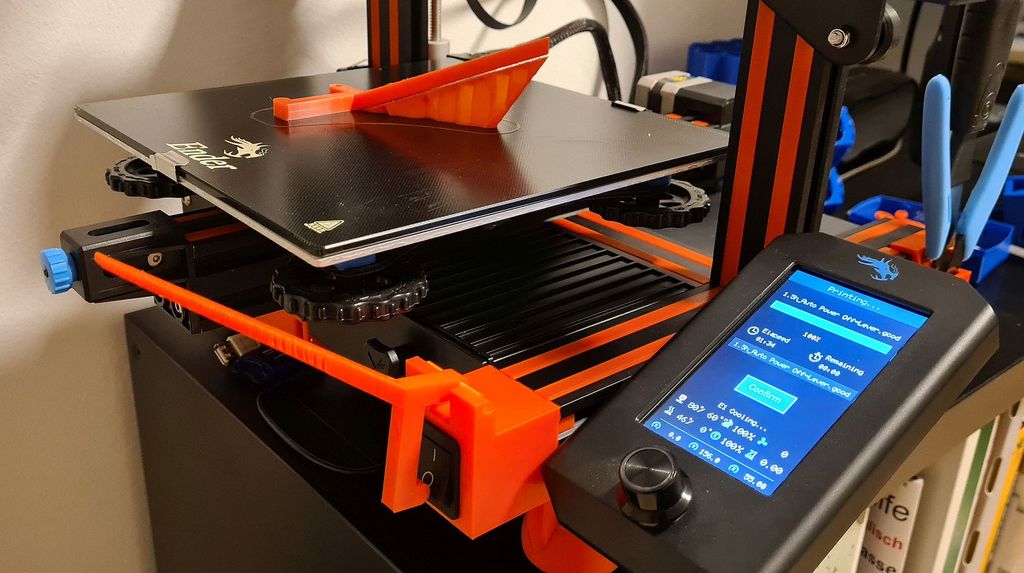
<p>I always wanted sth to shut my printer down after long prints, especially if I leave it running over night.</p><p>I made erverything from scratch. I even rebuild my own front switch completely to make it sturdier and with much better grip.</p><h3>Advantages of my design</h3><ul><li>no use of octoprint</li><li>no smart-plug required</li><li>disconnects the printer completely from power (phase and neutral are disconnected; better than original switch)</li><li>no complicated using of free pins on the mainboard</li><li>only uses one power switch for the printer</li><li>moves the power switch to the front where it is easier to access</li><li>the "auto switch off" function can manually be deactivated</li></ul><h3>Function</h3><p>After the print is finished, the printer waits till the hotend is cooled under 60°C.</p><p>This is to prevent any problems from shutting down the printer with the hotend still hot (heat creeps, clogs, etc.)</p><p>Then the bed is pushed forward to present the print, which is the normal behaviour.</p><p>When the bed reaches the end the mechanical lever triggers the power switch and shuts down the printer.</p><p>If you want to deactivate the "auto switch off" function, which is convenient if you just want to print some small prototypes, change sth and print them again, you can just manually remove the lever, it is desinged to be very easy to remove.</p><p>I personally have two printer settings in my slicer, one with the standard End G-Code and the modified one for the Auto Shutdown, for fast prototyping I use the standard code which doesn't wait for the hotend to cool down.</p><h3>How to use</h3><p><br>If you have a print you want the printer to shut down afterwards, given you used the correct g-code, you can simply hook in the lever at any given point.<br>Yes it is also possible to just leve the lever in place right from the beginning, so the printer powers off after every print, the standard start procedure will <strong>NOT </strong>trigger the power-off.</p><h3>End G-Code</h3><p>For this to work you have to change the End G-Code, this is the "Ending Code" your slicer adds to the end of every print.</p><p>If you don't change it, the printer will shut itself down, while the hotend is till hot.</p><p>This is the code I use in Cura:</p><p>(yes this is the complete End-Code)</p><pre><code class="language-plaintext">G91 ;Relative positioning G1 E-2 F2700 ;Retract a bit G1 E-2 Z0.2 F2400 ;Retract and raise Z G1 X5 Y5 F3000 ;Wipe out G1 Z10 ;Raise Z more G90 ;Absolute positioning M106 S0 ;Turn-off fan M140 S0 ;Turn-off bed G1 X0 ;move hotend to side M104 S60 M105 M109 R60 ;Wait for hotend to cool down to 60 degree M104 S0 ;Turn-off hotend G1 Y{machine_depth} ;Present print M84 X Y E ;Disable all steppers but Z</code></pre><h3>Additional needed stuff</h3><ul><li>~1m power cable (to connect the power from the back to the switch and the other way around)</li><li>1x power switch for 240V which can switch two things at once (I use the C1350VB switch that needs a 22 mm x 31 mm hole; bought it at a local shop but also found it here: <a href="https://www.rapidonline.com/arcolectric-c1350vbaaf-rocker-switch-high-inrush-black-dpst-on-off-250v-ac-16a-50-0968">https://www.rapidonline.com/arcolectric-c1350vbaaf-rocker-switch-high-inrush-black-dpst-on-off-250v-ac-16a-50-0968</a>)</li><li>6x insulatet crimp connectors (4x switch; 2x power-input)</li><li>2x insulatet crimp connectors with fork (to connect to power-supply)</li></ul><h3>How to build</h3><ol><li>Install switch in the front and push the cables through the v-slot (it's hollow in the middle)</li><li>optionally use a new cover for the back I use this: <a href="https://www.thingiverse.com/thing:4836112">https://www.thingiverse.com/thing:4836112</a></li><li>remove original power-switch and Install the cables at the back of the printer. I use this PSU cover which has cable support at the back: <a href="https://www.prusaprinters.org/de/prints/152242-ender-3-v2-psu-cover-flat-bottom-92mm-fan">https://www.prusaprinters.org/de/prints/152242-ender-3-v2-psu-cover-flat-bottom-92mm-fan</a></li><li>hock the lever in (over the front switch)</li></ol><p>I will not answer any questions for the wiring because for everybody who knows about elektronic it should be trivial and everybody else should proberly not touch the 240V cables for obvious reasons ;)</p><h3>Customize</h3><p>For easier modification I added the step files and also the FreeCAD file.</p><p>In FreeCAD you can edit it very easily using the "Dimensions"-Spreadsheet.</p><h3>Print Settings</h3><p><strong>Printer: </strong>Ender 3 V2</p><p><strong>Rafts: </strong>No</p><p><strong>Supports: </strong>Yes (Only needed for the Lever)</p><p><strong>Resolution: </strong>0.2</p><p><strong>Infill: </strong>25%</p><p><strong>Filament: </strong>PLA</p><p> </p><p>Category: 3D Printer Parts</p>
With this file you will be able to print Auto Power Off / Shutdown with Front Switch - Ender 3 V2 with your 3D printer. Click on the button and save the file on your computer to work, edit or customize your design. You can also find more 3D designs for printers on Auto Power Off / Shutdown with Front Switch - Ender 3 V2.