Auto Tool Setter and Shapeoko Touch Probe Holder
thingiverse
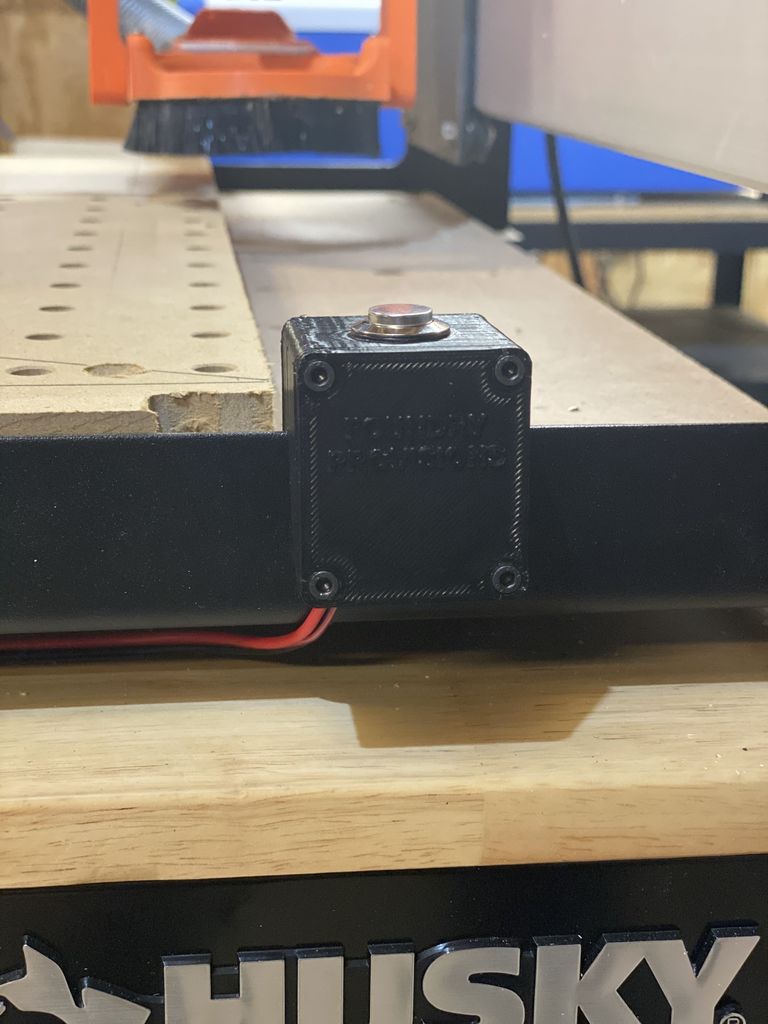
First, huge thanks go out to [wdoler's](https://www.thingiverse.com/thing:4136922) probe holder and bitsetter design that inspired me to create my own version. I was drawn in by the sleek and compact look of Shapeoko's official Bitsetter so I set out to make something similar. **UPDATE:** I added a V2 feature to accommodate dust shoes and their holders (PWNCNC dust boot), making it perfect for working with 3/4"+ thick stock without bottoming out. A 1/16th bit works flawlessly now! **UPDATE 2:** For Shapeoko Standard users, I created the "SO3 Standard" Versions, a huge shoutout to - [peteseyeview](https://www.thingiverse.com/peteseyeview/about) for helping with those files. **UPDATE 3:** The touch probe holder has been redesigned with tighter tolerances, using less material and printing faster, all while eliminating the need for supports. I replaced the M4/5 screws with M2 screws for the side clip and nut cutout. It's sturdy enough to hang onto the clip without any issues. **UPDATE 4:** I redesigned it (again) to require no supports and make it in one piece, eliminating the lid entirely. You will still need the touch probe holder for this setup. I created three files: two for the Bitsetter and one for the touch probe holder. The touch probe acts as a tool offset probe, adding electrical connections from your touch probe to a momentary push button that automatically calculates tool offset. This allows you to use debouncing and other circuitry within your touch probe to reset your Z-axis zero point to reflect a new bit length. I used the [High Flush Push Button](https://www.amazon.com/WerFamily-Waterproof-Momentary-Stainless-Button/dp/B012I0GSR8/ref=pd_day0_hl_60_3/145-0316177-9803705?creativeASIN=B012I0GSR8&linkCode=w61&imprToken=Tc.yXPiBtGrHevvMTn5B7g&slotNum=1&_encoding=UTF8&pd_rd_i=B012I0GSR8&pd_rd_r=cd5ddf2e-6e03-40a4-a961-ed90e21d37b0&pd_rd_w=v99LK&pd_rd_wg=rPskX&pf_rd_p=531c5da2-92c8-47a3-8df6-cb5fa8f00603&pf_rd_r=Y0P1VQ1BTD631S6TQB39&psc=1&refRID=Y0P1VQ1BTD631S6TQB39&tag=tv-auto-20) as my touch probe. I connected one wire from the push button to two bolts and washers that sit under the probe for the Shapeoko. The other lead is connected to a vertical screw that I clamp the alligator clip to. To verify your setup, turn on the power to your Shapeoko and press the button. The green LED in the touch probe should turn red, indicating you have completed the circuit between the probe and the alligator clip. I printed this with 15% infill and support structures for the bitsetter slit opening. I mounted the bitsetter on the front ledge of the Shapeoko using two M4 screws to pin it against the ledge. I used four M3 screws to hold the lid in place (overkill, I know) and one 16mm M3 screw for the alligator clip mount.
With this file you will be able to print Auto Tool Setter and Shapeoko Touch Probe Holder with your 3D printer. Click on the button and save the file on your computer to work, edit or customize your design. You can also find more 3D designs for printers on Auto Tool Setter and Shapeoko Touch Probe Holder.