Autobot Matrix of Leadership
thingiverse
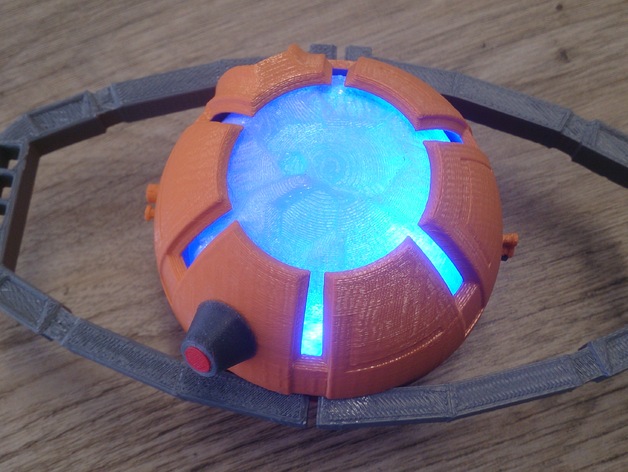
Light your darkest hour with the Autobot Matrix of Leadership from the 1986 film "Transformers the movie". UPDATE 19/12/2014:Assembly instructions with photos uploaded. UPDATE 28th May 2014: Replaced the "red part of nubbin" file having reduced it slightly in size, it is still a tight fit but it is easier to get in now. Replaced the "battery door" file, I have just rotated it to be flat on the build plate. No support is required as it should bridge ok but the middle thin part will now be stronger after printing. Instructions Print one of each and put together. All parts can be snap fitted with the exception of the arms which will need gluing or a dab of acetone. I printed it with the following settings: Battery pack back ball, frontball and battery door: orange PLA at 0.2mm layer height, 10% infill, 2 shells. Print the frontball with support, the rest without. Arms: Gray or silver ABS at 0.2mm layer height, 10% infill, 2 shells with support. Nubbin: Silver PLA at 0.1mm layer height, 15% infill, 2 shells, no support. red part of nubbin: red PLA at 0.1mm layer height, 15% infill, 2 shells, no support but you may want to use a raft to make it easier to get it off without damaging it. Partition clips: white PLA af 0.2mm layer height, 10% infill, 2 shells with support. Centre crystal: Translucent blue at 0.2mm layer height, 10% infill, 2 shells with support. For the LEDs, I bought a string of 10 LEDs on a 2xAA battery pack (5 would probably have been better). I removed the wiring and connectors from the battery pack and put them into the battery pack back ball. To assemble: Push the red part of nubbin into the nubbin. This will be a very tight fit so won't need gluing. Push the nubbin into the frontball. This will also be a very tight fit and may need some persuasion. The surface of the nubbin that meets up with the curved face of the frontball has been designed with the curvature of the ball so you may need to rotate it a little to be able to have a flush fit. Push the centre crystal into the front ball, it has flat sides that help to do this and you shouldn't have to use much, if any force. Push one of the partition clips into the front ball with the clips sticking out. Put your LEDs in and then put the other partition clip in place making sure that the wires for the LEDs is coming through the middle gap. Make sure that you have wired up your printed battery pack with the on/off switch sticking out of the side and bunch up the extra wiring in the space provided. There is a very thin guide for the LED wires to go above the batteries and into the the front part. Push the front and back together and they should clip into place and be held tightly. Use Acetone or glue to put the arms on.
With this file you will be able to print Autobot Matrix of Leadership with your 3D printer. Click on the button and save the file on your computer to work, edit or customize your design. You can also find more 3D designs for printers on Autobot Matrix of Leadership.