Autonomous Hexbug Spider v1.0
thingiverse
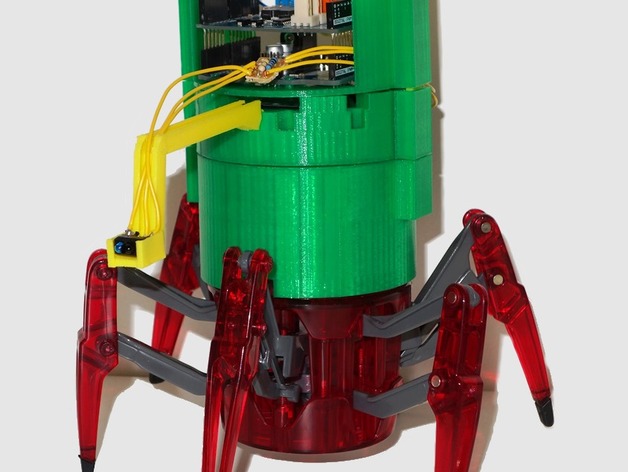
Modification of an inexpensive and entertaining robot, the Hexbug Spider XL, has captured my interest lately. Replacing the original top portion with a 3D printed alternative is where it begins. This fascinating robot relies on two operational motors that are expertly controlled by Arduino Uno along with its trusted Motor Shield counterpart. The spider's electronics run seamlessly on a 9V battery, and for added functionality, a convenient battery holder contains sockets where up to ten proximity sensors can be securely attached. Curious about the modification of the Hexbug Spider? Dive into this engaging post for further information. Experience the fascinating movement of the robot in motion through this captivating video. Take a closer look at its autonomous design by checking out the top view provided via this direct link. Please note that this initial version is far from optimal in terms of space requirements and plastic usage, paving the way for future refinements and enhancements. **Creating Your Own Autonomous Hexbug Spider:** As you embark on bringing your own unique Autonomous Hexbug Spider to life, let's break down the steps into a manageable guide: **Disassembling the Robot:** Flip the robot over and remove the screw securing the battery cover. With the batteries safely out of their compartment, three screws will become apparent; they must be carefully unscrewed next. The spider's head can now be gently lifted off its body. Taking a moment to extricate the circuit board from its socket will ensure future work can progress smoothly. The delicate step that follows is removing the four wires (linked on the other side to the motors) from the circuit board, accomplished either through unsoldering or precision cutting.
With this file you will be able to print Autonomous Hexbug Spider v1.0 with your 3D printer. Click on the button and save the file on your computer to work, edit or customize your design. You can also find more 3D designs for printers on Autonomous Hexbug Spider v1.0.