Autoswitch OFF for Tevo's Black Widow
myminifactory
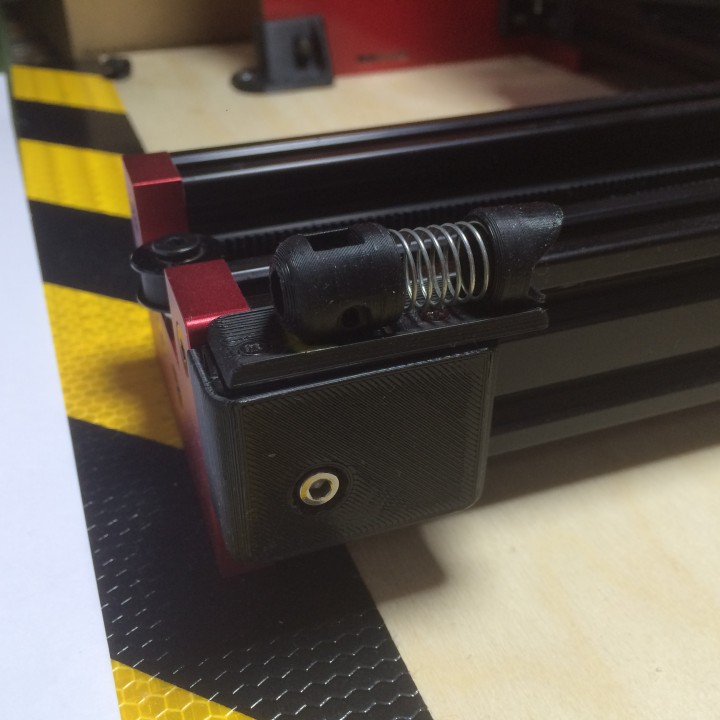
Autoswitch for Tevo's Black Widow Autoswitch was design to shutdown (immediately or after a preferred time) completely the printer after it finishes print. No more headaches by leaving the printer powered ON or to not forget to shut it down even remotely or giving a call home to tell someone to shut it down manually, also probably it is the cheapest way and headaches free cause this works instantly. PDF guide included!You will only need: One slide switch. (like this one: https://www.ebay.com/itm/10-Heavy-Duty-4PDT-125V-250V-6A-Slide-ON-ON-Switch-S201-ling/321039564222?ssPageName=STRK%3AMEBIDX%3AIT&_trksid=p2060353.m1438.l2649)Download and print those parts you will need to.Add a gcode line at the end of the print, before disabling the motors add “G1 Y235 ; serve print”. The number of the Y axis should be around 230-240 depending your building area. The more further more better to secure not powering down the printer while it is printing, so be sure for that. * Note, the “pusher” needs to be aligned with the X plate to get pushed. To find your Y axis position to setup the autoswitch just go to home all axis then move the Y axis at the spot you want to set it up. Then use the number of the Y axis you already moved (add a few more milimeters would be even better) and bolt tight your autoswitch. Also you can make the printer to coolown the hotend before the printer move on the autoswitch by adding this line “G4 P300000 ; wait 5 minutes” before “serving the print”. (see the example on PDF guide)1,50-2,00 meters of dual cable. (schematic on the PDF guide)2x M4 screws with 2x hammerhead nuts, for the bracket.2x small pc screws. (Usually those from laptops will fit. Also, if the pusher barrel is loose you will need on more extra screw of that type to tighten those parts)1x M3 bolt with 1x M3 hex nut, or 1x M4 screw with 1x M4 hex nut (Uploaded 2 types of models to fit both size of bolts), to secure all the wires with the cap into the bracket.1x spring with 0,8-10mm wire diameter, 12mm outer diameter and a length about 20mm.But OK, this might be not easy to find, so i desgned the switch pusher as solid in one piece. Keep in mind i havent tried that yet, so if your are facing any problems let me know.Also you can add one more switch of the same type as refered on 1. for using it to disable the autoswitch and use the manual switch, or replace the main manual switch and avoid all this wires.After all these you need to read PDF guide for the assembly and the wiring schematic/diagram form the how to setup all the wires. (images below)Notice, this may can applied on other printers too with modifications or not, or might need to deisgn the whole thing from scratch, I couldnt do that cause i dont own any other printers.WARINING! Leaving printer ON is not secure at least you have secure a few things like smoke detector, fire extinguisher and etc., so leaving your printer with this switch working on, is your own risk. So, this is the semi-final product that works pretty good but still can be better, (this will happen by getting expirience with it and finding out weak points and etc.). Still, your feedback will help too, so if you have any suggestion i will love to hear. message me here.Thank you!
With this file you will be able to print Autoswitch OFF for Tevo's Black Widow with your 3D printer. Click on the button and save the file on your computer to work, edit or customize your design. You can also find more 3D designs for printers on Autoswitch OFF for Tevo's Black Widow.