Avatar: The Last Airbender Topographic Map
myminifactory
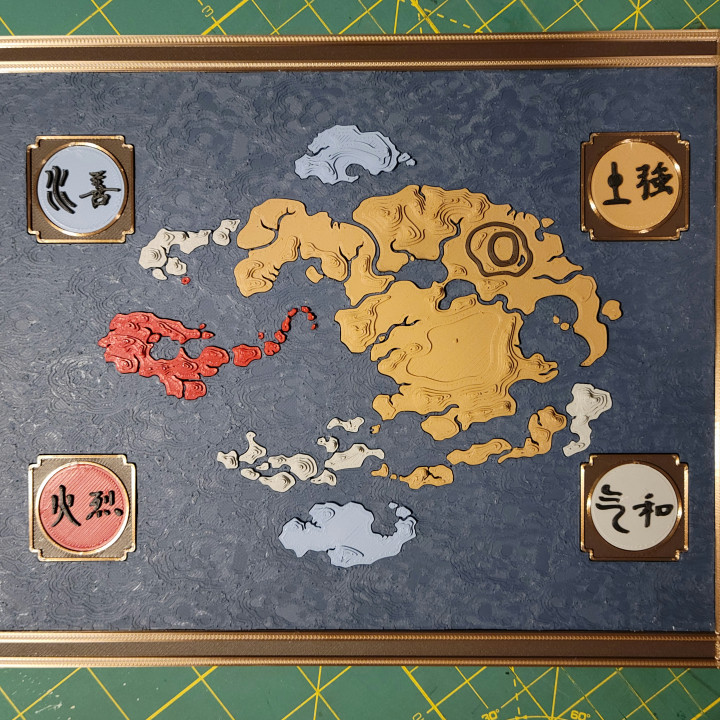
Summary This is a 3D topographic map of the Avatar: The Last Airbender world. In this model, the landmasses print like puzzle pieces that fit into the background- it's done this way to make it as easy as possible to have multiple colors. This map has features that are not included on other maps- You'll be able to find Kyoshi's Island, the Boiling Rock, Roku's Island, and the magnetic center of the Si Wong desert. This is also at a much higher resolution than other available maps, including finder detail regarding both landmass coastline and topology layers. Q: "What's the deal with the 'split' .stl models?"A: Well, there are some very tiny islands that are very close to other very tiny islands. In such cases, even the smallest amount of stringing will cause them to attach in an inconvenient way. Some of the islands are so small that it's even difficult to tell where to trim. For example, the very last island on the Fire Nation island chain will be indistinguishable from the stringing that connects it to its closest neighbor, causing a bit of headache during cleanup. The split models stagger the islands such that this isn't an issue. For me, this was an extremely fun and rewarding build! I highly recommend it. Print Settings Printer: Artillery Sidewinder X1 V4Infill: 15% Rectilinear Notes: If you want the accent colors on the frames and the black text on the tokens, you'll need to do some layer swaps. At .2mm layer height, colors will need to be swapped at the following heights: Large frame: 5mmToken frames: 1.8mmTokens: 1mm For the best results, the landmasses and the ocean should be printed at specific layer heights. The landmasses should be printed at .15mm exactly, as the "steps" are tiered in multiples of .15mm. If you print the landmasses in .2mm resolution, the steps will likely be uneven. The ocean should ideally be printed at .12mm layer height or lower because the details in the waves are too fine to be captured well at larger resolutions. You may need to print the written characters with .38mm line width in order to fully capture them. For absolutely best results, both the landmasses and characters should be printed with a .2mm nozzle. That said, the result shown above was done with .4mm. A little bit of "elephant's foot" on your prints won't cause any issues, but too much will cause the pieces not to fit, so be aware of that. There are lots of extremely tiny islands that are about as small as you can print with a .4mm nozzle, so excellent bed adhesion is imperative. Filament brands and colors: Frames- Hatchbox Wood Medium and DO3D Silk Coffee GoldOcean- Amolen Matte BlueCharacters- Overture Matte BlackWater- Spidermaker Matte PLA+ Misty BlueEarth- Hatchbox Wood LightBa Sing Se- Hatchbox Wood MediumFire- Spidermaker PLA+ Matte Jujube Red (Currently Unavailable)Air- Spidermaker PLA+ Matte Concrete Gray (Currently Unavailable) My print times: Frame: 7hrs, 1mOcean: 11hrs, 59mElement Token Frames: 38mElement Tokens: 18m The landmasses all took 10-20 minutes each, except for the Earth Kingdom which took 1 hour and 38 minutes. I printed all the air temples in one go as well as the southern and northern water tribes. Post-Printing For the most part, these pieces should not need to be cleaned up to fit. Those who suffer from bad stringing will need to remove any strings and seams before slotting the pieces in. That said, you may need to trim out the back "slot" on the element tokens a little in order for them to seat properly with the alignment peg in the frames, the tolerances there are a bit snug. These will not hold in with friction, you'll need to use some adhesive. I used superglue and it worked wonderfully- because the connection points are so flush and the glue spreads so thin, only 5-10 seconds of positive pressure will be enough to set the glue for each piece. You'll probably want to use some soldering tweezers to handle the smaller islands, I couldn't really see myself doing this assembly without them. Have fun, enjoy!
With this file you will be able to print Avatar: The Last Airbender Topographic Map with your 3D printer. Click on the button and save the file on your computer to work, edit or customize your design. You can also find more 3D designs for printers on Avatar: The Last Airbender Topographic Map.