Baby Puss
cults3d
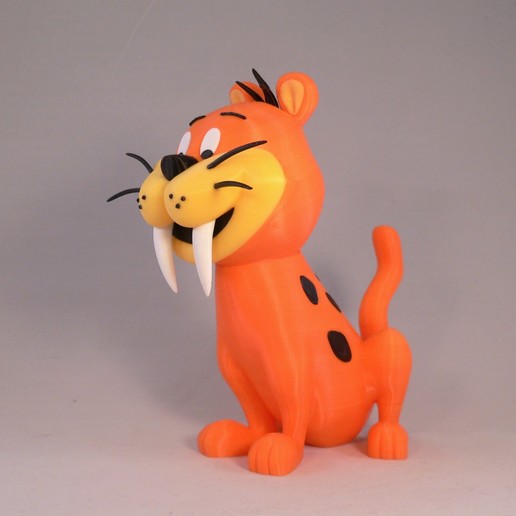
Baby Puss, from the Flintstones cartoon show by Hanna-Barbera. The Flintstones cartoon takes place in a romanticized Stone Age setting, depicting the lives of the Flintstone family and their best friends and neighbors the Rubbles. Baby Puss is the Flintstones' pet saber-toothed cat, which is rarely seen in the actual series, but is always seen throwing Fred out of the house during the end credits, causing Fred to pound repeatedly on the front door and yell "Wilma!", waking the whole neighborhood in the process. Baby Puss was modeled in proportion to my Fred, Wilma, Barney, Betty, Pebbles, BamBam and Dino models. No supports are required. If you have the proper filament colors, no painting is needed. The model is 200mm tall after assembly. Enjoy, and I hope you have a "Yaba Daba Do" time printing this! (Don't forget to post your makes. The more makes I see, the more models I create.) Print Settings Printer Brand: Prusa Printer: I3 MK3S Rafts: Doesn't Matter Supports: No Resolution: .2mm Infill: 10% Filament: various PLA/ABS various Notes: Refer to the notes below for helpful printing and assembly instructions. Building the Model Colors Yellow: (Paramount3D PLA - Simpson Yellow) ear_left ear_right face .. Orange: (3D Soulutech ABS - Real Orange) head body .. White: (Hatchbox PLA- True White) eyewhite_left eyewhite_right tooth_left tooth_right .. Black: (Paramount3D PLA - Black) nose mouth hair spots (contains 10 unique pieces positioned for placement) whisker_dots (contains six identical pieces) eyeblack_left eyeblack_right eyebrow_left eyebrow_right whiskers (contains 4 unique pieces positioned for placement) .. Printing and assembly tips Printing tips 1-No supports are required. 2-To keep things organized, I suggest printing the spots stl and the whiskers stl on rafts, even though they do not need a raft to print well. These stl parts have multiple pieces and the print layout is positioned to help arrange the parts on the model. Each part is unique, even though some parts look quite similar. 3-The whisker_dots are small and using a raft as well as printing two sets of them are quite helpful since they tend to get lost easily (especially for people like me who keep dropping things and then cannot find them). .. Assembly tips: 1-I used both E6000 and B7000 sticky craft glue. B7000 comes out of the tube a bit smoother which is helpful if you just need a small amount for a small area (small parts). It is also less stringy which makes it even easier to use. Each glue has it's advantages. Sticky glue, in particular over superglue, helps significantly with handling and placing small parts, as well as it gives you plenty of wiggle room to get them in the correct position. 2-The whisker_dots have a narrower bottom that easily fits into the face if you place the glue in the face hole first. 3***The spots for the body are all in one stl file and are laid out for easy positioning. As mentioned above, using a raft keeps things organized. Each of the 10 spots is different, so if the part does not slip into place then you most likely have the wrong place for the part. 4***The whiskers for the face are all in one stl file and are laid out for easy positioning. The four whiskers are all unique even though they look quite similar. I apologize for the small whisker holes in the face but any other hole would have required supports. Follow the picture for proper positioning. The flat side of each whisker should be facing back towards the yellow face. If you have the right part in the right hole it should lay correctly. Check for left right symmetry while waiting for the glue to set. The top whiskers lean slightly backwards while the bottom whiskers lean slightly forward. 5-Glue in the nose at the same time that the face is being glued in to the head. If the head is glued in and dry, the nose cannot be slipped in afterward. 7-Refer to the assembly diagram as well as the uploaded pictures for putting the model together. The model is meant to be glued. Do not hesitate to ask questions, feedback is essential to making better models.
With this file you will be able to print Baby Puss with your 3D printer. Click on the button and save the file on your computer to work, edit or customize your design. You can also find more 3D designs for printers on Baby Puss.