Back Horn Speaker V2.0 BL2 - Bluetooth, Active, Passive
thingiverse
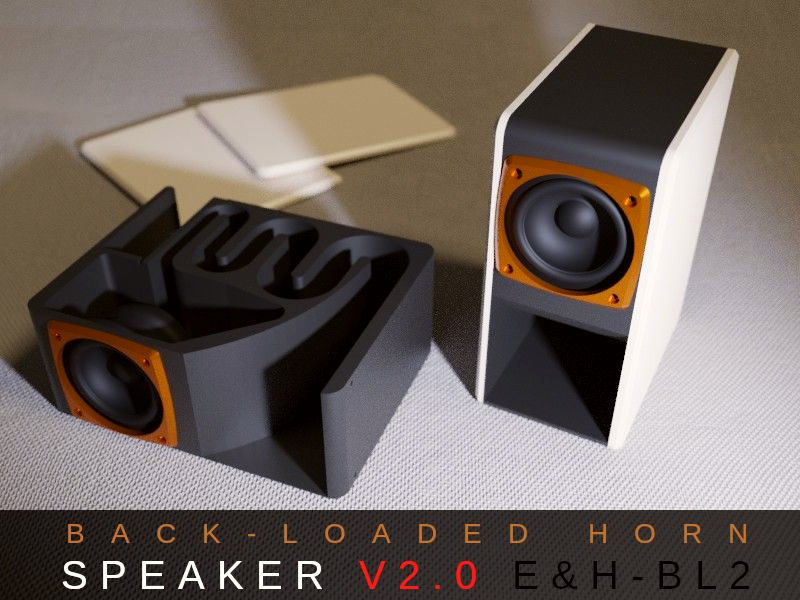
<img src="http://www.alpinehiking.eu/imgs/Speaker_Banner_640.jpg" alt=""> <b><font color="#850000">For all those who have been waiting for the 4" version of the V2.0 speaker, it is now online: https://www.thingiverse.com/thing:4750820</font></b> And so is the new <b>isobaric subwoofer</b>: https://www.thingiverse.com/thing:4765663 Check out the full set of stereo components (and plenty of other stuff): https://www.thingiverse.com/guppyk/collections/my-stuff <h3>So here it is. Kissing the frog V2.0.</h3> This version is a complete redesign, still just as stylish, super cheap, fully printable BUT sounding MUCH better. This back loaded horn Bluetooth speaker uses a 3.3" (as opposed to the original 2 1/2") driver and a USD 1 Bluetooth board and USD 3.5 amplifier. Total cost should be around USD 20. The enclosure with the back loaded horn (please read below if you are not familiar with the concept) is also a complete redesign. However, the concept remains the same. It is like kissing the frog. You kiss that tiny loudspeaker and hope it turns into a prince. And yes, it does... It is truly amazing how much sound you can get out of these ultra cheap components. The enclosure is for a 3.3" (6.5 cm) driver. You can use it as a Bluetooth (as I do), active, or passive speaker. There is a chamber at the back for the electronics (BT board + amplifier). - I am using this <a href="https://s.click.aliexpress.com/e/_AcWdXX">MP3 Bluetooth Decoder Board (approx. USD 1)</a> - plus a cheap <a href="https://s.click.aliexpress.com/e/_A9Ykzu">TPA3116 D2 Dual Channel 50Wx2 Amplifier Module (approx. USD 3.5) - this is stereo, so I short-wire L and R channels coming from the BT board</a> - plus any <a href="https://s.click.aliexpress.com/e/_Ae7uhR">12V/1A+ power supply (approx. USD 1.7)</a> - plus a small <a href="https://s.click.aliexpress.com/e/_9gCrOm">AMS1117/LM1117 Step Down converter (approx. USD 0.2) - this one is for the Bluetooth module, which needs 5V</a> - The driver I use is a Visaton FRS 8 M - 8 Ohm 8 cm (3.3") full-range speaker (around USD 12). However, experiences with this specific driver have been rather mixed. Remember, you can use pretty much any driver as long as it has roughly the same diameter. The better the driver, the better the sound you will get from this design. - However, if you are willing to spend a little more, e.g. <a href="https://s.click.aliexpress.com/e/_A91mtW">Aiyima has a few interesting 3-4" drivers to choose from</a>. - You can find a somewhat more detailed list of supplies in my Instructable at https://www.instructables.com/Kissing-the-Frog-V20-Back-Horn-Bluetooth-Speaker-F/ Basically any combination will do (as long as the driver is 3.3" or smaller so it fits the enclosure - if you use a different driver you may have to slightly adapt the mounting holes or scale the the model). This design and components are intended to be very economical. <b>The better your components (particularly the driver), the better the sound.</b> In other words, before you kiss the frog, make sure it has the heart of a prince. xD <table border="0"> <tr> <td width="120" align="left"><img src="http://www.alpinehiking.eu/imgs/Amplifier_small_vertical.jpg" width="" height="" alt=""></td> <td width="1" align="left">.</td> <td><b>OPTION 2.</b> Basically all electronic components are optional. You can just as well use V2.0 as passive speaker. Just connect to your favorite amplifier. I am currently working on an enclosure to match the speaker's design based on this amplifier: <a href="https://s.click.aliexpress.com/e/_AM1qkr">2x50W TPA3116D2 Bluetooth 5.0 Stereo Amplifier Board</a>. Very happy with this board. It is using the same chip (TPA3116D2) as the amplifier I used in V2.0 but has a much better designed board, no noise, it has treble and bass control, and great sound. Stay tuned if that's what you are looking for. I will post the enclosure as soon as it is completed (expect around early Jan). <b>UPDATE 08Jan21: The amplifier is now online: <a href="https://www.thingiverse.com/thing:4713469">https://www.thingiverse.com/thing:4713469</b> </a> </td> </tr> </table> <b>PRINTING.</b> This should be a simple print. You will notice that the body has a 1 mm cover on one side (if you don't want this, e.g. because you are using transparent side panels, I have added a version of the body that has "NO BOTTOM" added, otherwise use the standard body WITH the 1 mm cover!). This is to give it more stability and make it easier to print and remove from the printer. No support or attachments needed. Print in PLA (or ABS, PETG...) at 0.28 mm resolution and (around) 15% infill. The side panels can either be printed or cut (15 x 20 cm) from 6-8 mm plywood (I use beech). Attach the front and speaker (originally the driver was meant to be mounted from the inside but you can just as well mount it from the outside, which makes it easier to make changes at a later stage) with M3 screws and the back panel that covers the electronic compartment as well. Glue the side panels to the body. The feet (I print these in TPU) are optional. I have included a 1:2 PDF drawing of the side panels if you prefer to cut them from wood (as I do). - I print the main body <a href="https://s.click.aliexpress.com/e/_99SlSf">using some super cheap, easy to print carbon fiber PLA</a>, which gives a beautiful surface, but of course any PLA/color will do. - The <a href="https://s.click.aliexpress.com/e/_9yPyik">side panels could e.g. be printed in wood PLA</a> - looks great together with the carbon and silk copper, - and the front ring in <a href="https://s.click.aliexpress.com/e/_9v7OHg">silk copper/bronze PLA. </a> <b>Side Panels:</b> Caveat. In essence this is a fully printable speaker enclosure. However, in my experience printed surfaces tend to be very light and reflect sound surprisingly well and the enclosures I built using wooden side panels seem to sound significantly better than the ones with printed side panels. <b>UPDATE 08Dec20: Upon multiple requests - I have just added a wiring diagram! Hope this helps.</b> <b>WIRING.</b> Upon request, here is short introduction to wiring the speaker (and remember, you can always use the enclosure as a passive speaker, which omits all the soldering!). You will need basic electronic and soldering skills! Make sure that you know what you are doing (particularly dealing with high voltage). All at your own risk and no warranty whatsoever! This is for the list of supplies above and may be different if you use different components. Connect the output from the 12V power adapter to the POWER IN (marked VCC and GND) on the amplifier board PLUS to the little LM1117 board (VIN and GND)- The 5V output (VOUT and GND) from the LM1117 board is connected to the power in on the BT board. If (like I do) you use this as a single MONO speaker, bridge the L and R output coming from the BT board (this is important, it will give you a mono signal, instead of half stereo!). Now you connect the bridged L/R and GND from the BT board to line in (IN-L OR IN-R and GND) of the amplifier (if you are using a stereo amplifier, connect to either the left OR right channel). Finally connect the output from the amplifier (L+ and L- OR R+ and R-) to the + and - on the speaker. Try all this before mounting in the enclosure (this really helps with troubleshooting). <b>THEORY.</b> Here a little theory: What is a back loaded horn speaker? Think of it as a reversed megaphone or gramophone. A (front) horn loudspeaker uses an acoustic horn to increase the overall efficiency of the driving element (i.e. the sound coming out at the front). A back loaded horn speaker does pretty much the same. However, here the horn is mounted at the back of the loudspeaker. So you get the direct output from the front of the driver PLUS the one from the horn at the back. Which frequencies are amplified and how well depends on the air chamber, throat (the narrow part), and on the length, design, and diameter of the horn. Particularly with small (and cheap) drivers this can very much improve the sound quality. <b>I REALLY HOPE YOU LIKE IT AND IF YOU LIKE IT, PLEASE LIKE IT! Thanks!</b> <h3>Enjoy!</h3> UPDATE 07Dec20: I have just added a simple adapter, which allows for mounting 2.5" drivers (should work with many/most 2.5" drivers). Mount the driver to the adapter and the adapter to the enclosure (use countersunk head screws for both). UPDATE 12Dec20: Added STEP files for the back cover and adapter (so you can easily modify them for your specific hardware) <b>UPDATE 21Dec20: <a href="https://www.thingiverse.com/thing:4692662">Kissing the frog V3.0 is here.</a></b> Remember, V3.0 is mainly a design (aesthetic) upgrade (including many suggestions from the community - thanks all!) but it is not necessarily the better sounding speaker (unlike V2.0, which was a major upgrade from V1.0). So chose the one YOU like best. ENJOY!
With this file you will be able to print Back Horn Speaker V2.0 BL2 - Bluetooth, Active, Passive with your 3D printer. Click on the button and save the file on your computer to work, edit or customize your design. You can also find more 3D designs for printers on Back Horn Speaker V2.0 BL2 - Bluetooth, Active, Passive.