Back to the Future - Delorean clock
thingiverse
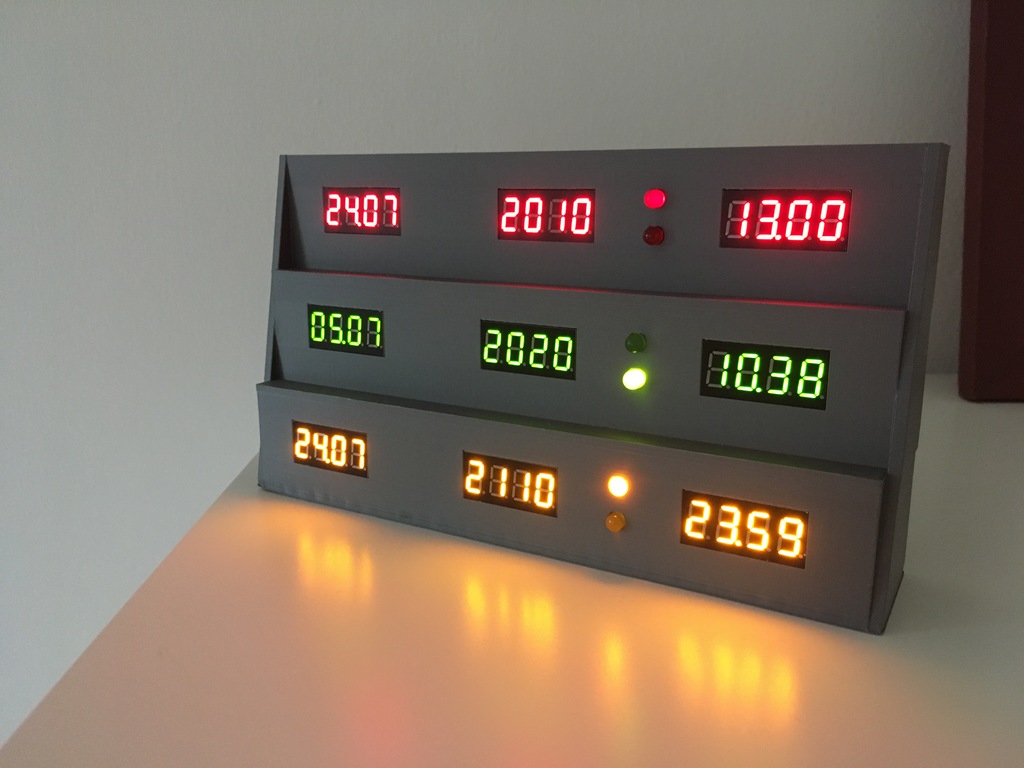
<b>Intro</b>: First I want to thank @jeje95 for his project. His clock was to big for my printer (Ultimaker 3) and I want a clock made of 2 parts. So... a idea was born a I made a remake. You will 5 files 2X .stl files 2X .SLDPRT files. 1X Delorean_clock_code.ino (code for the Arduino) This is my first project that I made. And I had a lot of fun to make and build it. I learn a lot!!! Mostly with the programming and with the clock module. The arduino community is a great place to learn! The clock module almost give me a headache. At the beginning I don't get it why the time keep restart to the "flashing-time" after a re-powering. (don't worry, I put the solution in the programming chapter ;) ) <b>Buying</b>: The list with a link of the products that I bought: Note: I got a different display then jeje95. The one that I bought don't have a ":" but a "." in the middle. My mistake... Keep that in mind with your choice. Nano: https://www.aliexpress.com/item/32341832857.html?spm=a2g0s.9042311.0.0.27424c4dvkd5uL Displays: https://www.aliexpress.com/item/32795864597.html?spm=a2g0s.9042311.0.0.27424c4dRDWgRp Real Time Clock RTC I2C DS1307: https://www.aliexpress.com/item/32847581114.html?spm=a2g0s.9042311.0.0.27424c4dRDWgRp Leds: https://www.aliexpress.com/item/32901407549.html?spm=a2g0s.9042311.0.0.27424c4dRDWgRp I had a adapter at home that I don't use, so I don't had to buy that. The adapter I use, is 5V with 1,5A output. <b>Printing</b>: Print the base "BovenMiddenOnderV2" the way you put it on your desk. With the bottom under. (I don't know why Thingverse put the file upside down) Print the back side "deksel". <b>Assembly</b> Just follow the Clock_Wiring. If you used (just like me) a non rechargeable battery, you must (!!!) adjust the Real Time Clock RTC. I used a glue gun. Remove R4, R5, R6 and D1 On the place where R6 was, make a jumper wire. (see picture before and after) If you don't do this, the nano used the time from the flashing after a re-powering. <b>Programming</b> Mostly I used the same programming but I made some adjust that I wanted. The library's I use. SevenSegmentTM1637 (by bram harmsen) RTClib (by adafruit) Wire (by adafruit Neopixel) <b>To do</b> - Stickers for the front - Auto adjust backlight. I think it's to bright for in the evening. - It look like the clock is a little faster than "normal". After 18 days, the time is 3 minutes off
With this file you will be able to print Back to the Future - Delorean clock with your 3D printer. Click on the button and save the file on your computer to work, edit or customize your design. You can also find more 3D designs for printers on Back to the Future - Delorean clock.