Backlash Tower
thingiverse
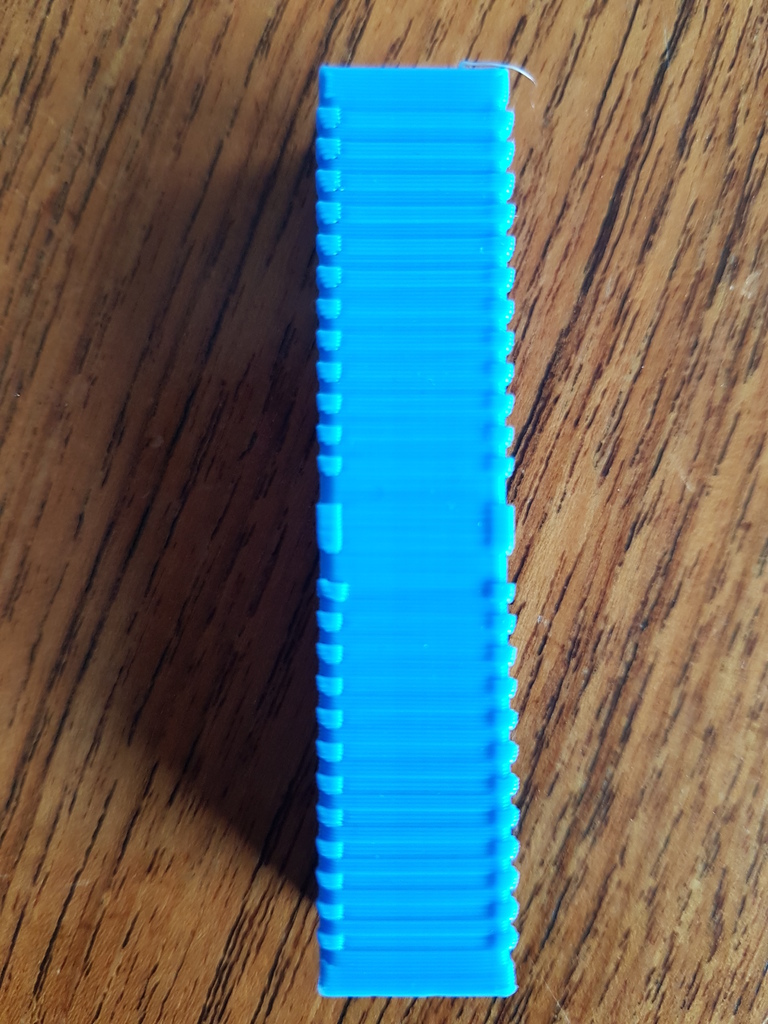
Introduction. This is a simple to use backlash calibration tool. In theory, you can print it once and be done with your backlash calibration. In reality, you probably want to go through at least two iterations. The farther off from perfect calibration the printer is, the less precise the reading will be. Print an extra after adjustment just to make sure. Instruction. _Update for M3D users: It has come to my attention that the new software compatible with the Micro+ and Pro tends to print the tower too large. Make sure to print it at 1:1 scale. Correct size: 1.2 x 1.2 x 6 cm._ The instructions are quite complicated, so I created a video to help understand them. If you watch it, you should come back and read the instructions anyway. https://youtu.be/NdDdhVzleWc After printing the tower, study it carefully. The front and back sides of the print display the backlash for the Y-axis. The left and right sides display the backlash for the X-axis. When studying one of the sides, you will see that in the bottom part, the layers with a bulge in the corners are wider than the layers without bulges. Henceforth called bulge-layer and square layer. You can say that the bulge-layers "stick out" from the square layers. And at the top, the bulge-layers will be narrower than the square layers. The objective is to find the exact layer where the bulge-layer shifts from being wider to being narrower (the match). Basically, you are looking for the spot where the ridges disappear. I use either a needle for probing or a magnifying glass to find the flattest part (the match). It can be pretty hard to find if the print quality isn't perfect. When you have found the layer where the change happens, count how far off that axis is from a perfect backlash calibration. If the match is below the center mark, you still have backlash. If it is above the center mark, your backlash compensation is set too high. Assuming you are using the 0.02 file, your calculation is as follows: Each step away from the center represents 0.02 mm of backlash. So if the match is 5 bulges below the center, you need to raise the backlash compensation in the software by 5 x 0.02mm = 0.10 mm. If it is 2 bulges above center, you need to reduce backlash compensation by 2 x 0.02mm = -0.04 mm. The fine-tune file changes 0.01mm per step. But my print doesn't look like that; what do I do? ---------------- If a side has too wide bulge-layers all the way up, your backlash is bigger than the range of the object. Raise the compensation by 0.2 - 0.3 mm and print the tower again. If a side has too narrow bulge-layers all the way up, your backlash compensation is too high for the range of the object. Reduce the compensation by 0.2 - 0.3 mm and print the tower again. If one side looks like the match is pretty close to the center and the other is further off, calibrate using the side that is furthest off. Depending on the slicer, the backlash of the bulge-layers and square layers may cancel each other out. This can happen on 0, 1, or 2 sides of the object. For me, I consistently have to ignore the front side of the print. Final notes. I like to finish my calibration by printing a nice cylindrical object to confirm the result. Like this one for example: https://www.thingiverse.com/thing:2371170 Not all software allows you to adjust backlash compensation. You may just have to tighten some belts or live with it. If you have a M3D printer, you can use this article for instructions on where to adjust it. Of course, ignore the rest of the article. https://printm3d.com/solutions/article.php?id=234 Don't be too ambitious. If you can consistently stay within 0.03 mm from the center, you are well off. Probably 0.05 mm for an older printer.
With this file you will be able to print Backlash Tower with your 3D printer. Click on the button and save the file on your computer to work, edit or customize your design. You can also find more 3D designs for printers on Backlash Tower.