Ball maze cube
myminifactory
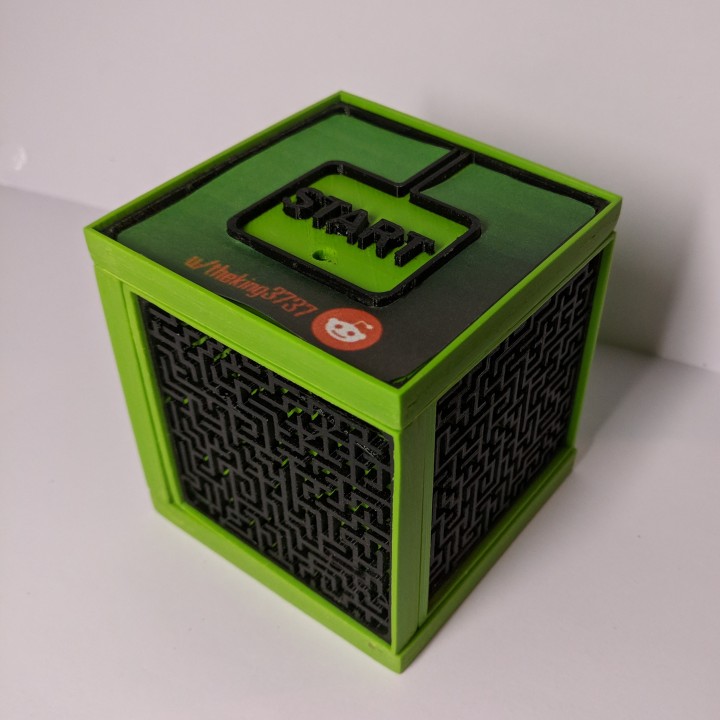
After a month of problems I’m finally able to post my end result :) I wanted to make a portable puzzle, because I would like to take it with me and show it to other people. Most puzzles contain of loose pieces, which can easily be lost. I personally liked the idea of a maze, but a single maze would be repetitive quite fast. I came up with the idea to include a couple of puzzles and connect them to each other, by making the shape of a cube. I designed everything in Fusion 360, which took me a couple of days. I left some space in the “start” and “Finish” sides, because I thought that it might be great for other makers to put their own design there. I also came up with the idea to make use of filament swaps, so you can have the walls printed in a different color. I wanted to make the puzzle as small as possible, so I designed it for a 1mm ball which I found in my drawer (I later created a version for a 2mm ball). Everything went quite smoothly up to this point, but this all changed when I wanted to print. First of all, the 3D-printer I have at home (DMS DP5) isn’t mine, so I had to wait until I was allowed to use it. After I had permission to use the printer, I started the first print and discovered that the extruder kept making this “clicking” sound, which led to my prints failing. After 2 weeks of troubleshooting I decided to completely disassemble and reassemble the hotend, which looked like it fixed all my issues. But after just 2 prints the auto leveling sensor stopped working, because it had literally melted. I wasn’t able to home my printer because of this and ordering a new sensor would take a couple of weeks, which would mean that I wasn’t able to make the deadline of the puzzle competition. Luckily a friend of mine also had a 3D-printer. He was also actually really interested in my project, so he liked to help me with it. I gave him the filament and the files and he started printing right away. But he also didn’t have good luck, because after the first print his PSU died. Luckily he’s pretty good with electronics, so he was able to hook up a desktop PSU and continue printing. But it still wasn´t over. He soon discovered that all the prints were mirrored, which would cause problems when assembling. He eventually fixed this and started printing all over again. But then again he discovered another problem. This time it was some kind of “Thermal runaway” error, which led to prints failing. This error was caused by his hotend cooling off too rapidly. He fixed the “Thermal runaway” error by disabling the parts cooling fan, which did decrease the quality of the prints (but I’d rather have a finished object than nothing). He finished printing everything on the 16th, so I quickly cleaned up the prints and assembled everything. In the end I’m quite happy with the end result. I hadn’t done any filament swaps before this, so it was quite satisfying to see at first. The quality of the prints could be better, but my friend had to print it all fast, because otherwise he wouldn’t have made it. Also his Anet A8 (clone) wasn’t really calibrated well at first, so he had some first layer height issues with some of the prints. There were a couple of moments where I thought I wouldn’t be able to make it in time, but that all proved to be wrong in the end. What else do you need: - 2mm thick sheet of acrylic (Plexiglass): 1mm ball version (some sanding may be required to make it fit): 4x 51,5mm x 51,5mm 2x 60mm x 60mm - 1mm ball; - Some glue that sticks on 3D-printed parts. Templates 1mm ball version
With this file you will be able to print Ball maze cube with your 3D printer. Click on the button and save the file on your computer to work, edit or customize your design. You can also find more 3D designs for printers on Ball maze cube.