Ballistic Ball Launcher
thingiverse
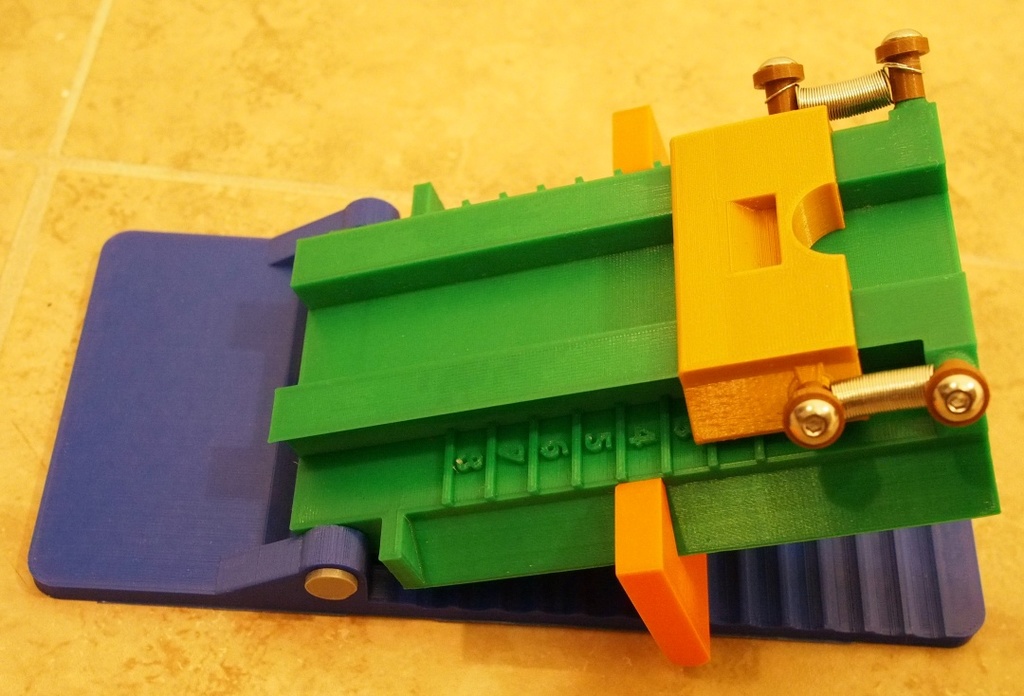
V2 Update: Added a set of files to build the device using M5 screws. Two M5-20mm machine screws are used for the strip piece, and Two M4-25mm machine screws are used for the shooter piece (these two can also be M5-20mm screws if desired, though I haven't tested that change). These are common screw sizes found in nearly any M5 screw kit, the one I used is linked below. "ball_launcher_screw_post_test_b.stl" - Use this to test your printer, slicer, etc. without having to print out a whole shooter piece. "ball_launcher_shooter_screws_a.stl" - Replaces ball_launcher_shooter "ball_launcher_shooter_screws_b.stl" - If you have problems with the corners lifting, this contains a partial brim which can be removed with an exacto knife after the print is complete. "ball_launcher_screw_spring_spacer_a.stl" - Recommended plastic spacer when used with M5 screws and the extension springs in the kit (see link below). "ball_launcher_strip_screw_a.stl" - replaces ball_launcher_strip "ball_launcher_strip_screw_c.stl" - looser tolerances and reinforced sides These pieces have been tested and so far are very reliable even when printed with PLA. If printed with 0.20mm layer height, the pieces should still fit together, but may not slide smoothly. In this case, some super lube synthetic oil is recommended. The Original (V1) release of this device can be made to be somewhat reliable, but it is not recommended now that the V2 release (above) is available. The device is designed to be printed without any support. Extension Springs: https://www.amazon.com/gp/product/B000K7M36W https://www.amazon.com/gp/product/B0002KO1X0 M5 Machine Screw Kit: https://www.amazon.com/Glarks-150Pcs-Stainless-Button-Assortment/dp/B01J9865L6 Wooden Balls (Ammo): https://www.amazon.com/gp/product/B01EI821GA Video Demonstration: (shooting at knights in a tower) https://www.youtube.com/watch?v=CnZNmiPoWCo (shooting at destructible wall blocks) https://www.youtube.com/watch?v=RIMAlG7hsXY&t=53s (V1 note) The posts on the large shooter piece have a tendency to break, and it can take a long time to print a replacement. I have some ideas of how to fix this problem, but here are a few you can try: "ball_launcher_shooter_l.stl" is the original file and if you use this one, you should use modifiers to reinforce the posts with plenty of infill or additional perimeters (if possible). Especially if you are printing using a brittle plastic like PLA. "ball_launcher_shooter_n.stl" uses posts which are reinforced with inserts, if you want to try this, first attempt to print "ball_launcher_post_test_a.stl" as a test print. The insert used is "ball launcher post square a.stl". The post should fit into the test piece tightly once forced in. If it does, print the shooter piece described and test the post again. if it works, liberally smother the post with a superglue or some type of plastic-safe epoxy, and then push it in all the way. Allow to dry completely before using. The posts on the strip have a similar problem of breaking, however this piece is small so printing a replacement is not as big of a deal. The modifier "ball_launcher_strip_modifier_a.stl" can be used, though many slicer apps now also support other methods of adding modifiers now.
With this file you will be able to print Ballistic Ball Launcher with your 3D printer. Click on the button and save the file on your computer to work, edit or customize your design. You can also find more 3D designs for printers on Ballistic Ball Launcher.