Bambu Lab Modified Start and End gcode
prusaprinters
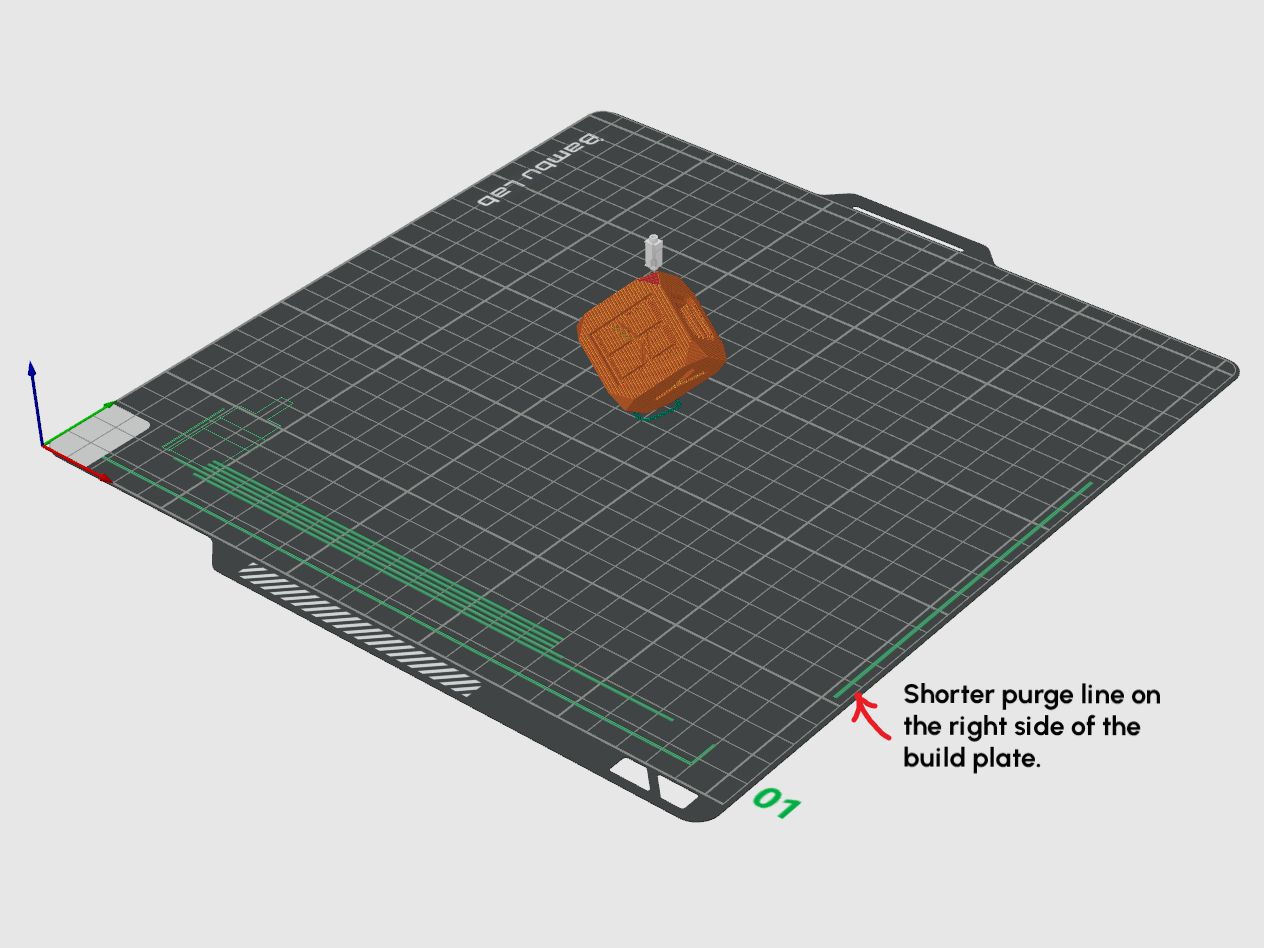
<h5>UPDATE 24 Nov 2022</h5><p>Added a new start code “startcode_221123_HT_WB plate.txt” In addition to the -0.04mm z-offset adjustment for the Textured PEI bed, this code will recognize when High Temp plate is chosen and does +0.03mm z-offset to reduce the over-squish. <br><br>If you are using Wham Bam plate, try choosing High Temp plate option in the slicer and you should see the first layer print improves with less over-oversquish.</p><h5>Description</h5><p>My customized start and end gcode for Bambu Lab printers. Usable for X1, X1C with or without AMS. The cube is a placement stl so that I can publish this post. What you need to download are “startcode_221117.txt” and “endcode_221024.txt”. Please download the “Bambu cube v1.stl” file so that Printables can register as a download. I would then know if there is traction to this post. thank you. </p><p>Take note of the date that the codes are written. 221117 mean 17 Nov 2022. I will update it as and when I can and/or when Bambu Lab does any updates to their firmware. Please read the entire post before you decide if you want to use these codes. </p><h5> </h5><h5>How to Use</h5><p>Cut and paste the start and end gcodes onto your printer settings. Save it under a different profile name. <i><strong>Test the codes using a small test print and watch what it does.</strong></i> If you like what you see, all well and good. If not, you can always use back the stock setting from Bambu Lab. </p><p>I have been running and updating these codes for the past weeks and it works for me. </p><figure class="image image-style-align-center image_resized" style="width:75%;"><img src="https://media.printables.com/media/prints/322000/rich_content/3b3a9167-e3d9-441b-9098-acecb693ad70/printer-settings.png#%7B%22uuid%22%3A%22f7f4e4ec-c844-4d89-9b79-09f857dc28e0%22%2C%22w%22%3A1281%2C%22h%22%3A960%7D"></figure><p> </p><h5>What I Customized</h5><p><i>Start Code</i></p><ol><li>I reduced the AB motor current to 1.0A (vs 1.2A on stock) This helps to reduce the build-up heat generated by the motors.</li><li>Reduce the Z motor current to 0.7A (vs 0.75A on stock)</li><li>Clean up the gcodes for the chamber fan (set to 70% fixed) so its not running loud at 100% during start-up. </li><li>Reduce the initial purge to 80mm (vs 100mm). This reduces the chance of purged filaments getting flicked out during the wipe sequence. </li><li>Add a Z-offset of -0.04 when users select Textured PEI Plate. This helps to provide additional squish. You will need to apply some elephant-foot compensation (around 0.06-0.08mm).</li><li>Change to a shorter purge line to the right side of the bed. This prevents any loose filament from being deposited on the center of the bed like the stock code.</li><li>I added a short wipe sequence on the edge of the bed plate after a purge line to have a cleaner nozzle. </li><li>There are other commands that I have commented out so that they will not be part of the print command. I used them for testing purposes. </li></ol><figure class="image image_resized" style="width:75%;"><img src="https://media.printables.com/media/prints/322000/rich_content/f40c6dc4-114d-4f6c-bcfc-ce4405e5dcf0/startcode.png#%7B%22uuid%22%3A%22876ecd08-abbc-4f90-bc52-0e06f2a089d5%22%2C%22w%22%3A1264%2C%22h%22%3A948%7D"></figure><p><i>End Code</i></p><ol><li>Reduced the idling current of A, B and Z motors.</li></ol><p> </p><p><i>Filament Code</i></p><ol><li>Under the Advance tab, copy and replace the gcode in the Filament start G-code section</li></ol><p>; filament start gcode 20221117<br>; Run the chamber fan at 70% instead of 100% to reduce the noise</p><p>M106 P3 S180 ;run chamber fan at 70% to keep enclosure cool. </p><figure class="image image-style-align-center image_resized" style="width:75%;"><img src="https://media.printables.com/media/prints/322000/rich_content/6b044fad-50e8-4ad8-9347-de4dc668457c/filament-settings.png#%7B%22uuid%22%3A%224e0f0404-ec08-46fe-a29c-f9875b28fc58%22%2C%22w%22%3A1295%2C%22h%22%3A971%7D"></figure><p> </p><p>When using textured PEI plates from Bambu Lab, Energetic, LDO, etc. Please remember to choose the Textured PEI Bed setting on the slicer. This will enable an additional 0.04mm squish to improve line adhesion. But that will also mean you will get elephant foot, which you will need to compensate via the elephant foot settings. A value of 0.06 to 0.08mm should do the trick.</p><figure class="image image-style-align-center image_resized" style="width:75%;"><img src="https://media.printables.com/media/prints/322000/rich_content/dec29a95-7252-4857-a62d-e8fb46261f05/elephant_foot.png#%7B%22uuid%22%3A%229188a6da-2d64-406d-8815-82bd265a4f13%22%2C%22w%22%3A518%2C%22h%22%3A474%7D"></figure><p> </p><p>In the stock setting, the common flush temperature is set to 250C. I have reduced it to 245C (Line 79) This is for users that swap different filament types regularly. ie PLA to petg. </p><p>If you are like me and only print with high temp filament ie ABS and PET where the temperature is at 260-270C, enabling Line 78 and disabling Line 79 would produce a cleaner purge. </p><h5><strong>IMPORTANT NOTE</strong>: </h5><p><strong>DO NOT ENABLE Line 78</strong> if you ever swap between high temp filament with PLA. Shit will hit the roof. The extruder will clog when you try to purge ABS or Nylon with PLA at 220C and/or get burned carbon deposits if you try to purge PLA with ABS at 260C. </p><figure class="image image_resized" style="width:75%;"><img src="https://media.printables.com/media/prints/322000/rich_content/6aa42567-bb1d-4eb0-ad56-c2b01a641bee/image.png#%7B%22uuid%22%3A%22483def05-95d1-4543-8008-0cdc40baa02b%22%2C%22w%22%3A1450%2C%22h%22%3A359%7D"></figure><p> </p><p>Till date all my designs are free to download and use. There is no Pateron or OnlyFan (hahaha). If you like my designs and want to contribute to my coffee addiction & help fund the filaments I need for prototyping, a donation of $2-$5 to <a href="https://ko-fi.com/thrutheframe">Ko-fi</a> or <a href="https://www.paypal.com/paypalme/shannonheng">paypal.me</a> will be greatly appreciated. </p><p><strong>DO NOT INCREASE THE Z OFFSET. </strong>Do not increase the the z offset value. This is because the nozzle will be scratching the bed. In serious cases, it may bend the nozzle at the heatbreak. If you need more squish, I would recommend increasing the flow rate from stock 0.95 to 0.97. </p><p> </p><h5><strong>Caveat</strong></h5><p>As with all my designs, it may and may not work for you. So print and install at your own discretion. </p>
With this file you will be able to print Bambu Lab Modified Start and End gcode with your 3D printer. Click on the button and save the file on your computer to work, edit or customize your design. You can also find more 3D designs for printers on Bambu Lab Modified Start and End gcode.