Banana Keytar - Laser Cut Acrylic, PVC
thingiverse
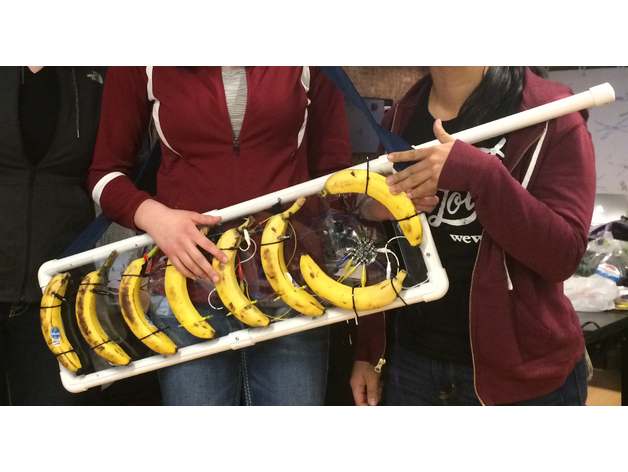
Laser cut pieces for a Banana Keytar frame. We used a Circuit playground and clipped bananas to the capacitive touch pads. We generated random colors, and flashed these as notes were played. Pieces were cut on a laser with a 32 x 20 bed. The initial thought was to put a Pi with touchscreen in the large rectangular front hole. It fits perfectly, but we couldn't get the internet to be reliable at the hackathon. I'll do another build in my shop and document the assembly. With Pi, the process would be Bananas - Capacitive Touch Pads - Use the Circuit Playground as a MIDI controller - USB in to Raspberry Pi 3 - Map pads on an online synth program - Bluetooth sound out to speaker. How I Designed This CAD - Corel - Laser I started with a CAD model of the top panel. It's free to fork and modify on Onshape:https://cad.onshape.com/documents/d05c7a8f6e9a6bab922b9b76/w/1d7e83d76073245a1de53ad2/e/3f9dd5e9602a8d73441620d6 Then I exported as a DXF, opened in Corel, and used our laser plugin to cut the acrylic pieces. Build Information BOM (in progress) 1 20 X 32 Sheet of Acrylic FRAME: 1 10ft length of 3/4" PVC 3 3/4 PVC elbow connectors 1 3/4 PVC T connector 1 3/4 PVC end cap 1 Box (~25) #6 wood screws SHOULDER STRAP: 2 1/4-20 x 1" bolts (or similar) 6 1/4-20 nuts (jam nuts would be best, regular work) 1 guitar strap ELECTRONICS: 1 Circuit Playground 1 Raspberry Pi 3, with SD Card 1 7" Pi touchscreen display, mounted to Pi 3 1 USB data cable 1 10000mAh battery pack with USB cable Bluetooth Speaker or Speaker with 3.5 mm headphone jack and cable Lots of alligator clips MISC: Adhesive wire tie blocks Zip ties Packing (clear) tape Double stick tape (thick, like foam tape or the 3M clear mounting tape) Alternative: Command Strips Synth Information We used the online synth on Websynths.com No real engineering went into this choice, except it was free and easy to use. If you use this, make sure to change your number of pads to 8, and the lowest MIDI input to 36. The channel should also be 10. The blue indicator light on the MIDI tab on the site should blink as you press a key. Design for Disassembly I cut all of the big parts for this project at the makerspace in SC and then brought it all to NYC for assembly and programming at a hackathon. All the parts and tools needed to fit in carry-on or checked baggage, so it made sense to use a PVC frame that could be easily disassembled and thrown into a roller bag. I carried the flat laser cut sheets on the plane sandwiched between a piece of foam core cut in half, and they sat fine at the top of the overhead bins. It was originally designed to use cucumbers, but they don't come in bunches and are more expensive. Initial Layout and Material Cutting I chose the overall dimensions based on the capacity of our laser cutter and so I could get both the front and back panels off of the same sheet of acrylic. I cut the PVC and adjusted the lengths by removing material as needed. Remember that fittings will add length to a side. If you intend to take it apart and reassemble after you drill mounting holes for the panels, make sure to mark the alignment of pipe to fittings - it's really hard to get the rotation to line up again if you don't. Figuring out the frame. This size is great for my sister and I, but we're tall. When I bring this to science fairs it is way too big and heavy for kids, so I end up just putting it on a table and using it as a keyboard. Marking approximate locations with a dry erase marker. I drew everything out before I drew it in CAD.
With this file you will be able to print Banana Keytar - Laser Cut Acrylic, PVC with your 3D printer. Click on the button and save the file on your computer to work, edit or customize your design. You can also find more 3D designs for printers on Banana Keytar - Laser Cut Acrylic, PVC.