Basic Robot Arm
thingiverse
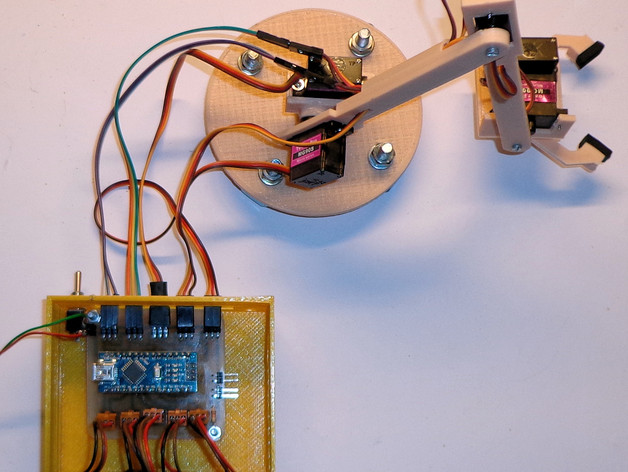
Robot arm for Beginners Rookie-friendly robot arms frequently use mini servos like the MG90S (MG = Metal Gear). However, the power of these tiny instruments is often exaggerated. Traditional robot arm designs are quite complicated and have many friction points due to their link structure. This link structure exists solely to keep the clamp horizontal. By adding one more servo, we create more freedom and eliminate the link structure. The simple arm structure is directly attached to the servos, without the need for horns that come with the servos. However, we make use of the screws supplied. The wires run through the cylinders on the arms to clean things up a little bit. The servos are controlled by an Arduino Nano. Ensure that you supply 5-volt power from an external source. On the PCB is also a connection for 7 to 12 volts, but it's only used for test purposes without servos attached. You don't want to damage the Arduino 5-volt regulator, which has very limited capacity. In this setup, five potentiometers are used to control the position of the servos. If you want the robot arm to operate autonomously, you can use the switch in the sketch: val = analogRead(switch); if (val > 500) { use potentiometer program } else { use your program } Check out this YouTube video where the arm is manually controlled: https://youtu.be/OyY5stUXjUI The manual control sketch is attached. Print Settings: Printer: Wanahao i3 Rafts: Doesn't matter at all Supports: No Infill: 20% Notes: You can print all parts with a 0.1mm layer thickness and 100% infill for maximum strength, but it's not really necessary. Standard settings work fine too.
With this file you will be able to print Basic Robot Arm with your 3D printer. Click on the button and save the file on your computer to work, edit or customize your design. You can also find more 3D designs for printers on Basic Robot Arm.