BATTERY FILLER - WIRED FOR SOUND
thingiverse
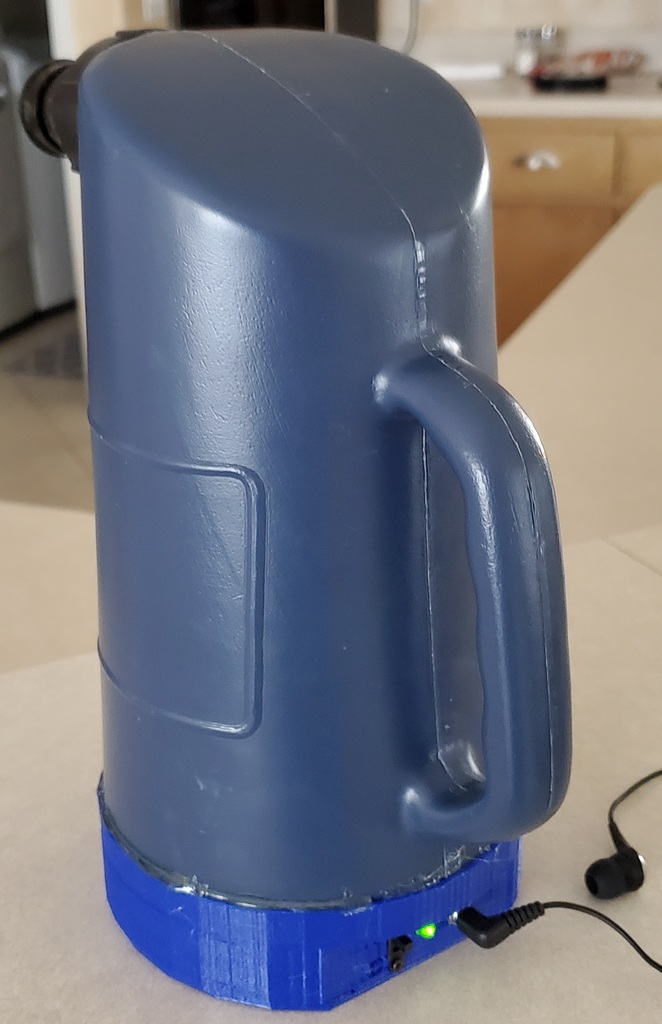
BATTERY FILLER - WIRED FOR SOUND This project evolved from the need to maintain lead-acid batteries in an electric golf cart. Six 8-volt batteries of four cells each require water monthly. The filler jug automatically fills the cells to the required level, typically taking 10-15 seconds each. When the gurling sound stops, the cell is full. Unfortunately my hearing acuity is missing in action, no doubt still lurking somewhere within the power plant where I misspent my career. As a result, my ability to hear the gurgle of the water in the battery filler is less than ideal at the best of times and is entirely absent with background noise. Thus began this project, to wire the battery filler for sound. The finished project works very well. I can clearly hear the gurgling within the filler, even in a fairly noisy environment. It works even better than I expected and was a fun and useful project even if a little on the weird side. [You're doing WHAT?] As my Son-in-Law observes, if it works, it's not stupid. The 3D printed part of the project consists of a short extension base to be hot-glued to bottom of the existing plastic battery filler jug (If you're looking to make a battery filler, this is not the place). The main housing contains the electronics. There is also a printed bottom cover plate. These are the only printed parts required. I originally intended a hold-down bracket to retain the amplifier in its socket but that proved unnecessary. I've removed the screw posts intended for that purpose from the original model but they're still in the photos. The 1.8K ohm series resistor only passes about 2-3 mA through the power indicator LED which is bright enough to be easily visible without materially affecting battery life. Note that other LED colors may have different brightness levels at this current. A green LED is recommended. I made both parts from PLA, using a 0.3 mm nozzle, .15 mm layers, 2 mm first layer, 2 mm shells, 25% infill. [EDIT - 2/26/23 - The housing needs to be printed with supports.] The housing should be printed with at least a 2 mm shell and 25% infill to provide enough meat in the screw posts for the cover screws to bite properly. ASSEMBLY: Attach the brass side of the microphone to the bottom of the filler jug with double-stick adhesive foam. A 12-15 mm square is sufficient. You don't need to cover the entire brass plate with the foam. [Lesson Learned: Solidly attaching the microphone to the jug with epoxy is not a great idea. It damps the microphone to the extent that sensitivity level is unacceptably low.] It is helpful for assembly, but not absolutely necessary, to incorporate Dupont connectors in the microphone leads. The mic leads pass through the large hole in the main housing to the electronics cavity. It's easiest to fasten the microphone to the filler jug first, then when the filler and housing are mated, connect the microphone wires. Solder the 2-pin male headers to the amplifier board. Install and connect all the electronic components except the battery, microphone and ear bud in the main housing. If the amplifier board is a little loose in the socket a bit of glue on two corners should hold it in place satisfactorily. The LED is a light press fit in the housing but if it's too loose a bit of glue on the inside surface will do the trick. Connect the microphone leads to the proper terminals of the amplifier board. Plug in the earbud, install a 9V battery and test by agitating the half-full filler jug. Adjust the volume pot on the amplifier board as required. You should be able to easily hear water splashing/bubbling/gurgling in the jug through the ear bud. Install the bottom cover with three M3 screws. Secure the filler jug in the top of the main housing with hot glue all the way around. BILL OF MATERIALS: NOTE: Bad news/good news. Some of the components can only be bought in quantity. Fortunately, they're still pretty cheap and you can never have too many of these things in your parts box until you achieve SABLE (Supply Adequate Beyond Life Expectancy). Single Side Earphone in-ear Mono Earbuds https://www.amazon.com/dp/B07T18H792 3.5mm/0.137" Panel Mount Female Mono Socket Headphone Audio Jack https://www.amazon.com/dp/B07DKDWHRR 35mm Piezo Disc Transducer Contact Microphone https://www.amazon.com/dp/B084KHH7B6 DC 5V-12V 6V 9V Micro Electret Microphone Amplifier Mini MIC Condenser Microphone Audio Amplifier Board (yes, it says electret or condenser microphone but it works quite well with the piezo microphone specified) https://www.amazon.com/dp/B09FX7NSTX Micro Mini Slide Switch, 3 Pin, 2 Position SPDT Latching Toggle Switch Panel Mount https://www.amazon.com/gp/product/B099N3HFPG 9 Volt battery 9 Volt battery snap connector 2 pin male header - qty. 3 (solder to amplifier board) Green 5mm LED 1.8K 1/8 W resistor (brown, gray, red) M3 X 16 mm flat head wood screw - qty. 3 (cover screws) M2 X 8 mm flat head wood screw - qty. 2 (switch screws) ~ 15 mm square of double stick adhesive foam (attaching microphone) 26 gauge stranded wire male/female Dupont connectors - qty. 2 pair (microphone leads - optional) Heat shrink tubing Solder Hot glue
With this file you will be able to print BATTERY FILLER - WIRED FOR SOUND with your 3D printer. Click on the button and save the file on your computer to work, edit or customize your design. You can also find more 3D designs for printers on BATTERY FILLER - WIRED FOR SOUND.