BB Band Mine
thingiverse
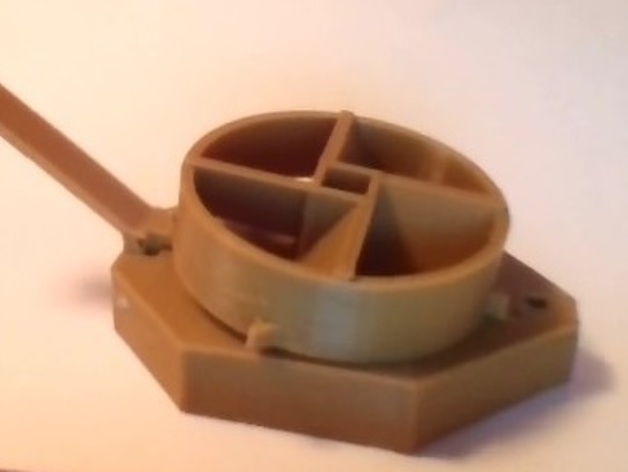
New update as of 4/14!! Pocket version is only an 3x2x1" dimensions an fits in your magazine pouch, has a string latch or trigger latch and only takes four printed parts, a pen spring, trim nail, and of course the rubber band. Coming soon = extra fan file for wall mount applications!!! They print reliably and smoothly on all the infill styles I've tried so far, and the whole thing only takes about two hours at 80mm/s and .2mm layers!!!! Problem: airsoft claymores/mines/traps take batteries, fail to be sensitive enough to reliably trigger, and have limited areas of effectiveness, Requirements: 1: Cannot cause any serious harm to wildlife/persons/ecology (wear eye pro) 2: Must reliably and quickly coat 15sqft or more area with BBs 3: Must be durable enough to be stepped on by 250lb+ players 4: Must be self contained, including renewable power source Answer: Big Rubber Band and a Fan! The first one I made was from a personal hand held fan set in a food bowl on top of a square carriage that was screws, standoffs, and a few scraps of flat metal I had laying around the hill. Had all sorts of trouble with triggering ideas and reliability, so went to a metal assembly using shortened coffee can and 5inch oven hood fan. added a gear to the axle and pin guides to the carriage assembly for somewhat more reliable triggering, but it threw BBs 25ft+ in every direction, which was awesome!! Unfortunately, its not real safe to go skipping through a field with a sharp cut-off can that some idiot could fall on, so my design still didn't fit the bill... Enter 3d printing... plastic won't really cut you unless it was designed to, holds weight, energy and enough rigidity for high speed torque relief... Best of all its DURABLE! VERSION 2.0 Pocket band mine It prints great can even be scaled up for larger rubber bands!!!! video coming soon!!! Parts to find: Spring from click pen, cut in half or third Normal rubber band Trim nail, cut down Parts to print and assembly, bottom to top: Print one each of the case, fan, and axle and whichever of the two latches you prefer. the latch.stl is string trigger only, but compact, whereas the extralatch.stl file is pressure or string trigger with lesser draw weight. Step 1: place the spring in the round guides in the case and whichever latch you intend to use. Step 2: pin with trim nail. Step 3: slip band through axle. Step 4: place axle in case and slip band around circular bars with a toothpick/key etc. Step 5: flip over, place fan on axle, twist fan counterclockwise. TEST: after turning the fan one full rotation (I find it helpful to mark one blade), you should be able to see the marked blade spin back about one and a third rotations the other direction by simply pressing on the latch, you should also notice if you don't release the latch that the Fan will bounce back and forth for a second before coming to a halt. OPERATION: Twist one and a half to three full rotations (just try not to break the sears on fan edge), place it, add 10-25 BBs directly into the Fan, slide a nail through the tie down hole, and run away before somebody sees you. I'm thinking a stick on the extra latch trigger notch would increase sensitivity and triggerable range. Like and follow here and my soon to be fully up and running youtube channel: Rock't Hill Print Settings Printer Brand: RepRap Printer: Prusa i3 Rafts: No Supports: No Resolution: layer height of 0.2mm Infill: 100% Notes: I CAN'T WAIT to catch somebody hitting one on video... soooon, very soon.
With this file you will be able to print BB Band Mine with your 3D printer. Click on the button and save the file on your computer to work, edit or customize your design. You can also find more 3D designs for printers on BB Band Mine.