Bear Linear Rail Y Axis Modification
prusaprinters
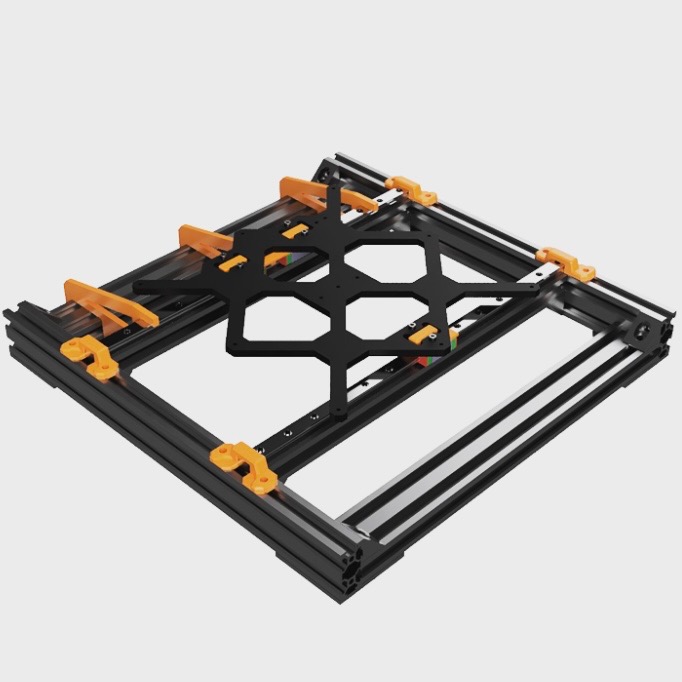
<p>This design allows for quieter operation, but also significantly improves stability and rigidity of the y axis. For a double linear rail design, it is important to not over constrain the carriage in order to allow for smooth operation. The design was inspired/remixed from JuanPuchol on Thingiverse and the Rail Holder is a slight modification from Chris Warkocki on GitHub. Be sure to take a look at their respective designs. They work really great as well.</p><p>When assembling, please follow these instructions:</p><ol><li>Attach Rails to VSlot Extrusions</li><li>Put Bearings on Rail and Screw in the Spacers with Countersunk screws</li><li>Put on the Y Carriage and Screw in final screws</li><li>Place Extrusions and Y carriage assembly into the frame and align with the aligner.</li><li>I suggest putting on the Rail Holders first and then screwing on the angle corners afterwards</li></ol><p>Parts Needed:</p><p>2 x V-Slot Aluminum Extrusion (330mm)<br>2 x Linear Rail (350mm - C)<br>3 x MGN12C Blockz<br>6 x M3 12mm<br>6 x M3 6mm Countersunk Head<br><br>10 x M3 5mm (Users have found that 8mm works better)<br>10 x M3 T-Nuts</p><p>8 x M5 8mm (Users have found that 12mm works better)<br>8 x M5 T-Nuts</p><p><br>Prusa Bear Printer Design by gregsaun<br>https://github.com/gregsaun/prusa_i3_bear_upgrade<br> </p><p>Rail Holder Design - Small Modification from Chris Warcocki design https://github.com/codiac2600 </p>
With this file you will be able to print Bear Linear Rail Y Axis Modification with your 3D printer. Click on the button and save the file on your computer to work, edit or customize your design. You can also find more 3D designs for printers on Bear Linear Rail Y Axis Modification.