Bearing Protector Trek 5900
thingiverse
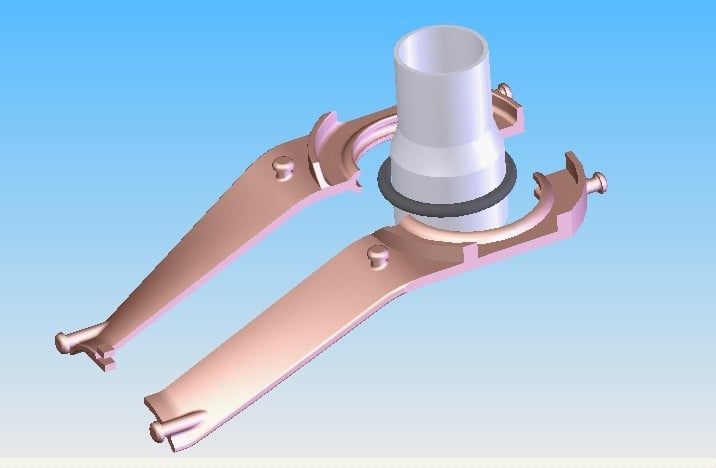
*** This accessory only fits a small number of Trek OCLV full carbon fames/forks. The 5900 model was the top of the line bike that was ridden in the Tour de France in 2003/2004 and cost over $3000 in those years. This is NOT designed to fit Trek's OCLV 5000, 5020, 5200 or 5500 series frames/forks. *** The headset on my 2003-2004 Trek 5900 was overdue for replacement and I’d stopped riding it because it had a very obvious center “detent.” I had read that this model had a tapered steering tube but wasn’t sure until I took it apart. I’d also read that this design suffered from corrosion. I expected the fork to just drop once I unscrewed and removed the center screw & top- cap and loosened the two cross-bolts on the stem. With the center cap & screw and the stem/bars removed the fork just stayed in place. I hit the top of the steering tube with a nylon hammer while supporting the top and head tubes and nothing happened. I got that oh-shit feeling, like what is it going to take to disassemble this. After removing the stem spacers and the split-beveled centering-washer things still didn’t move with a nylon hammer hit. I then gave the steering tube one shot of “PB Blaster” so it would run down the steering tube and penetrate the bottom bearing. I came back a day later, hit it again with the nylon hammer and the fork dropped out with the bottom bearing firmly attached to the fork-crown. On this aluminum/composite fork the “fork-crown” is a thin ring that’s about 1mm thick and provides a 2mm annular ring. ( see photos ) Next I needed to remove the old bearing and found that the inner ring of the bearing was wide enough to use a large flat-blade screwdriver, a hammer, and soft pine-wood block to cushion the hammer blows. With the fork upside-down I gave a hit on the front of the fork, then one on the back, rotating the fork 180 degrees for each hit to walk the dead bearing down about 1.5 inches until it just fell off the steering tube. A little re-cap here. The fork and it’s bottom sealed bearing remove as one piece. The bottom headset cup is a snug fit for the outer ring of the bearing and this cup stays with the frame. The top and bottom sealed bearings are a snug fit in the cups that are bonded (glued) to the frame's head-tube. The steering tube on my fork had lots of surface oxidation, but was otherwise in good shape, unlike pictures of some I've seen posted. The top surface of the larger bottom bearing had significant rust on it but still looked usable… as if the balls and bearing surfaces inside were still good. They weren’t… this sealed bearing was shot. The rust on the bearing looked like water had made it up around the edges of the bottom cup rusted and dried out on top of the bearing. There was also some rust film on the lowest area inside of the carbon fiber head tube. Seeing this drove me to devise some protector. So I got out my dial calipers and took measurements, writing down the I.D and O.D of both sealed bearings and the steering tube at the top and the bottom. The top bearing was in good shape and I just need a new bottom bearing. These bearing are not proprietary and once you know their dimensions (ID/OD/Thickness) you can source them anywhere. A bit of internet searching made me realize that the bearing isn't unique, but very much off the shelf if you know what’s needed. I ended up buy a pair of replacement lower bearings from one eBay seller in the USA, and from one eBay seller in Hong Kong. The USA part arrived in 9-days and was about $22 with shipping and had the Enduro brand name on its rubber seals. The Hong Kong part was about $11 delivered and hasn’t arrived yet (two full weeks & counting). Both bearing had identical published dimensions, and the picture of both made it look like the inner ring had a slight “chamfer” making it easier to install or remove. The inner ring of the Enduro bearing did NOT have any chamfer on it. So much for the picture... Before installing the new lower bearing I decided to clean up the steering tube using a Harbor Freight buffing wheel in my drill-press and brown-rouge. This got much of the tube to almost a mirror finish. Next I slid the new bearing down the steering tube and used a piece a 1.75” ID schecule-40 PVC pipe as a tool to slam the new bearing into place. This didn’t work and the sharp edge of the Enduro bearing literally shaved off a few hundredths of a millimeter (less than a human hair). Rather than muscle the bearing into place and let the bearing shave the steering tube I decided to remove the new bearing with a hammer and screw-driver as I’d done with the old (bad) bearing and get out some 220 grit sand paper. I paused at this moment to wonder how Trek handled this when the frames where being built up? Was the bevel of the original bearing enough to allow easy assembly? Perhaps the newly made steering tubes were completely free of oxidation? Perhaps Trek chilled the fork tube to shrink it and rammed a room temperature bearing onto the cold tube? Someone at Trek 20 years ago knows the answer. I used a 2x6x8 inch piece of wood and a forstner wood bit that matched the diameter of the top of the steering tube. This allowed me to twist the steering tube snugly into the cross-hole of the 2x6 and clamp the 2x6 into a bench vise so the fork was horizontal. I created sandpaper strips of 220, 400, & 600 grit that were folded over and about 8 x ½ inch long. I used these like a shoe-shiner’s towel to sand away high spots and turn the fork 90 degrees at a time to remove the shavings and any marks made by installing the new bearing. I repeatedly installed the bearing to be snug enough that it would scratch the steering tube, then removed the bearing and sanded just to remove the scratch marks it left behind. This way the sanding wouldn't make the steerer egg-shaped. After about 20-30 minutes I had the bearing within ¼ inch of being fully seated. i cleaned the sanded aluminum tube with alcohol after each sanding volley. Before the final installation of the bearing to its full down position I rolled an o-ring ***(3.5mm thick x 30mm ID x 36.5mm OD) *** all the way down the steering tube, over the tiny fork-crown and had it come to a rest under the fork-crown and well above the front brake mounting hole. The o-ring came in an assortment pack from a local AutoZone store. This o-ring was installed as part of a 3D printed mini-fender assembly to protect the new bearing from road dirt and water kicked up by the front tire. The 3D printed split mini-fender holds itself into place by friction encircling the o-ring and still leaves a 1.5mm gap between the top of the 3D printed parts and the bottom (outside) seal of the lower bearing. Before doing the final reassembly I gave the top of the lower bearing and the entire steering tube a thin coating of Phil Wood’s green waterproof grease to protect it from future corrosion. I also inspected the o-ring that is built into the upper top cup/cover and painted that o-ring with Phil’s grease as well. Also painted the inside of the steering tube above the star-fangled nut and also painted its threads. Doing the final assembly of the top bearing, its split-beveled washer, the stem spacers, the stem, and the center screw/cap I used a lot of Phil’s grease to keep moisture out. Going a bit further I put a thin bead of clear silicone caulk under the outer edge of the top cap and around the center screw to keep moisture out. With everything back together and adjusted I used more clear silicone and loaded up the pinch-slot on the back of the stem to keep water and sweat from getting it. Before the lower bearing was ever an issue and the 5900 was new to me, I knew I needed to keep moisture out of the head-tube and headset bearings. While the lower bearing was shot, but the clear silicone I used years ago kept the damage from being much worse. And that’s the whole story that led to this odd 3D printed protector. The protector itself is held in place by the o-ring and the alignment fingers at the narrow part of this mini-fender. Three inner-tube slices (rubber bands) cut from an 18-25mm butyl inner-tube are used on the nail-head features I designed into the 3D model. The fender works as planned and it can be removed or reinstalled as needed. The o-ring can only be installed while the fork is out and does NOT have its bearings in place. However, the o-ring can be removed with an x-acto knife if you just want it to be gone. The 3D Printed part protects the bearing from head-on rain, and has a v-shaped drain detail at the back to keep water from being trapped, and it is open on the sides to allow it to breath and stay dry. The fender section keeps water and dirt from being splashed at the bearing. I just road the 5900 for the first time in 4-years with its new lower headset bearing, the prototype bearing fender, and the cleaned and repainted front brake-cable stop and top tube area. All is good and I thought other 5900 owners would benefit from my craziness. FYI – one of the bikes sold from Robin Williams estate was a Trek 5900 that he acquired while following Lance on some of his races.
With this file you will be able to print Bearing Protector Trek 5900 with your 3D printer. Click on the button and save the file on your computer to work, edit or customize your design. You can also find more 3D designs for printers on Bearing Protector Trek 5900.