Bearing Retainer PLUS Plunger Screw Adapter
thingiverse
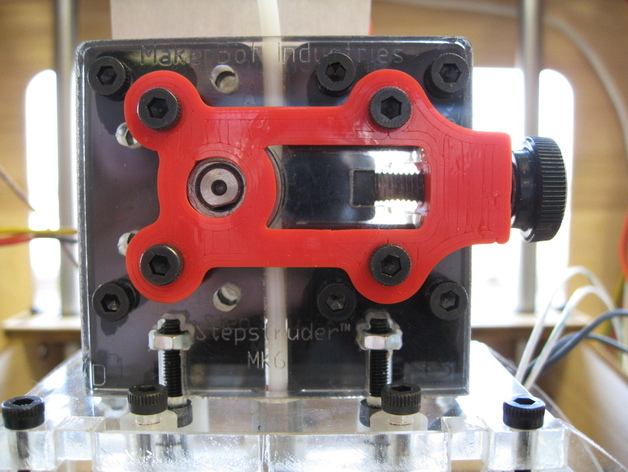
This is a modification and upgrade on the few derivatives of emmett's bearing retainer, such as johnboiles'. Like some others, I too wanted to have as much visibility to the plunger/bearing/filament feed area. This is for the MK5/MK6/MK6+ stepper acrylic face. So I trimmed as much material I could off the original design while keeping it rigid. Included the standoffs from johnboiles' design. BUT WAIT THERE'S MORE! Like some others I had the problem where the plunger screw keeps loosening and ruining my prints. Due to the filament being forced in forward and reverse rapidly for certain prints, it would result in the plunger screw becoming loose and the filament would stop extruding. I would have to go to town with kapton tape everywhere trying to keep that screw in place! I couldn't trust my printer for long periods of time without checking on it periodically. But everything is included in one part! So this part includes an arm that slides into the plunger screw area and fits snug around the screw shaft so it no longer loosens! Yeah! Save my kapton tape for more important uses now. Due to the tight tolerances in the plunger screw area, the hole may not print perfectly. Just grab some tweezers or an X-Acto blade and remove any extruded plastic that gets in the way. The plunger screw should insert fairly easily - you may need to use pliers to hold onto the screw as you rotate it in for the first time or your fingers might be raw after. I would suggest test inserting the plunger screw before bolting it onto the extruder so its easier once its actually installed. NEW IN VERSION 7!! (Took me 4 more revisions to get it juuuust right) New and improved, this part adds additional support area where the plunger screw is inserted and more viewing area. New steps for v7 include removing the two nuts and bolts that are intended to hold the plunger nut in place. Since the adapter blocks the nut from falling out, these bolts aren't needed and allowed me to place in additional plunger screw support. Enjoy! Instructions Print thing Unscrew plunger screw from side of stepper assembly 2a. Unscrew the two nuts and bolts holding in the large plunger nut. Keep the large plunger nut in place. Hold thing in front of stepper assembly and screw four M3x16 bolts into the unused nuts housed inside the stepper assembly. Reinsert plunger screw and tighten plunger. Print for hours on end in confidence!
With this file you will be able to print Bearing Retainer PLUS Plunger Screw Adapter with your 3D printer. Click on the button and save the file on your computer to work, edit or customize your design. You can also find more 3D designs for printers on Bearing Retainer PLUS Plunger Screw Adapter.