Bearings for Polisher Gear and Support Wheels
thingiverse
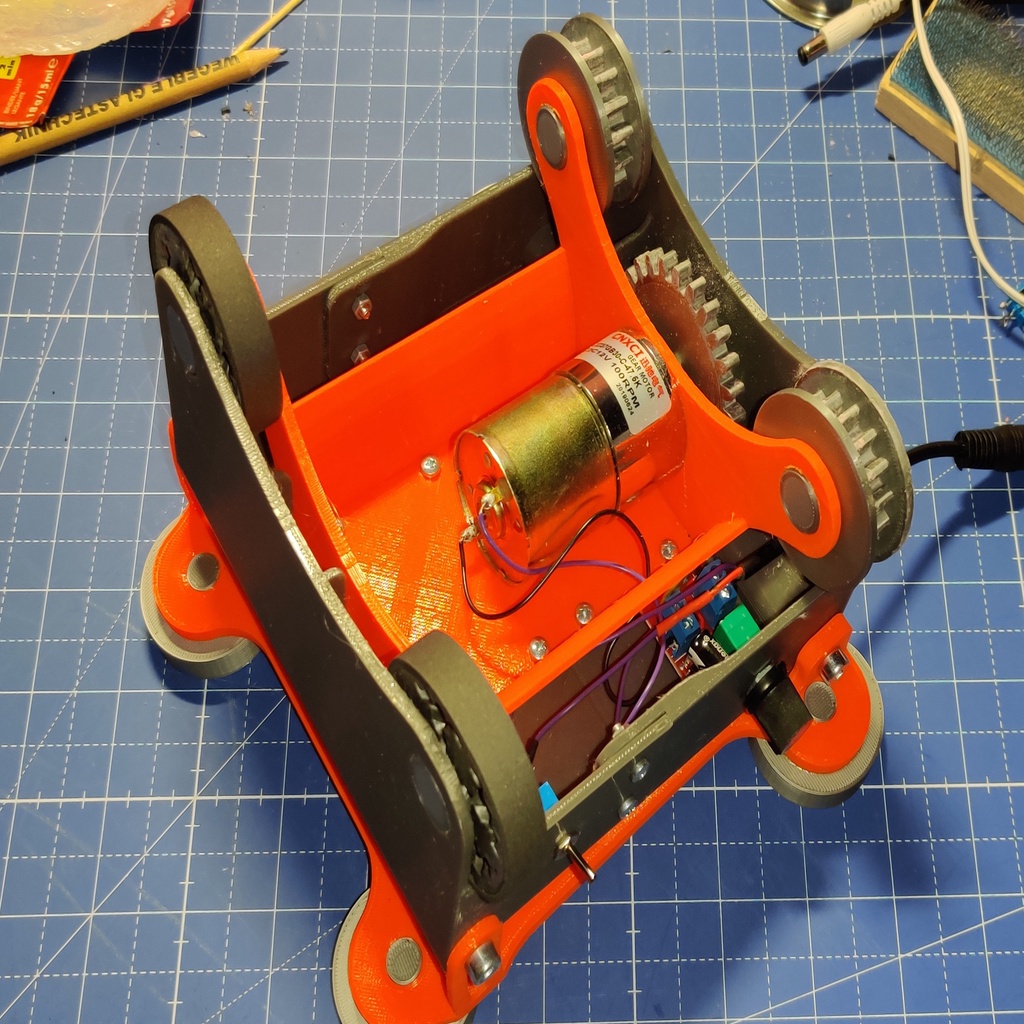
UPDATE: Hello again, I was asked if I could update my files for the new 170mm version of the polisher and finally came around to get them done. So here we go: The ONLY files which have changed compared to the original, are the support gear and the support wheel. The new wheel actually only shrank from 44mm to 40mm diameter, but I figured I might update it as well. In the end, I guess you can still use the old support wheels, since they only tilt the drum a bit higher. The bolts I designed for the original, fit with the new ones as well. The instructions basically remain the same, except for the parts you need to print. Pay attention to print one of each gear half, since the halfes have differently oriented teeth, which the original didn't. ***I have printed the parts to test the assembly but I have NOT updated my own polisher, so I couldn't actually test them. But in theory things should work out. If there's a problem, let me know.*** ------------------------------------------------------- Hello everyone, I've been a fan of the "reittec Polisher" reitter_m designed since I found it. Although I had an incident where the support wheel had too much friction with the bearing during operation and it broke. You know how plastic behaves under heat. Even PETG. So it got me thinking why not put bearings on or in the support gears and wheels. And this is the result. Replacing the support wheel was rather easy since it is just a cylinder. Thanks to the "Gear Bearing" emmett created alongside with the customizer, I could easily create a printable bearing which works as a replacement. For the support gear though, this wasn't possible. So I ran with a common 608 bearing instead. A few hours and tests in Fusion 360 and I had created bolts and caps which will hold the bearings in place. I have printed all the parts on my Prusa MK3S and designed to be a snug fit. The clearance and tolerances are 0.15mm. If your printer has troubles with that, a bit of sanding might be required. The bolts and caps I designed are meant to fit in the frame WITHOUT the original bearings. So pop them out or they won't fit! I hope you all find this helpful. Enjoy! ------------------------------------------------------- Instructions: To replace the Support Gears, you will need: 4x Support_Gear_half.stl 2x Gear_Bolt_1.stl 2x Gear_Bolt_2.stl 2x 608 bearings Plastic glue or epoxy (Superglue will most likely cure too fast) 220 grid sand paper The assembly is pretty straight forward. The bolt goes through the bearing and the cap closes it off. In my experience the tolerance is close enough to be a snug press fit and no glue is required here. The section that holds this part of the bearing is almost under no stress since the inside of the bearing doesn't move. Although if you want to go the extra step, glue them together. Run the halfes with the teeth of the Support Gear Halfes over some sandpaper to smooth out their surface so the gap between them is pretty small. Place the bearing in one half of the Support Gear. Again it should be a snug press fit. Now here you definitely want to put at least some glue on the teeth. If not the entire surface. In my experience, the weight of the rotating glass will force the halfes apart again. It isn't a major issue, but I'd reccomend it. Now with the glue in place, place a second Support Gear Half on the bearing and press them together. Carefully align the teeth and then set aside to let the glue cure properly. Repeat for the second Support Gear, test (and marvel at how smooth they are spinning) and replace on the polisher. :) ------------------------------------------------------- To replace the Support Wheels, you will need: 2x Bearring_Support_Wheel.stl 2x Support_Bolt_1.stl 2x Support_Bolt_2.stl Plastic glue, superglue or epoxy (optional) 220 grid sand paper (optional) EVA Foam 0.2mm (optional, Moosgummi for the german speakers around ;) ) Even though I printed them with a 0.15mm tolerance, I had to use some force to get it spinning. A 6mm allen key is your friend if it's stuck. Usually it is just some plastic lightly touching not properly merged together. So you should be fine. If you can't get it moving, you can find the values I used to design this in the customizer on the bottom. Create one for yourself and increase the tolerance to 0.2mm or more. If you feel like it, give the top surface of the printed bearing a slight sanding to make it smoother, but it isn't really necessary. I also cut some 138x9mm strips of EVA foam and glued it on the surface of the bearing so the glass had a better contact and ran smoother. Only push the bolt through the bearing and put the cap on. Once again it should be a tight press fit. Don't worry that the hole is hexagonal and the bolt isn't. It won't make a difference. If you feel like adding some glue between the bolt and the bearing, do so. Same with the cap. I found it not necessary especially since you could risk getting some glue getting into the gears of the bearing which might ruin it if you aren't careful. Repeat for the second Support Wheel, test and replace on the polisher. :) ------------------------------------------------------- https://www.thingiverse.com/thing:53451 Settings for the customizer: D = 44 T = 9 tol = 0.15 (default but change this value if the version I shared isn't working for you) number_of_planets = 5 number_of_teeth_on_planets = 7 approximate_number_of_teeth_on_sun = 9 P = 50 nTwist = 1 w = 6.5
With this file you will be able to print Bearings for Polisher Gear and Support Wheels with your 3D printer. Click on the button and save the file on your computer to work, edit or customize your design. You can also find more 3D designs for printers on Bearings for Polisher Gear and Support Wheels.