Beatmania IIDX mini controller
thingiverse
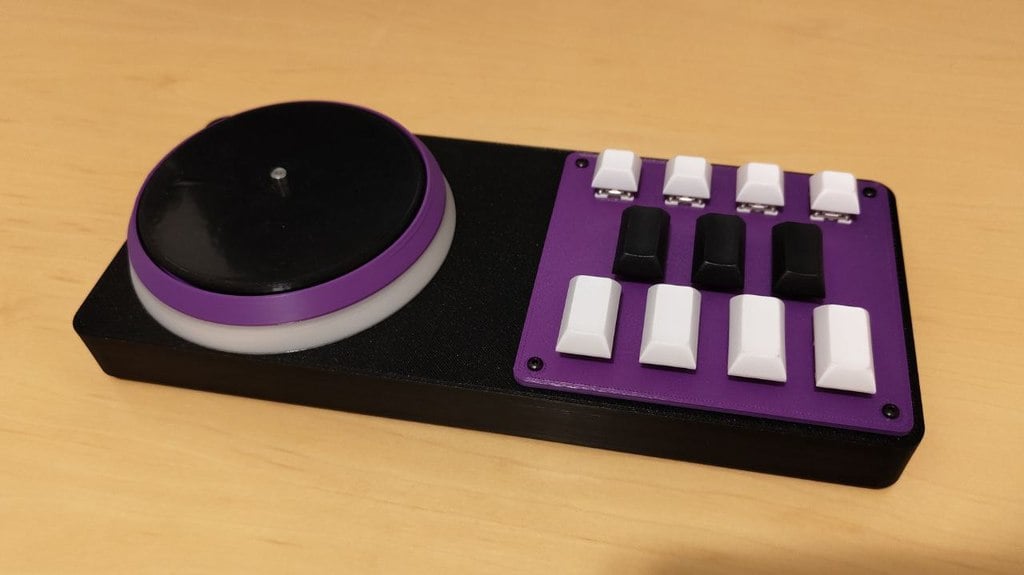
A simple 3D printable pocket sized IIDX controller using MX style keyboard switches for buttons and chinese aliexpress optical encoder for the turntable. Instructions: Use the splitted models if your printer are not capable to print bigger than 300mm. Print all the parts. I recommend increasing your wall settings for the case parts to make it more sturdy. For the split case models, you need to attach the pieces together using 2x m3 20mm screw and nuts. Mount the control panel to the case using 4x m3 12mm screw and nuts. You can choose the orientation you want, 1p or 2p. Mount the tt_bottom to the case using 4x m3 12mm screw and nuts. I recommend printing this part with no infill. but make sure you have enough bottom and top layers to cover the bottom part. use transparent material if you would like to use leds. Mount the tt_center and TT_top to the case using 4x m3 20mm screw and nuts. if you would like to use leds on the turntable, attach ledstrip around the tt_center part. Mount the optical encoder to the tt_top using 3x m3 6mm screws. Install m3 threaded inserts (outer dimension something close to 4mm. and about 10mm in length) to the case part in order to install the backcover. Look up guide on how to do it before you ruin the case. but basically, you melt them in place using a solder iron (with clean tip!) you can probably screw directly to the plastic too if you want. install the MX switches to the control panel. you may have to push em real hard. All printers may print models different so you may have to use hot glue in order for the switches to not come loose over time. Use keycaps of your choice. I recommend 1.75u for the main buttons and 1u for the extra buttons. You may find models to print here on Thingiverse. like this: https://www.thingiverse.com/thing:4920619 The bottom of the Turntable disc need to be smooth as possible in order to move without too much force. sand it down or print on a smooth printbed. Install some feltpads on the tt_top like shown in pictures. about 4-5mm thickness of pads should be fine. The turntable disc installs directly on the encoder shaft. it may be a tight fit, so in worse case you may have to file it down a little. If you want better grip on the turntable disc, you can cut sheet of adhesive nitrile material or something. Install adhesive rubber pads on the bottom to prevent it from sliding around while playing. Use 6x m3 6mm screws for the backpanel. (8x screws if you use the splitted version) There should be enough room to fit smaller boards like Arduino Micro/pro micro or Pico. Unfortunately I do not provide the software part of this build.... but you might find some useable firmware around somewhere else. But you could take a look on this wiki: https://rhythm-cons.wiki/w/Main_Page And lastly.... wire everything together! Have fun! I appreciate if you show off your build ;) Please note: my build in the photos shows a attachable usb panel mount. The models I share only comes with a small gap for the wires.
With this file you will be able to print Beatmania IIDX mini controller with your 3D printer. Click on the button and save the file on your computer to work, edit or customize your design. You can also find more 3D designs for printers on Beatmania IIDX mini controller.