Bed camera mount for Makergear M2
thingiverse
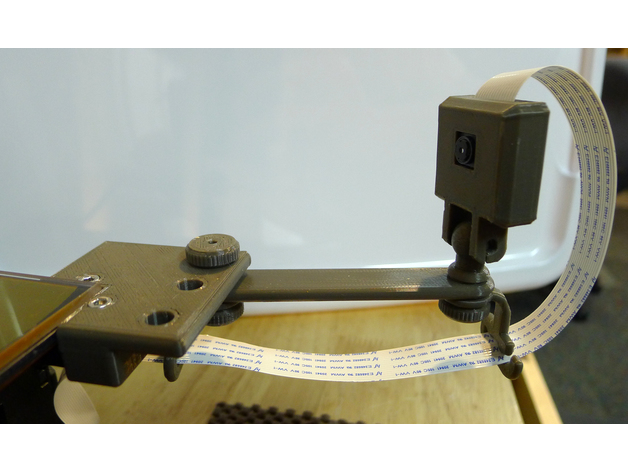
This is a bed camera mount for the Makergear M2. I designed it, originally, to use with a Raspberry Pi camera inside this case: http://www.thingiverse.com/thing:1646474 . I redesigned it to be a little more general by using a tripod-screw mount with a threaded ball mount for the Pi camera case. Now, you can use it with any camera with a tripod mount. Still, you'd be better off using the low-mass Pi camera. If you're careful, you can mount the camera directly on the bed mount. That's the way I did it. For a while. Then I was rudely reminded that the part-cooling fan may smash into whatever you mount there should your printer move the hot end out near Z0,Y0,X200. The quickly-designed extension arm will help keep the camera out of harms' way. It has serrations to match the bed mount and will lock the camera at your selected position. To install the camera mount, you will need to remove the rubber corner piece (shown sitting on the bed in one of the photos. Save it somewhere.) Slide the camera mount over the bed's aluminum foot - it should be a snug fit. Replace the M3 screws. The existing ones should work. Select the parts you want for your configuration and assemble. Remember that the bed will go up 250mm and you'll need enough slack in the camera cable. If using the Pi camera, you can use the cable hangers to help manage the ribbon cable. Note that one of the hangers has nubs to help restrict the cable movement in order to keep the cable movement from moving the camera. There are 3 lengths of screws - the longer one will be handy if you use the ribbon cable hangers. I've included one STL that is a plate of the complete set (with an extra nut.) This is for convenience, though you may be better served by only printing what you will need for your particular configuration. Credits: I used mike_mattala's Nut Job (http://www.thingiverse.com/thing:193647) for the screws and nuts, with some slight modifications to make the knurled screw. This is an excellent tool for making nuts and bolts and the way he generates the threads makes the result very easy to slice and print successfully. I originally used Exclusive (Austin Trulove)'s Pi camera mount and case (link, above) with my Prusa i3 Mk2 and I liked the way it worked. When it came time to "Pi" up my M2, this was the only case I considered. Finally, a disclaimer of sorts: I designed the mount using the specs of my M2 printer, which is an early model with a 3-point bed leveling system. My mount wraps the front-right aluminum bed foot - if that foot has changed on subsequent M2 versions, please let me know. Print Settings Printer Brand: MakerGear Printer: MakerGear M2 Rafts: No Supports: No Resolution: .2 max to get good threads Infill: 20% for most - may want more for screws Notes: There is a one-layer support printed in the two bed mount screw holes to allow the recessed head area to be printed flat. Cut, drill, or punch this layer out after printing. Note that the small openings in the mount where the M3 screw heads are recessed are normal. You can see them in the photos, but they are not actually in the STL or Preview . They will very likely show up when sliced. The screw heads are still enclosed and should not contact the glass. The cable hangers should be oriented so the upward curve faces your part-cooling fan. This will help the curved "neck" print more cleanly. None of the prints in the pictures required any supports, but you may find them useful for the hangers, if you're getting curl.
With this file you will be able to print Bed camera mount for Makergear M2 with your 3D printer. Click on the button and save the file on your computer to work, edit or customize your design. You can also find more 3D designs for printers on Bed camera mount for Makergear M2.