Bed leveling measurement tool.
thingiverse
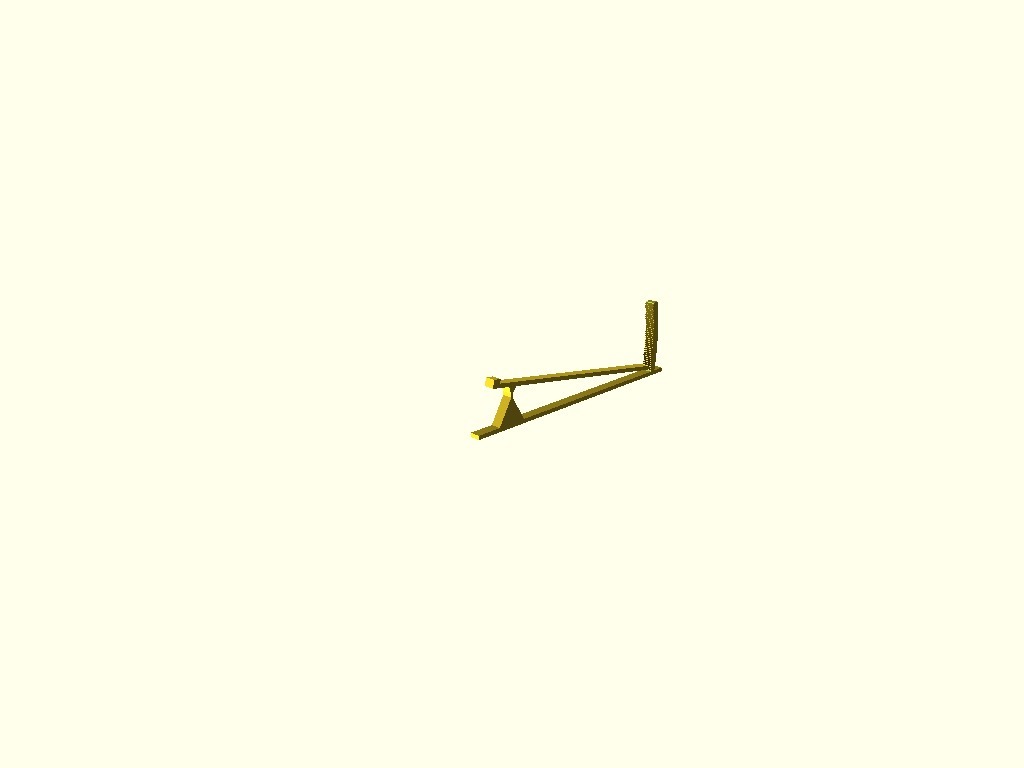
For leveling the bed on a (delta) 3D printer, you move the head to different positions near each of the three towers and then adjust a screw to make the head come out at the same height above the bed in each of the corners. If you place this at the right spot near one of the towers, you can command the head to move to that tower, at say 35mm height, and then to come down to 23.2 (this is the height with the default settings). When all goes well, you hit the middle of the platform on the short end of the see-saw. (make sure the hotend is COLD! :-) ) and the indicator will move up. The middle of the scale is what you're aiming for. Adjust the "go to" height at the first tower to put the stick in the middle. Then move over to the next tower and adjust the endstop to make the stick end up in the middle here as well. Continue this way on the third tower. Now your bed should be level. If necessary, you can now repeat this in the middle of the bed to see if you've calibrated your rod lengths correctly. I use a little script called "X": #!/bin/sh if [ $# -ge 1 ] ; then Z=$1 else Z=2 fi echo G0 X-95 Y-55 Z$Z F6000 > /dev/ttyUSB0 (the script of course starts with #!/bin/sh, thingiverse markdown doesn't understand that I don't need a header in a code section). to go to the X tower, optionally at a specific height. If you intend to use this script for this task, I recommend to make the default that 35 I recommended earlier. next use a script say called "lower" to do #!/bin/sh echo G0 Z$1 > /dev/ttyUSB0 so that you can say "lower 23.2" to go to that height. I use these on my "octopi" control-computer for the 3D printer. I printed this in PETG. I used a bend_len much shorter, causing the device not to bend back fully after being depressed. You might need an even longer bend_len if you print in PLA. For printing you need to rotate it by 90 degrees. No support, I recommend a significant brim because otherwise the long bars will pull loose from the bed (maybe not necessary for PLA). My printer is unable to resolve the tickmarks fully. However you can easily see them even if they don't look like what was designed. When customizing: ratio is the "amplification ratio" between the head and the indicator. Adjust bend_len for the bendy-ness of your material. Ideally the bend_thickness is one single extrusion width. But I couldn't get my slicer to connect that piece of my model with the outside of the rest of the model. So the printer would try to extrude that short piece of material after a long move and I'd end up with three completely separate parts. Check the layers view of your slicer before printing! I printed it at 10mm width, and I thought 5mm would be enough to hit the platform. On the other hand, the device might become too top-heavy and topple over too easily If you print it and that happens to you, let me know and I'll put the default back to 10mm. We decided to A) print it again, and B) use it again. It was now a snap to level the bed: Just read the indicator, turn the screw and try again.
With this file you will be able to print Bed leveling measurement tool. with your 3D printer. Click on the button and save the file on your computer to work, edit or customize your design. You can also find more 3D designs for printers on Bed leveling measurement tool. .