Begode Master Fairing and Bumpers
thingiverse
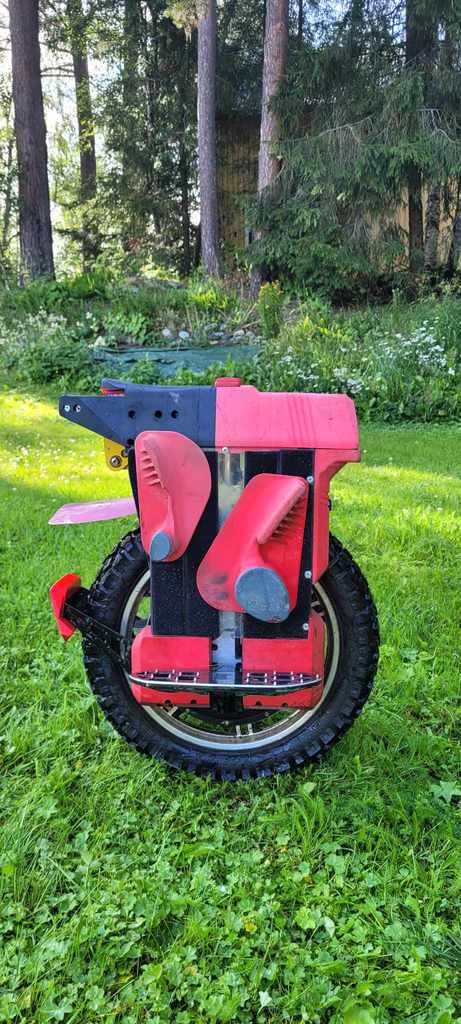
I just changed the looks of my Begode Master totally. https://youtu.be/PYBkNCLnr1k I wanted somewhere to mount my own power pads, (any power pads should fit) as well as lifting handles and bumpers. So... is just made a new seat as well while at it. Most is printed in soft TPU. I actually use softer than 95A, but that should work as well. A few parts is printed in PETG for a stiffer construction like the back lifting handle as well as a few stiffeners inside the bumpers. Some parts are glued on permanently, other parts fastened with velcro and/or screws. Parts marked with R (right) FR (front right) or BR (back right) must be printed in 2 versions. Original for the right side, and mirrored for the left side. Only files for the right side is uploaded. You will also need a few additional wooden screws as well as the original screws from the EUC seat and so on. Hints: 1... Display_cover (front part of the seat) must be printed standing nose down on the printer bed to fit on an ender3 as well as use as little support as necessary. 2 ...The Seat should be printed also with the front down. These two parts fit together and function best if glued together. 3... the back_handle support is to be printed in PETG or just cut out of 4mm polycarbonate or kydex. It is to be glued inside the slots of the seat to reinforce the back lift handle. 4... The back light is also printed in TPU, but high infill (50% or more). The original LED strip from the original back light should be fitted inside the printed one. 5... Back handle is printed in PETG (the round tube) and screwed into onto the seat with 4 wood screws. 6... In front of the batteries glue on 4mm polycarbonate or kydex. Print files missing as they are to long to fit my printer. do this BEFORE the lower bumpers. 7... The lower_bumper_plate can be printed in PETG, ABS, PLA or what ever, or like I did, cut from 4mm polycarbonate (or similar). 8... the lower Bumpers are glued on the battery boxes permanently with silicon with the lower_bumper_plate also glues on in between the soft bumper and the battery. To protect the battery case even more. 9... The side plate ribs are optional, but if the brake pads are mounted fas back, this will prevent the side plates to flex to much 10... SIDE PLATES to be cut out of 4mm polycarbonate (NOT acrylic as it shatters to easily), kydex sheets or similar. Drill a few holes for mounting with screws into the bumpers, display_cover and Front_handle. And some velcro to the batteries as well. bla bla bla bla.....
With this file you will be able to print Begode Master Fairing and Bumpers with your 3D printer. Click on the button and save the file on your computer to work, edit or customize your design. You can also find more 3D designs for printers on Begode Master Fairing and Bumpers.