Belt Driven Z-Axis for Kingroon KP3S
thingiverse
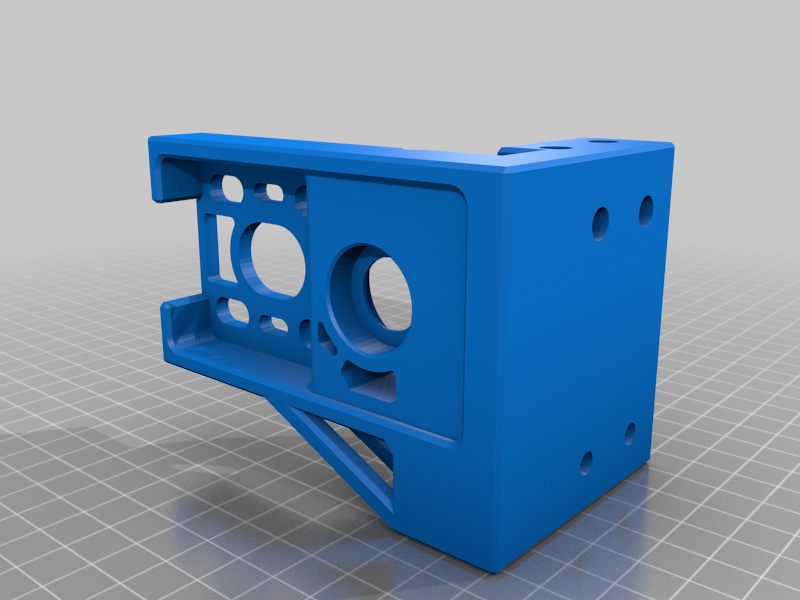
<b>July 25, 2022: After printing for a bit, the belt mod seems to work well. Still trying to figure out some vibration issues along my Y axis, which seems to be an unrelated issue.</b>  July 22, 2022: So I was able to fix both the Z axis dropping issue and incorrect Z movement issues by mimicking the Ender 3 belt driven mod. This made the design a lot more complicated but seems to be working. I'm still testing some prints to see how well this performs ~~I got around to testing this and there are a few large issues. The first is that the Z axis will drop when steppers are disabled. I will need to see if there are any solutions for this. Also, moving the Z axis 1mm moves way more than 1mm. Do not print the STLs now as there will be changes.~~ -------------------------------------------------------------------------------------------------------- This is based off of the Ender 3 belt driven mod by kevinakasam. My KP3S is one the newer ones that came with the titan extruder. I assume this mod would be compatible with the older ones assuming everything mounts the same. Be prepared to resquare your gantry as this involved unscrewing the bracket that holds the Z axis rail in order to remove the existing Z motor. A lot of instructions are similar to kevinakasam's video tutorial for the Ender 3 so check that out if you are not sure. <h2><b>BOM</b></h2>  <h2>Required Parts: (Work in progress)</h2> 1x Reuse Existing Z Motor <ul> <li><b>Motor cable connection</b> <i>(I ran my cable up the v-slot and used v-slot covers to keep them out of the way)</i></li> <li>1x 100cm Stepper Motor Cable (4pin to 6pin)</li> </ul> <ul> <li><b>Insert gear onto motor shaft</b></li> <li>1x 2GT 16 Teeth 5mm Bore Gear for 6mm belts</li> </ul> 1x Motor_Mount.stl <ul> <li><b>Mounting this to rail</b><i> (If you're having difficulties mounting with all 5 T-Nuts, you could get by with 4)</i></li> <li>5x M5x8mm screws</li> <li>5x M5 Washers</li> <li>5x M5 T-Nuts</li> </ul> <ul> <li><b>Insert bearings on both outer sides</b></li> <li>2x 608 ZZ Bearings</li> </ul> 1x MotorMountTensionerArm.stl <ul> <li><b>Mounting this to Z Motor</b></li> <li>2x M3 Nuts <i>(Inserts nuts first)</i></li> <li>4x M3x8mm screw</li> </ul> <ul> <li><b>Mounting this to Motor_Mount.stl</b></li> <li>2x M3x12mm Screws <i>(Don't tighten all the way until the closed loop belt is on and tensioned)</i></li> <li>2x M3 Washers</li> </ul> 1x ZDriveTensioningRing.stl <ul> <li><b>Directly screws onto MotorMountTensionerArm.stl</b></li> </ul> 1x 80TRingGear.stl <ul> <li><b>Insert and secure gear onto this</b></li> <li>1x 2GT 20 Teeth 8mm Bore Gear for 6mm belts</li>(Use pliers to remove the flange, then insert into thhe 80TRingGear, watch kevinakasam's ender 3 video for clarification. Tight fit, I had to use a rubber mallet to get it to fit.)</i> <li>5x M3x6mm screws</li><i>(To secure the gear)</i> </ul> 1x M8x80+mm screw or rod <i>(I recommend anywhere between 80mm to 100mm, easier to find rods at 100mm )</i> <ul> <li><b>Slide into Motor_Mount.stl through the bearings along with the below</b></li> <li>1x 2GT 20 Teeth 8mm Bore Gear for 6mm belts</li><i>(Hold this in place first before the 80TRingGear)</i> <li>1x 2GT 188mm Closed Loop 6mm Belt</li> <i>(Slide this on the gear on the motor shaft first, then slide in the 80TRingGear into the Motor_Mount and hold in place to slide the M8x70mm screw all the way through the 2GT gear and the washer on the other side, then put the closed belt on and tighten the motor with the ZDriveTensioningRing, then secure the Z motor.)</li> </ul> 1x Bracket.stl <i>(Keep note of the eccentric screw orientation when you remove the existing bracket. It needs to be the same with this bracket. Slightly file the hole if you are having difficulties getting it to fit)</i> <ul> <li><b>Mounting TensionerClampV3.stl onto this</b> <i>(Insert these nuts prior to mounting the bracket. A dab of super glue can help keep them in place)</i></li> <li>2x M3 Nuts</li> </ul> <ul> <li><b>Mounting Z Axis with POM wheels</b></li> <li>2x Bracket_Spacer.stl</li> <li>3x M5 Washers</li> </ul> 1x 2GT Open Synchronous Timing Belt 6mm Width, 1M Length <ul> <li>You'll need around 67cm, I don't have an accurate measurement, but cut more than you need and trim it from there</li> </ul> 1x TensionerClampV3.stl <ul> <li><b>Mounting to Bracket.stl</b></li> <li>2x M3x14mm screws <i>(Clamp on one end of the belt)</i></li> <li>2x M3 Washers</li> </ul> 1x Bottom.stl <ul> <li><b>Mounting pulley for belt onto this</b></li> <li>2x F623ZZ 3*10*4 mm Pulley Bearing</li> <li>1x M3x25mm Screw</li> <li>1x M3 Nut</li> </ul> <ul> <li><b>Mounting this to the rail</li> <li>2x M5x8mm screws</li> <li>2x M5 T-Nuts</li> </ul> <ul> <li><b>Mounting this to frame (Option 1)</b></li> <li>2x M3x8mm or 10mm screws</li> <li>2x M3 Washers <li>2x M3 Nuts</li> </ul> <ul> <li><b>Mounting this to frame with Motor_Slot_Cover.stl (Option 2)</b></li> <li>2x M3x6mm or 8mm screws</li> <li>2x M3 Washers</li> <li>2x M3x4.6x4.0 (M3xDxL) brass heat inserts <i>(I think you could substitute using 4 nuts and washers on the opposite end instead of heat inserts, and use longer screws, but I haven't tested)</i> </ul> 1x TensionerBlockV3.stl <ul> <li><b>Mounting this to Bracket.stl</b></li> <li>1x M3x25mm screw <i>(Secure the other end of the belt)</i></li> <li>1x M3 Washer</li> <li>1x M3 Nut </ul> (Optional) 1x 2040_Rail.stl for mounting generic top mount spool holders <ul> <li><b>Mounting this to rails</b></li> <li>2x M5x20mm screw</li> <li>2x M5x7.0x5.0 (M5xDxL) Heat Inserts</li> </ul>
With this file you will be able to print Belt Driven Z-Axis for Kingroon KP3S with your 3D printer. Click on the button and save the file on your computer to work, edit or customize your design. You can also find more 3D designs for printers on Belt Driven Z-Axis for Kingroon KP3S.