Bento Box
prusaprinters
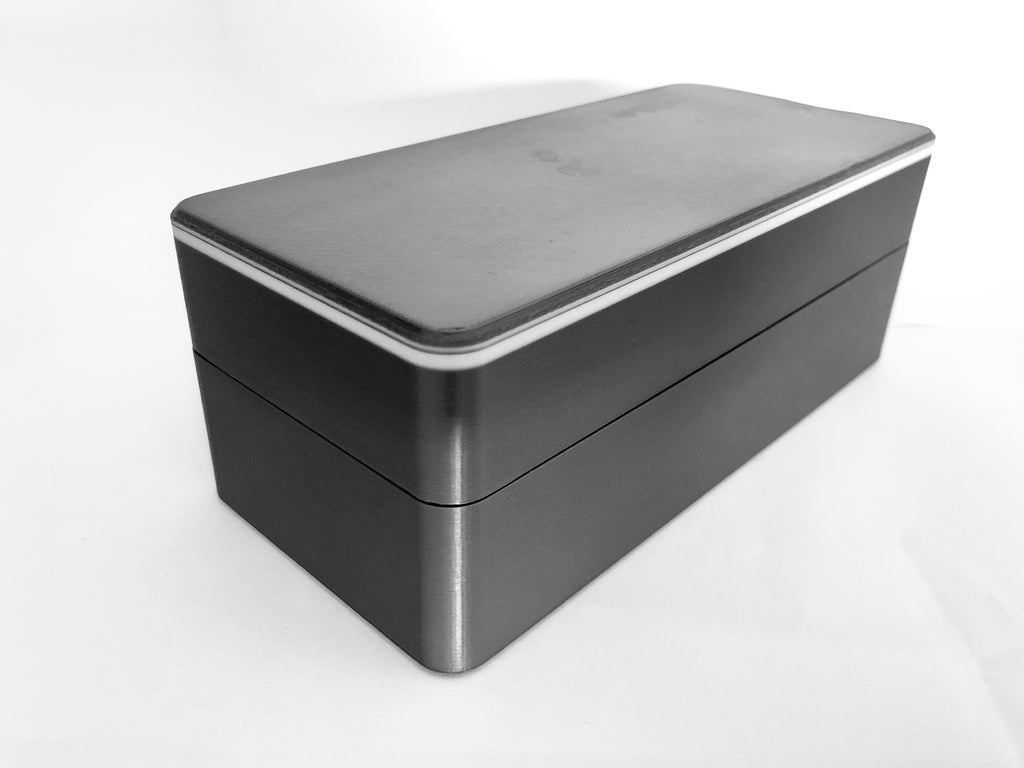
<p>Hello again!</p> <p>This time, I have designed a smart storage system based on Japanese Bento boxes.<br/> This bento box was designed to fit a 87W USB-C MacBook Pro charger and other accessories that I usually need to carry with me to my university. With this box and it’s modular design I an arrange them and protect them at the same time.</p> <p>The typical Japanese bento box has 1 or 2 floors and a top, so this box can have 2 floors (1 base and 1 middle section) or more, if needed (1 base and several middle sections).<br/> I have designed several variants of the same floors:</p> <ul> <li>“Base” and “Middle floor” are the modules that I have printed and shared on this post. They are the basic ones and have no static dividers.</li> <li>“Base_Small” and it’s variants are the basic “Base” module, but with the same hight as “Middle_floor”. It’s useful if you need a more compact set up.</li> <li>“Base_Tall” is another variant of the standard base, but this time featuring the size of a base and a middle flor. I t can be useful to carry bigger accessories like power banks or massive cables.</li> <li>“12” and “13” variants have static dividers. “12” variant have 1 divider, so you have 2 spare sections for your gadgets. “13” variant has 2 static dividers, which translates into 3 sections.</li> <li>“Divider” is a dynamic divider that you can move, add or remove to suit your needs. You can see them in my pictures. It’s designed to complement the modules that have no static dividers, but you can also add them to “12” and “13” variants if you want.<br/> In order to properly close the box, even though the floors fit nicely, you can use a silicone band or a fabric band in order to make sure that it is not going to open on the go.</li> </ul> <h3>Print instructions</h3><h3>Category: Organization Summary</h3> <p>Hello again!</p> <p>This time, I have designed a smart storage system based on Japanese Bento boxes.<br/> This bento box was designed to fit a 87W USB-C MacBook Pro charger and other accessories that I usually need to carry with me to my university. With this box and it’s modular design I an arrange them and protect them at the same time.</p> <p>The typical Japanese bento box has 1 or 2 floors and a top, so this box can have 2 floors (1 base and 1 middle section) or more, if needed (1 base and several middle sections).<br/> I have designed several variants of the same floors:</p> <ul> <li>“Base” and “Middle floor” are the modules that I have printed and shared on this post. They are the basic ones and have no static dividers.</li> <li>“Base_Small” and it’s variants are the basic “Base” module, but with the same hight as “Middle_floor”. It’s useful if you need a more compact set up.</li> <li>“Base_Tall” is another variant of the standard base, but this time featuring the size of a base and a middle flor. I t can be useful to carry bigger accessories like power banks or massive cables.</li> <li>“12” and “13” variants have static dividers. “12” variant have 1 divider, so you have 2 spare sections for your gadgets. “13” variant has 2 static dividers, which translates into 3 sections.</li> <li><p>“Divider” is a dynamic divider that you can move, add or remove to suit your needs. You can see them in my pictures. It’s designed to complement the modules that have no static dividers, but you can also add them to “12” and “13” variants if you want.<br/> In order to properly close the box, even though the floors fit nicely, you can use a silicone band or a fabric band in order to make sure that it is not going to open on the go.</p> <h3>Print Settings</h3> </li> </ul> <p><strong>Printer Brand:</strong> Prusa</p> <p><strong>Printer:</strong> i3 MK3</p> <p><strong>Rafts:</strong> No</p> <p><strong>Supports:</strong> Yes</p> <p><strong>Resolution:</strong> 0,2mm</p> <p><strong>Infill:</strong> 10%~20%</p> <p><strong>Filament:</strong> [ Prusa PLA ] Grey<br/> <strong>Notes:</strong></p> <ul> <li><p>Total Print Time:</p> <ul> <li>Floors: 2h and up<ul> <li>Dividers: 30min</li> </ul> </li> </ul> </li> <li><p>Print Dividers at 100% Infill</p> <h3>How I Designed This</h3> <p>Designed in Fusion360, sliced in Slic3r PE</p> <p>Here are the links to the Fusion360 Files!</p> </li> <li><p>Base<br/> <a href="https://a360.co/2I4eEC6">https://a360.co/2I4eEC6</a></p> </li> <li>Base 12<br/> <a href="https://a360.co/2zmZNQy">https://a360.co/2zmZNQy</a></li> <li>Base 12<br/> <a href="https://a360.co/2xueksh">https://a360.co/2xueksh</a></li> <li>Base Tall<br/> <a href="https://a360.co/2xw0JAD">https://a360.co/2xw0JAD</a></li> <li>Base Small<br/> <a href="https://a360.co/2Dn2BkG">https://a360.co/2Dn2BkG</a></li> <li>Base Small 12<br/> <a href="https://a360.co/2PWA4nj">https://a360.co/2PWA4nj</a></li> <li>Base Small 13<br/> <a href="https://a360.co/2PTDTJS">https://a360.co/2PTDTJS</a></li> <li>Middle Floor<br/> <a href="https://a360.co/2xveBLn">https://a360.co/2xveBLn</a></li> <li>Middle Floor 12<br/> <a href="https://a360.co/2zmHzOS">https://a360.co/2zmHzOS</a></li> <li>Middle Floor 13<br/> <a href="https://a360.co/2NxgLUY">https://a360.co/2NxgLUY</a></li> <li>Divider<br/> <a href="https://a360.co/2xpYqPB">https://a360.co/2xpYqPB</a></li> <li>Top<br/> <a href="https://a360.co/2zlNp3d">https://a360.co/2zlNp3d</a></li> </ul>
With this file you will be able to print Bento Box with your 3D printer. Click on the button and save the file on your computer to work, edit or customize your design. You can also find more 3D designs for printers on Bento Box.