Bicycle Handle Bar Mount for 1/4
thingiverse
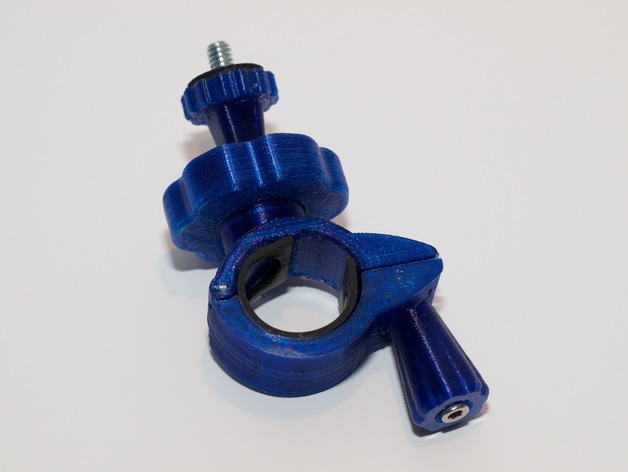
Designed to replace a store-bought handle bar mount that could support a device w/a 1/4"-20 threaded nut. After buying 2 of them and having both of them break on me, I decided it would be fun to recreate the mount but make a few improvements, which include: Reinforcing the areas that were susceptible to breaking because they had very thin walls. Increased the size of the thumbscrew that tightens the ball-joint to make it easier to adjust the angle and un/tighten. Instructions Print all the parts once. Use this info as a guideline: Print each in the orientation in the STLs. Top Mount will need support. Make sure to add support to the arch and the area around the joints. Ball Joint will need either: manual supports (Simplify3D), a raft, or a brim in addition to supports to keep it from popping off the plate. Use 3 shells and at least 30-50% infill. The big thumbscrew needs at least 50%. I used PETG plastic for a stronger/heat resistant part. It'll print well in PLA and can be strong... just won't hold up over hours of hot TX summer heat. Build of Materials 1 1/2" section of 1/4"-20 threaded rod (I dremel'd off the head of a 1/4"-20 screw) 2x 1/4"-20 nut (1 is just used for assembly) M4x40 socket head screw 2x M4 nut 1/16" nail or rivet - cut to 24mm Gorilla glue a 1" wide strip of rubber to use on the handle bars to restrict the mount from slipping. Assemble Clean up the ball on the ball joint part by removing all support material. Don't worry about making the bottom of the ball perfect. Don't over polish/smooth the ball. Some friction is required to allow it to be locked in place. Take the 1/4"-20 threaded section and add 2 nuts on the end that will be exposed for mounting a device. Tighten the 2 nuts against each other to lock them in place. This will give us leverage to get the threaded rod screwed in. Add some Gorilla glue inside the top of the ball joint that will receive the 1/4"-20 threaded rod. This will be used to lock the threaded rod in place. Screw the threaded rod into the top of the ball joint. Use the 2 nuts to tighten the rod all the way down the hole (12mm). Set aside and allow to dry. With the smaller thumbscrew, add a small amount of gorilla glue along the outer wall of the hole for the nut. Place the nut in the hole and tape it down (or put a weight on the thumbscrew/nut. Gorilla glue foams to conform to the area it's bonding, so you need to keep the nut from being pushed out. Set aside to dry. Join the top/bottom clamp pieces. Take the 24mm length of nail/rivet and insert thru holes in joints. Use a 1/16" drillbit to clean the holes to make it easier to insert. Insert one M4 nut into the top opening on the Top Clamp. Insert the other M4 nut on to the top of the knob. Insert the M4x40mm screw thru the Knob and tighten to M4 nut. Insert the completed knob thru the bottom part of the clamp to tighten with the top clamp. Once the ball joint is dry, remove the 2 nuts from the threaded rod. Loosen them against each other to remove. Carefully (very carefully) insert the ball joint into the top post on the clamp. This is a very tight fit which will require a slow/delicate insertion so you don't break the threaded walls. The walls will flex out a bit to allow the ball to seat fully in place. Insert the large thumbscrew over the ball joint and tighten. It might be easier to add a lubricate to the thumbscrew before tightening to help against plastic-on-plastic friction. Add the small thumbscrew to the threaded rod. Additionally, I glued a small round piece of rubber to the top of the smaller thumbscrew to help in keeping things from moving.
With this file you will be able to print Bicycle Handle Bar Mount for 1/4 with your 3D printer. Click on the button and save the file on your computer to work, edit or customize your design. You can also find more 3D designs for printers on Bicycle Handle Bar Mount for 1/4.