Bicycle light battery case
thingiverse
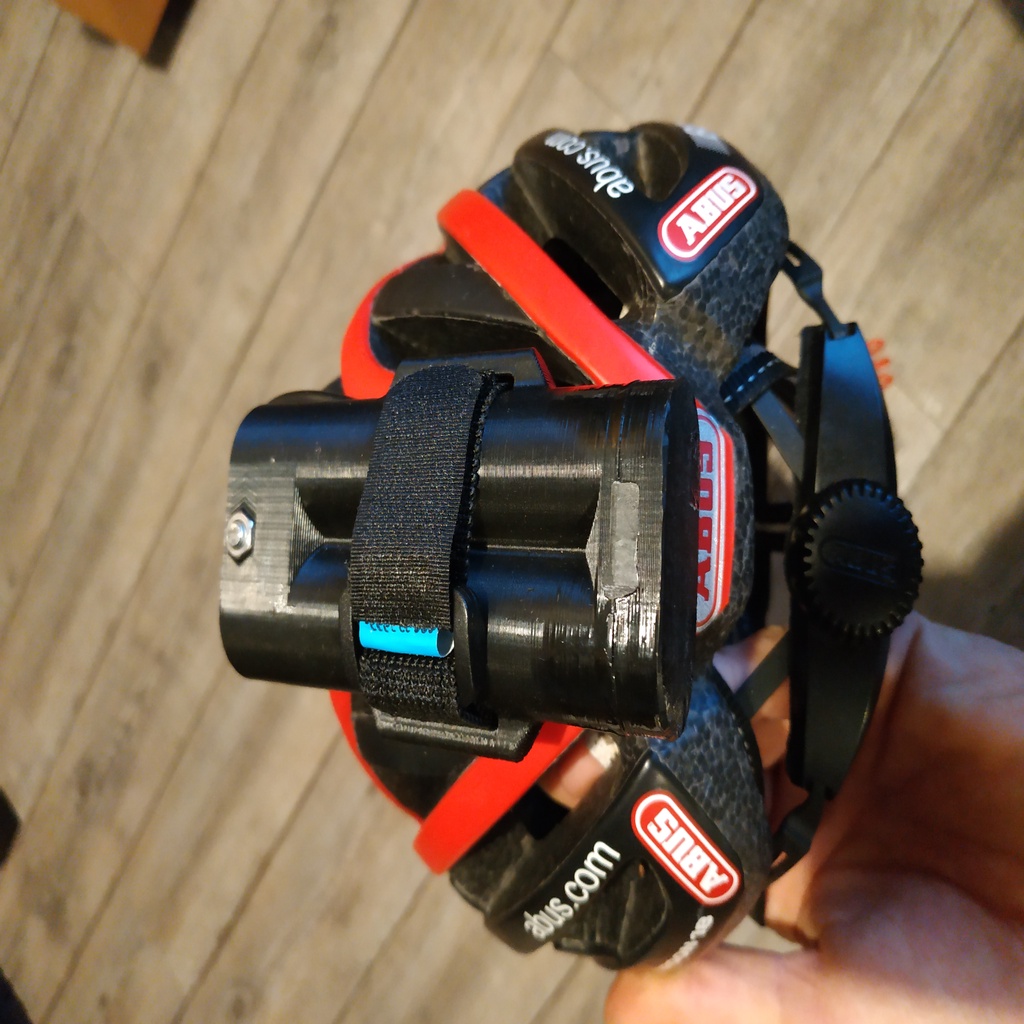
There are many cheap and very bright headlights on the market, but most of them come with a battery of poor quality. At the same time high quality 18650 Li-Ion cells are easily available and widely used, yet rarely found in form of separate cells in end user products. Here I present a battery case that allows to replace the cells on the go, which gives you the opportunity to easily carry energy for several nights, at very low cost. The use of protected cells is highly recommended, the cells can be taken out of the case and charged separately in a universal charger. I provide a “package” of 3D-print parts (battery case, different case mounts), that can be assembled with some additional parts (battery connectors, cable, plug). Together with 18650cells, a charger and some headlight it builds a high end MTB light bundle. The battery pack provides an output voltage of 6.4 to 8.4V. It has to be used with an appropriate headlight (most headlights with this connector work on this voltage). --- Case: The case consists of three parts: Bottom and main part that get glued together and the removable lid. First the female end of the cable is cut to ~300mm (or what you prefer) and the cut end is threaded through the main part's hole pointing to the bottom part. Then each of the wires is soldered to positive (truncated cone - red wire) and negative (spring – black wire) contact respectively. The contacts' connectors should be bent backwards, so that the soldered connection can fit in the bottom part's slot. Ripping off the cable's insulation at a distance of 30mm overall and stripping the wire at the last 10mm works well. Then glue the battery connectors to the bottom part; make sure they are centered and glue main and bottom part together. Cable should be properly glued to the case (stress relief). I used 2K epoxy resin. In the lid, positive and negative connectors are shorted (series connection of cells). Solder positive and negative connector together and glue them to the lid. Connectors seat has a tight fit, it might help to cut the connectors edges slightly, if the “double-connector” doesn't fit. Glue a M4 screw into the knob and the M4 nut in the slot of the battery case. Parts to order: Cable: female connector (5,5mm x 2,1mm DC jack, watertight and lock-in plug) + min. 300mm of 20 AWG cable http://kaidomain.com/S024776-5_5mm-x-2_1mm-Male-to-Female-20AWG-Extension-Cable-100cm-Length Connectors: 18650 cell connectors with 16x16,5mm base and rounded edges (see picture, as “18650 connector” everywhere on eBay/aliexpress) Screw: M4 hex screw (min. 26mm) and M4 hex nut Velcro strap: 20mm width and ~200mm length for fixation on the mount. Drone battery straps work well: https://www.banggood.com/5PCS-Banggood-Battery-Tie-Down-Strap-for-RC-Multirotor-p-1067255.html?cur_warehouse=CN Parts to complete the bundle: Protected 18650 cells: I use Panasonic NCR 18650B Protected 3400mAh (Green) cells (protected from short circuiting, overcharge, and undercharge). A very good overview can be found here: https://lygte-info.dk/review/batteries2012/Common18650comparator.php and https://lygte-info.dk/info/batteryIndex.html. The case is designed so that even the very long protected cells (up to 70.5mm) fit inside. Charger: A good overview is given here: https://lygte-info.dk/info/indexBatteriesAndChargers%20UK.html. I use the LiitoKala Engineer Lii-500. --- Mounts: I provide three mounts for flat surfaces/tubes, for positioning parallel to a tube with some space (i.e. half below the stem clamp on a handlebar) and for positioning at 90° angle to a tube. All mounts are fixed to the frame with two cable ties and the battery can be fixed on the mount with a non-elastic Velcro strap (mount and velcro stay fixed, battery easily changeable). --- All parts should be printed in ABS. The case needs to be printed with 100% infill, the mounts can be printed at 50%, but some solid outer layers are recommended. Unfortunately, the production procedure is quite laborious. Especially the dovetails between main and bottom part of case often need to be cleaned. Besides that, it is challenging to assure a proper gluing that guarantees a decent fit of connectors and batteries. Any remark/suggestion for improvement is welcome.
With this file you will be able to print Bicycle light battery case with your 3D printer. Click on the button and save the file on your computer to work, edit or customize your design. You can also find more 3D designs for printers on Bicycle light battery case.