BigTreeTech TFT43 Case for Creality Ender 5 Plus (laser cut)
thingiverse
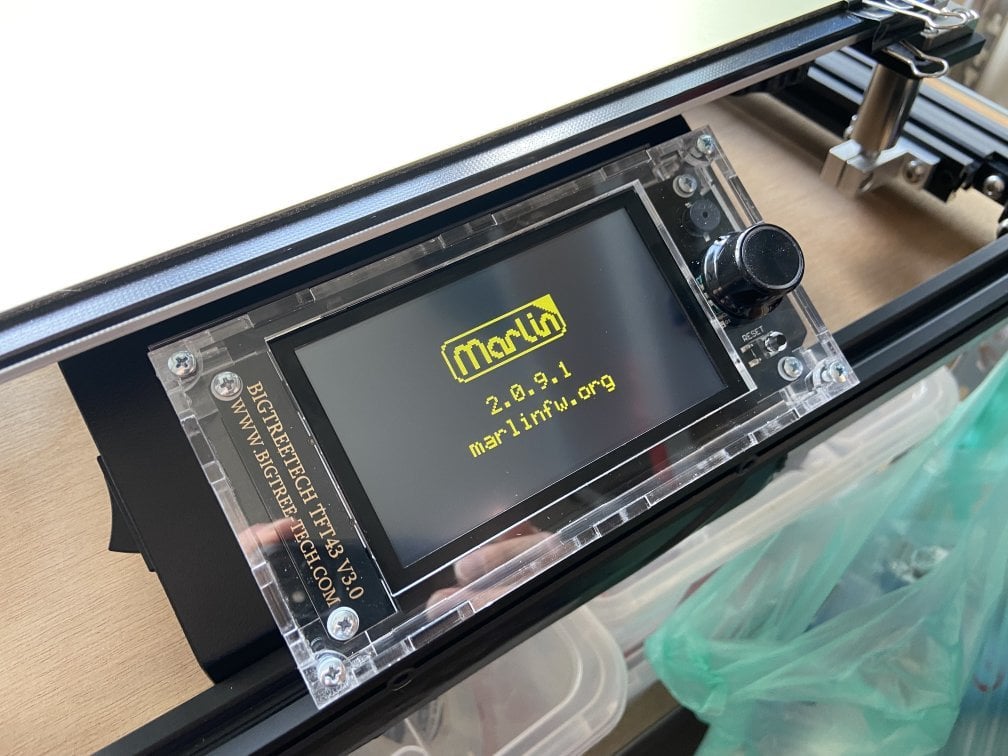
This is a laser cut acrylic case out of 3mm acrylic for the BigTreeTech TFT43, to fit the Ender 5 Plus case. No destructive action needed to your printer or its case! It just snaps cleanly into the original screen window. This may or may not fit other Creality models with the same slanted touch screen interface layout. Check if the window cutout is 96.2mm * 54.2mm. Below the bottom edge, you should have at least 35.1mm of clearance straight along the slanted front face of the printer case before you hit the 2020 aluminium bar. When in doubt, first cut mockups out of cardboard or some other cheap material - that's what I did! You'll need: - A sheet of 3mm acrylic (aka PMMA, Plexiglas, Plexi etc.) - A laser cutter that can cleanly cut the material (even small diode type lasers should be able to do this job) - 8x metric M3 screws (6mm length under the head is a perfect fit, but there's room for quite a bit longer screws in the design) - Glue for acrylic, ideally UV curing Build instructions: 1. Glue the case latches into the slots on the back of the rear plate, paying close attention to their alignment. The RS232, EXP1 and EXP2 ports should be aligned with the cutout in the rear plate, see the picture. 2. Then, glue the side panels in place along with the PCB brackets (which go into the small slots near the corners. Pay attention to the direction of the USB port cutout. 3. Lastly, glue on the corner brackets. 4. Let glue set fully 5. Run a 2.5mm drill through the screw holes to clean them up, then tap M3 threads 6. Clean up and remove any protective film that you didn't already remove for gluing Assembly: 1. Remove the original touchscreen from your printer. 2. Feed the display cables through the hole in the case assembly, then snap the case into the Ender 5 Plus case's screen cutout. It should snap in with all six latches and have little to no play. 3. Connect the TFT43 screen and test whether it still works before you continue. 4. Mount the TFT43 PCB using four M3*6 screws. 5. Remove the dial knob from the rotary encoder. Snap in the front acrylic plate, and fasten with four more M3*6 screws. Place the knob again. SolidWorks files included for remixing/change purposes. I also included my LightBurn project file, if you're a LightBurn user this should make it really easy to cut - don't forget to adjust speed, power and kerf compensation for your machine though! Known issues: - The USB port cutout only fits relatively small cables. A chonky USB stick won't fit - use an extension cable. This is by design as I didn't want to have a large hole that would allow hot PSU exhaust air to be blown through; I want as much as possible of that air to be blown out the sides of the case. - The reset button is ever so slightly misaligned in relation to the hole in the front panel. Frustratingly, BTT specified the vertical positioning in their engineering drawings but not the horizontal... I may or may not fix this and cut another front panel depending on how well my OCD ends up coping with this - The reset button protrudes a bit from the case, so be careful when turning the know that you don't accidentally hit it. I suggest cutting/sanding off a bit of the reset button to make it sit flush with the panel; you'll still be able to consciously press it when needed, but you won't hit it accidentally anymore.
With this file you will be able to print BigTreeTech TFT43 Case for Creality Ender 5 Plus (laser cut) with your 3D printer. Click on the button and save the file on your computer to work, edit or customize your design. You can also find more 3D designs for printers on BigTreeTech TFT43 Case for Creality Ender 5 Plus (laser cut).