Mod anet a6 Y-Axis mgn12
thingiverse
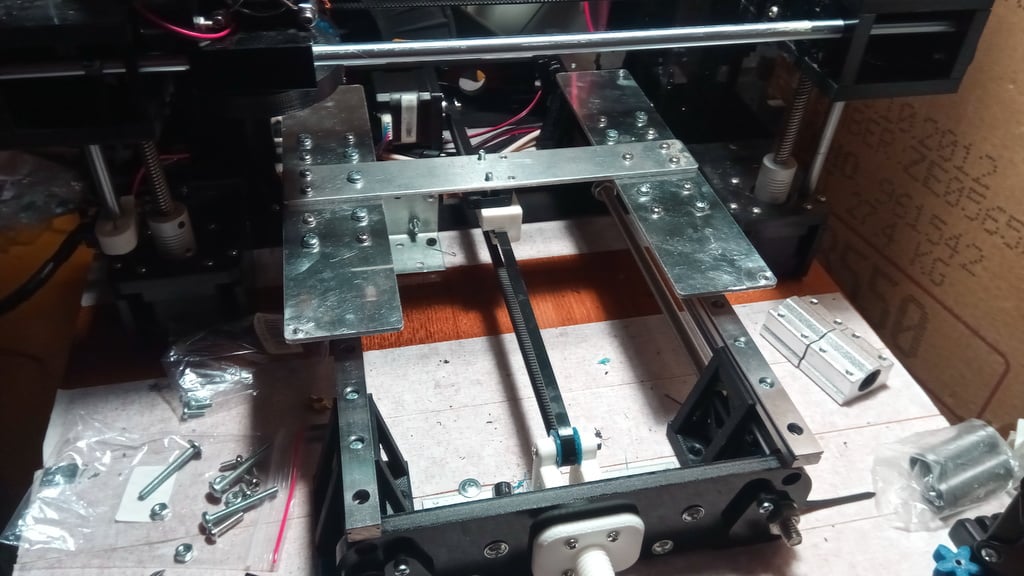
ВНИМАНИЕ! модели делались в тинкеркаде, при проверке в repetier-host выяснилось что имеют дефекты. Но распечатались из Simplify3d нормально. в данный момент работаю над исправлением. кронштейны натяжителя ремня оси Y немного модифицировал. я убрал лишнее, чтобы колесо вращалось свободно. усилил пазы для гаек с одной стороны. теперь гайки не вываливаются насквозь при установке и немножко добавилась прочность этого узла. крепление ремня теперь позволяет ремню дать ровное натяжение. models were made in Tinkerkad, when checking in the repetier-host it turned out that they had defects. But printed out from Simplify3d is fine. I'm currently working on a fix. Сваял на скорую руку опоры для перехода на рельсы MGN12H принтера Anet A6. для установки необходимо иметь винты М3х12 и гайки с нейлоновым кольцом (самоконтрящиеся) М3. Опоры скручиваются с рельсой и встают поверх вала и шпильки, не разбирая принтер. так будет соблюдена прямолинейность. После установки всех опор и рельс, собирается стол, на таком адаптере. https://www.thingiverse.com/thing:2877621. проверяется плавность хода и прикручиваем опоры к доске. Y Датчик стола откручиваем с кронштейном, прикручиваем к кронштейну с другой стороны, и крепим его в дырку от заслонки вала (на фото видно) Так как стол стал выше, пришлось доработать крепеж ремня к столу чтобы выровнять линейность ремня. Крепить болтами М4*35 2шт, М4*45 2шт. необходимо: рельсы MGN12H(400mm) 2шт. дополнительные каретки болты М3*12 8шт болты М3*8 16шт болты М4*8 16шт гайки М3 16шт гайки М3 с нейлоновым кольцом самоконтрящиеся 8шт. болты М4*35 2шт, М4*45 2шт. В ближайшее время планирую сделать ось X тоже на рельсе mgn12. Следите за проектом. He hastily made supports for the transition to the MGN12H rails of the Anet A6 printer. for installation, you must have screws M3x12 and nuts with a nylon ring (self-locking) M3. The supports are twisted with a rail and stand on top of the shaft and the studs, without disassembling the printer. so straightforwardness will be respected. After installing all the supports and the rail, the table is assembled, on such an adapter. https://www.thingiverse.com/thing:2877621. check the smoothness and fasten support to the board. Y We unscrew the sensor of the table with the bracket, fasten it to the bracket on the other side, and fasten it into the hole from the shaft damper (seen in the photo) As the table became higher, it was necessary to modify the belt fastener to the table in order to align the belt linearity. In the near future I plan to make the X axis also on the rail mgn12. Follow the project. Y-belt tensioner brackets slightly modified. I removed the excess so that the wheel rotates freely. strengthened grooves for nuts on the one hand. Now the nuts do not fall out during installation and the strength of this knot was added a little. fastening the belt now allows the belt to give even tension. it is necessary: MGN12H rails (400mm) 2pcs. additional carriages M3 * 12 8 bolts of piece M3 * 8 bolts 16 pieces M4 * 8 bolts 16 pieces M3 nuts 16pcs M3 nuts with nylon ring self-locking 8pcs. M4 * 35 bolts 2pcs, M4 * 45 2pcs.
With this file you will be able to print Mod anet a6 Y-Axis mgn12 with your 3D printer. Click on the button and save the file on your computer to work, edit or customize your design. You can also find more 3D designs for printers on Mod anet a6 Y-Axis mgn12.