BIQU H2 complete Kit for B1 dual 4010 Fan - V1
thingiverse
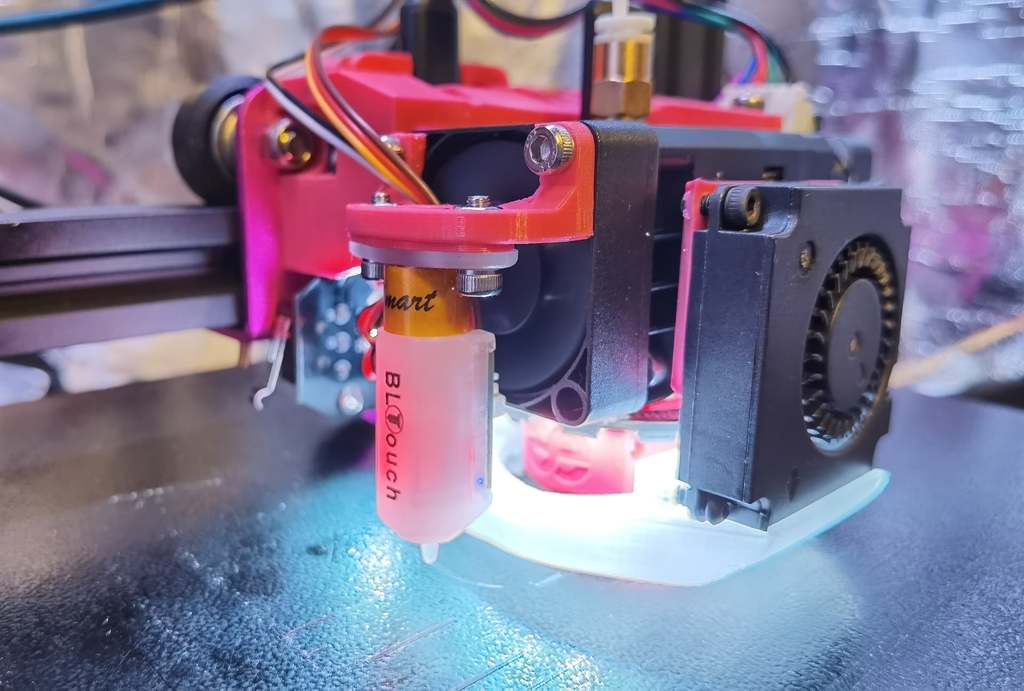
I am working on ah V2 right now, with ah Single 4020 Fan, as see ah little bit of an issue that the nozzle is so far away from the X Axis... i don't like it, but then there is no change to fit ah 2nd Fan somewhere between PCB and Extruder... i tried a few things, one of my ideas is also to but the 2nd 4010 under the extruder in eh steep angle... but as i almost just print PETG, ABS/ASA i almost don't need cooling... so stay tuned for the V2 Version with single 4020 Blowerfan and even way more compact design! here you can get my single4020 fan design now: https://www.thingiverse.com/thing:4757657 i still leave this online, as somebody would like too use the dual fans, its still a very viable soutions, just make sure you print the mount with extra strengthness in mind, so that means, "connect infill lines" and gyro infill not a good %-amount of it! THIS IS STILL in BETA Status and Work in Progress... i've started printing the mounts right now, but need to setup my enclouse first to print the fanduct intransparent ABS so haven't tested the fit completly!) Complete Mount with Fan Duct and bltouch mount for the new Biqu H2 Direct Extruder on the Biqu B1 printer! i liked the idea of the stock B1's dual fan Design, and also saw an additional fan duct design here on Thingiverse (i've also used the idea from this parts for my own, but basically have modified almost everthing: https://www.thingiverse.com/thing:4682915) the base mount for the extruder itself is also a remixed version of the "officially" released one from biqu from their homepage (https://www.bigtree-tech.com/help/download) basically the original mount has also many issues, the nozzle is not centered, the level from the extruder collides on the top of the extruder, etc... so did a lot of work redesigning the mount, extended it to fit the 4010 fan between extruder and hotend PCB and also changed the mount position so that the nozzle is as close as possible centered from the carriage, else i guess you cant use the full printbed volume anymore... as the nozzle sits to far left and you cantprint anymore on the far right of the bed! the bltouch mount is also a remixed version of the famous mount for the stock printhead (https://www.thingiverse.com/thing:4564987) just changed the screwholes and fitted it a little bit better the 3510 fan on the side of the extruder... i would like to had the bltouch also inbetween the extruder and hotend pcb hat there is just not enough space, so downside of this is that there will certainly ah region on the far right of the bed that can't be probed... but all other possitions of the bltouch would make it even worse, its just the best we can get,sorry! both fans can be screwed into the extruder with one screw directly, you might have to widen the hole from the fan little bit! the 3 (just 2 on the sandwitched fan) other screwholes i've designed as "self tapping" holes, just use the screws from the stock fans, should have enough grip! btw: if you import the models in Cura and they are toooo big, then its because the dimensions are scaled wrong... sadly i cannot scale the models down in fusion360, idk... and i've to scale it either with Windows 10 3d Builder after the STL export, but sometimes i just forget about it... but basically you just can scale the models in Cura too to just 10% and then they have the correct dimenson! What you need todo the swap now? (re)use the stock (or allready swapped 4010 fans) reuse the stock heater cartridge with the short cable (or buy "b1" heater cartridge with short cable as spare and use this) for the thermistor i would suggest to shorten the cables, as you can't reuse the b1 stock, at the H2 Hotend needs an cartridge style thermistor! for Stepper connection, either use supplied stepper cable and route into the B1 case, or what i did was, I've ordered B6B-PH-K-S JST 6-pin connectors and soldered that to the shortend supplied cable with the h2 kit and just extended the b1 stock extruder stepper cable.... with that i'm able to "quickly" switch between hotends, though i have unmounted the stock feeder and stepper because of the dead weight of course... I am using Lukes UBL Firmware, though you might need to make some changes to the source code, as the 3 point probing does not work correctly... i've disabled the 3point probe points defines, and just set the PROBING_MARGIN_BACK to 20 and you just need to set the Probe Offset correctly! My Offset (with 1mm BLTouch spacer) is: X -35 / Y -12,5 / Z -2 (you need to check Z before first print!!) you also need to set the Home offset, as the nozzle sits a little bit more to the front then the stock nozzle! You can do this with M206 or just set it with the machine parameters (in latest tft firmware there should be an option to change Home offset) and give Y an -12(.5) ... Another issue i had on ah 1st layer print test... the fanduct (as it is verry very low) collided with the Bed connector on the far left back edge... so make sure that doesn't stick up over the Bed! both the self printed one, and also the stock connection clamp on the new batch machines is too high! so either unscrew the top cover, and print it lower.. just acommodate this when you print in the far corner!
With this file you will be able to print BIQU H2 complete Kit for B1 dual 4010 Fan - V1 with your 3D printer. Click on the button and save the file on your computer to work, edit or customize your design. You can also find more 3D designs for printers on BIQU H2 complete Kit for B1 dual 4010 Fan - V1.