Bird Feeder with Wifi Camera (Wyze OG)
thingiverse
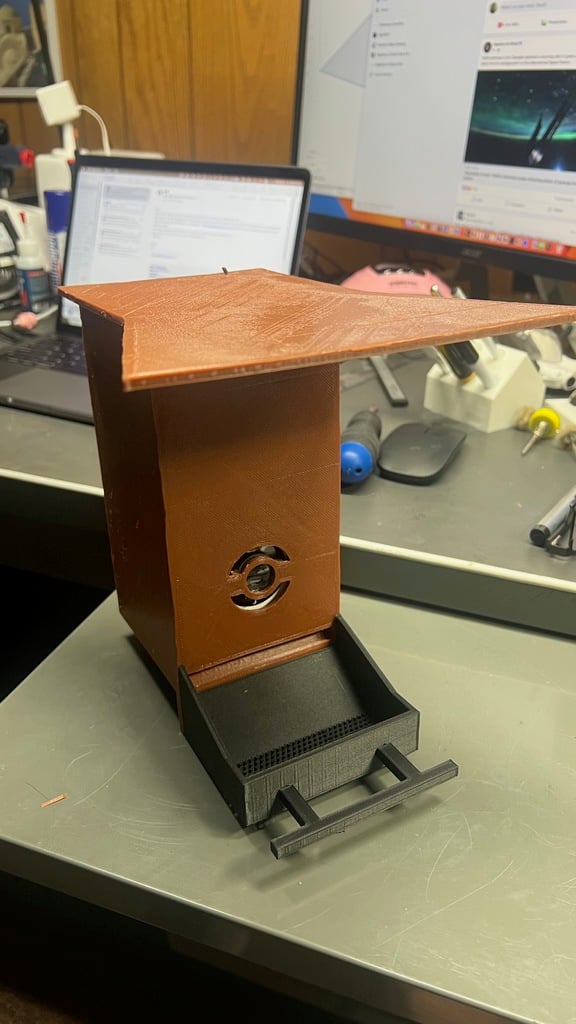
You can buy camera bird feeders for close to $100. This one cost less than $40 with the camera, and has a larger feed capacity than the ones I've seen online. You can modify this to make it taller if needed. I'm still trying this out with actual birds. It works pretty well, but I may redesign the roost to raise the perch a bit to get the smaller birds better centered. (as of 3/2/23) Update: I designed a new trayer, Taller Tray, that raises the floor of the try about 1/2 inch and raises the roost another 1/2". This puts the birds better in the frame for viewing. The smaller birds just land on the edge of the tray so the roost isn't necessary for smaller birds. This bird feeder that uses an off-the-shelf Wyze OG wifi camera to get close-up pictures of the birds. The Wyze OG is currently $20, which is a good deal. It has night vision, a light that you Other cam feeders I've seen on here also use Raspberry Pi and build the camera, but for $20 I couldn't be bothered, and this has the app and everything ready to go. You can view live or have it be motion-activated, and it will record any motion-activated events as a picture for later viewing, or will record video if you use an SD card. The app is easy to use. The camera focuses to far away to be useful, however. So it needs some corrective optics. You need a lens that is 20x magnification and about 20-25mm in diameter. I used a rotary tool with a cutting wheel to get the lens out of this $10 loupe https://a.co/d/8JmiFF1 from Amazon. This will give a focal range of about 1 to 4 inches in front of the camera. I printed this from PETG for all of the parts except the tray and roost. PETG holds up better outdoors than PLA, but was too stringy to print the tray with the drainage grid/holes, so I used PLA for that (easy to print another if it deteriorates). If you're putting it somewhere under cover, I wouldn't bother with the PETG, it was a pain to get to print. I used screws to combine the parts, and tapped the holes. Holes are sized for 8-32 screws, and countersunk. You don't really need a tap, you can cut the threads just by screwing in the screw, but it's a little harder to get it screwed in. You could also glue it together. For the hinge, I use a length of coat hanger wire, bent at one end. it stays in place on its own but you could glue it in. I made spaces for three sets of 12x3mm rare earth disc magnets to hold the lid closed, but only used two of the pairs (wasn't sure how much strength they would have but two was plenty). I superglued them in place, and the holes are sized to be a tight press fit. It mounts to a flat surface (or post) via the hole on the tab in the bottom (which may not be necessary) and the hole in the center of the back piece toward the top. If you screw the assembly to the mounting surface before you put the roof and hinge in place, it's easier to get it mounted. The camera is easy to pair with the Wyze app, and all you need to do is power it wherever it's mounted with a micro USB plug that connects to the camera. Happy bird hunting!
With this file you will be able to print Bird Feeder with Wifi Camera (Wyze OG) with your 3D printer. Click on the button and save the file on your computer to work, edit or customize your design. You can also find more 3D designs for printers on Bird Feeder with Wifi Camera (Wyze OG).