Bits from Bytes 3DTouch rebuild
thingiverse
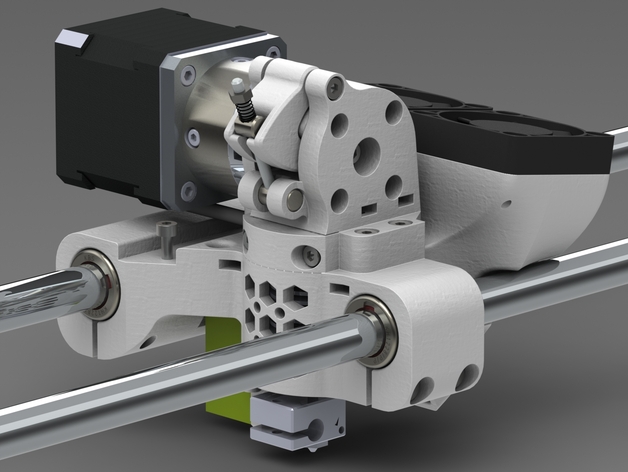
I'm rebuilding my Bits from Bytes 3DTouch printer. The 3D Touch printer was never any good to begin with, and then 3D Systems bought BfB, making everything even worse! I want to reuse as much of the hardware as possible but make it open-source. I am posting this as I do the rebuild, so expect updates and changes when I realize I've messed things up. If you choose to undertake this rebuild, you do so at your own risk. I can't guarantee that you will be able to put your 3DT back in its original order. Some of the parts in this rebuild may require access to a lathe and mill. The proprietary BfB controller will be replaced with a X4 Smoothieboard. A heated bed will be added. BfB extruders/hot ends will be replaced with a 1.75mm E3D-V6 direct drive. A proximity switch will be used for bed leveling. PART 1: The first parts I'll post here are the new extruder carriage and the extruder/hot end mount. I'm reusing the original 12mm rails and their mounts, so the carriage is modeled with an 82mm center-to-center distance in mind. You might notice that the actual center-to-center distance of the part "CARRIAGE" is actually 82.4mm. This is to compensate for the squeezing of the part when the bearing clamps are tightened. The linear bearings of the 3DT were reused (2 on back rail, 1 on front). The bearings need to be pressed out of the original aluminum housings. Do this carefully so as not to damage the bearings. A hydraulic press or a bench vise can be used with an appropriate arbor. This part of the build requires M3 & M4 bolts of various sizes and suitable nuts (I won't give detailed fastener descriptions, as I just used what I had lying around... make it work!). I used a NEMA 17 stepper motor with a planetary gear reduction. I disassembled the planetary drive, removed the output shaft, and then turned the length of the shaft down so that the end was 3.5mm off the face of the planetary gear housing (see picture). I then drilled and tapped the shaft for an M3 bolt. I sandwiched an 8mm M3 threaded hobbed gear (http://tinyurl.com/hvysjsp) between two 623-ZZ bearings and fastened it to the output shaft with a 20mm M3 bolt. I used Loctite to ensure it wouldn't come loose from the shaft (don't get Loctite in the bearing!). The opening in the EXTRUDER for the bearing/hobbed gear assembly needs to be reamed to 10mm (use a 10mm drill bit or preferably a reamer). The hinge/compression pin assembly consists of: A 6mm dia. 16mm long steel pin, drilled and tapped to M3. A 6mm dia. 7mm long steel pin, drilled to 3mm clearance. A 3mm dia. 35mm long threaded rod. A 3mm nut. An appropriate compression spring. I WILL ADD MORE INFORMATION SOON. IF YOU HAVE QUESTIONS, JUST ASK... NOTE: I've added a SolidWorks Pack&Go zip file for those who want it. However, keep in mind that this was still an early prototype when I abandoned it. The SolidWorks assembly has some issues, so make sure you check carefully before adapting it to your use.
With this file you will be able to print Bits from Bytes 3DTouch rebuild with your 3D printer. Click on the button and save the file on your computer to work, edit or customize your design. You can also find more 3D designs for printers on Bits from Bytes 3DTouch rebuild.