Bladeless Fan
thingiverse
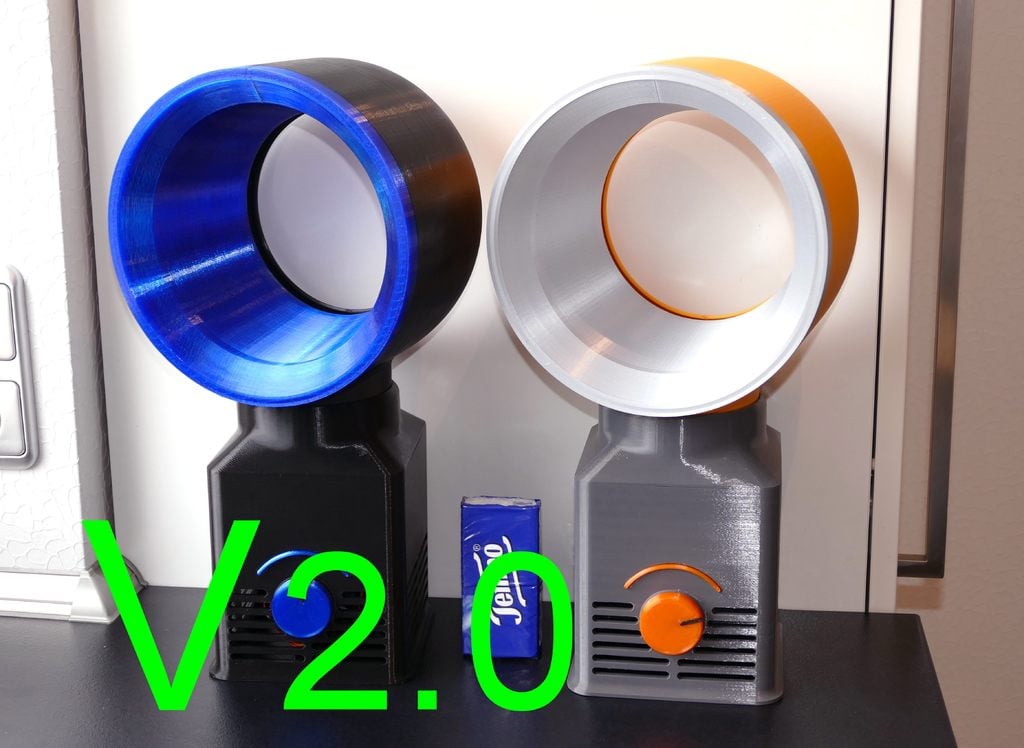
English I have completely revised the following bladeless fan : https://www.thingiverse.com/thing:2685544 Additionally I have integrated a customized FanBooster from this link: https://www.thingiverse.com/thing:3009239 - For printing this bladeless fan version 2 you need this files: bases.stl new_Innertube_big_V2.stl Trichter.stl Haube_big.stl FanBooster40mm.stl bottomplate.stl crossBar.stl Knopf.stl Segment.stl Zeiger.stl - To improve an already printed Version you need: upgradeV2_Ring_inside.stl UpgradeV2_Ring_8mm.stl FanBooster40mm.stl +++++++++++++++++++++++++++++++++++++++++++++++++++++++++++++++++++++ - Update 2.0 : By changing the inner tube (shortening the length by 7.5mm) the gap for the air outlet in the ring has been increased considerably. Now an adapted 40mm high FanBooster was used. This together increases the maximum air speed at the bladeless fan outlet by about 50%. For already printed units I designed an Upgrade 2.0. It also contains the new FanBooster and two plastic rings that move the inner tube 8mm forward, which also improves the air outlet significantly. Alternatively owners of version 1 can print a new V2 Innertube. +++++++++++++++++++++++++++++++++++++++++++++++++++++++++++++++++++++ I have reworked the basic case a lot, among other things so that it is easier to print and requires less support. It can now hold a 6mm switching potentiometer and has space for a 40mm high fanbooster above the fan due to the increased height. As drive I use a 120mm Sunon fan with 25mm thickness and 3.4W. The FanBooster above improves the static pressure and thus the air flow. The slightly translucent knob can be illuminated from behind with a 5mm LED, the hole for this is available. The potentiometer is part of the adjustable StepDown converter from the link. Due to the adjustable output voltage the fan speed can be adjusted in a wide range. Alternatively you could use a 0.5 to 1k Ohm potentiometer without the step down converter directly in series to the fan. The diameter of the outer fan ring has increased by 40% to approx. 21cm and the inner tube in the V2.0 version now sits a good 10mm to the front, so that the total air flow also increases significantly. The basic housing has a bottom which is fixed with a screw M4x12 by a cross bar above it. The electronics (StepDown converter) for the speed control is mounted on this bar. First the 120mm fan and then the 40mm high FanBooster is inserted into the basic housing from above. - Sunon Fan: https://www.pollin.de/p/axialluefter-sunon-mec0251v2-a99-120x120x25-mm-12-v-320526 - 15V Stecker Netzteil : https://www.pollin.de/p/steckernetzteil-up0301b-15pe-15-v-2-a-5-5-2-1-mm-351844 - DC Hohlbuchse : https://www.pollin.de/p/einbau-hohlbuchse-450598 - step down Wandler https://www.pollin.de/p/bausatz-step-down-wandler-v-1-2-810121 - Schaltpoti : https://www.ebay.de/itm/Potentiometer-mit-schalter-Dreh-Poti-1K-500K-Mono-linear-Arduino-Raspberry/392590485800 German Ich habe folgenden bladeless Fan komplett überarbeitet : https://www.thingiverse.com/thing:2685544 Zusätzlich habe ich einen angepassten FanBooster aus diesem Link integriert: https://www.thingiverse.com/thing:3009239 - Zum Ausdruck dieses bladless Fan Version 2 werden folgende Dateien benöigt: bases.stl new_Innertube_big_V2.stl Trichter.stl Haube_big.stl FanBooster40mm.stl bottomplate.stl crossBar.stl Knopf.stl Segment.stl Zeiger.stl - um eine bereits gedruckte ältere Version 1 zu verbessern werden diese Dateien benötigt: upgradeV2_Ring_inside.stl UpgradeV2_Ring_8mm.stl FanBooster40mm.stl +++++++++++++++++++++++++++++++++++++++++++++++++++++++++++++++++++++ - Update 2.0 : Durch Veränderung der Innertube (Kürzung der Länge um 7,5mm) wurde der Spalt für den Luftaustritt im Ring stark vergrössert. Es wurde jetzt ein angepasster 40mm hoher FanBooster eingesetzt. Das zusammen vergrössert die maximale Luftgeschwindigkeit am Austritt aus dem bladeless Fan um ca. 50%. Für bereits gedruckte Geräte habe ich ein Upgrade 2.0 entworfen. Es enthält ebenfalls den neuen FanBooster und zwei Kunststoffringe, die die Innertube um 8mm nach vorne verlegen, was ebenfalls den Luftaustritt deutlich verbessert. Alternativ können Besitzer der Version 1 auch eine neue V2 Innertube ausdrucken. +++++++++++++++++++++++++++++++++++++++++++++++++++++++++++++++++++++ Ich habe das Grundgehäuse stark überarbeitet, unter anderen damit es einfacher zu drucken ist und weniger Support benötigt. Es kann jetzt ein 6mm Schaltpotentiometer aufnehmen und hat durch die vergrößerte Höhe Platz für einen 40mm hohen Fanbooster oberhalb des Lüfters. Als Antrieb dient bei mir ein 120mm Sunon Lüfter mit 25mm Dicke und 3,4W. Der darüber liegende FanBooster verbessert den statischen Druck und damit den Luftdurchsatz. Der leicht durchscheinende Drehknopf kann von hinten mit einer 5mm LED beleuchtet werden, die Bohrung dafür ist vorhanden. Das Poti ist Bestandteil des regelbaren StepDown Wandlers aus dem Link. Durch die regelbare Ausgangsspannung lässt sich die Lüfterdrehzahl in einem weiten Bereich einstellen. Alternativ könnte man einen entsprechend belastbaren 0,5 bis 1k Ohm Poti ohne den Stepdownwandler direkt in Reihe zum Lüfter einsetzen. Der Durchmesser des äusseren Lüfterrings ist um 40% auf ca. 21cm gewachsen und die innere Röhre sitzt jetzt in der Version V2.0 gut 10mm nach vorne versetzt, so das ebenfalls der Gesamtluftdurchsatz deutlich steigt. Das Grundgehäuses hat einen Boden erhalten der über einen darüber befindlichen Querriegel mit einer Schraube M4x12 befestigt wird Auf diesem Riegel sitzt die Elektronik (StepDown Wandler) zur Drehzahlregelung. In das Grundgehäuse wird von oben zunächst der 120mm Lüfter und dann die der 40mm hohe FanBooster eingelegt. - Lüfter: https://www.pollin.de/p/axialluefter-sunon-mec0251v2-a99-120x120x25-mm-12-v-320526 - 15V Stecker Netzteil : https://www.pollin.de/p/steckernetzteil-up0301b-15pe-15-v-2-a-5-5-2-1-mm-351844 - DC Hohlbuchse : https://www.pollin.de/p/einbau-hohlbuchse-450598 - step down Wandler https://www.pollin.de/p/bausatz-step-down-wandler-v-1-2-810121 - Schaltpoti : https://www.ebay.de/itm/Potentiometer-mit-schalter-Dreh-Poti-1K-500K-Mono-linear-Arduino-Raspberry/392590485800
With this file you will be able to print Bladeless Fan with your 3D printer. Click on the button and save the file on your computer to work, edit or customize your design. You can also find more 3D designs for printers on Bladeless Fan .