Blastech E-11
thingiverse
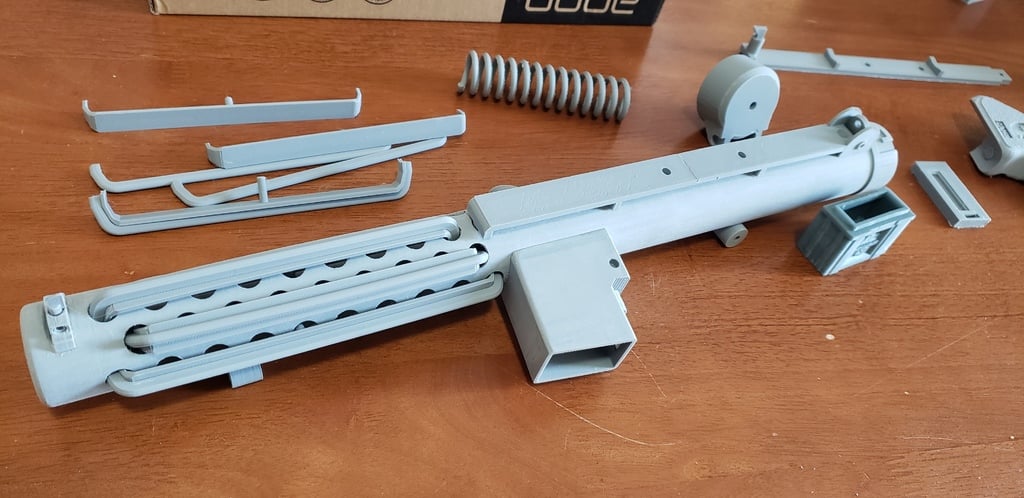
This is a remix of the e-11 by Blaster-Master. Unable to find any of his designs here on thingiverse, but I still want the original design credit to go to this awesome designer. If you know of his handle here on this site, please let me know so I can link it to the original and give proper credit where credit is due. Now, to what I have changed! First, I have split all of the parts up into their individual pieces, while the platters were nice, I can be ham-handed at times. When breaking or losing a single part, I did not want to have to print the entire build plate again for one part. Especially the small bits which were a single platter called "smalls". I have deleted nearly all of the support which was originally "baked" into the design work. The design is old, and printers were not always what they are today, as a someone who has gone through many generations of printers this is very common. The problem, newer printers are much better at bridging than they used to be, as well as new software is better at understanding where supports need to be placed. Keeping this in mind, some of the parts with the pre-designed support were failing due to not having a choice, or simply no longer needed the support at all and was just wasted time and material. A few points of note, the barrel sections of the model MUST be printed WITHOUT support, they will print just fine, though removing the support material will be nearly impossible because it will be enclosed. Support is also no needed in any of these parts, so please keep that in mind. Second, a few choice parts I have kept the "baked" in support in tact, namely parts such as the magazine wells. The support does actually aid in the post processing of these parts and how they fit together. If these parts need to have the support design removed, please message me and I will do so and re-upload them. All of the pieces are oriented in the way which I have printed them on my machines, but this is what has worked for me and may not work on your set-up. So please do not take the orientation as the ONLY way possible. I know what works on my machines and have altered them as such, you will know what works best with what you have, so go with that. Most of the parts of this, again, were designed for older machines, thus I recommend printing at a layer height of 0.20 for the beset possible outcome. I did attempt to print them on my detail settings of 0.10 but they parts were not as clean as when left at the 0.20 setting. Other parts were printed on my resin printers to preserve the detail, such as the Hengstler_Bottom because of the text. This was just a personal choice, and can be printed on and FDM machine as well. I will add the sizing of the screws used to put the pieces together when I get to the point of actually putting the parts together to build the final piece. I am uploading this as the project is being worked on. The spring was modeled in Fusion, it fits the bolt very snugly and adds pressure on the Endcap to keep pressure enough for the stock to lock and fold. Other people have mentioned using a clothes hanger wire wrapped around a 1" dowel rod to make the spring as well, so this could be considered an optional part if you go that route. The hole bolt piece was another part for my personal choice, so I can add a threaded rod through a majority of the body to add both weight, and some rigidity strength to the model. If this is going to be something that hangs on a wall, I would not bother with it and just use the regular Bolt. Lastly, the instructions I have included are not my own. They were the PDF file that was included when this was nothing more than a kit that would be purchased from the original makers ebay page. The page has long since been deleted and through scouring forums and message boards I happened across these. They are not for this EXACT kit, but rather an older version which the designer sold. Once the files were uploaded to other 3D sharing sites, instructions were no longer included and people were left to their own methods to figure out what went where. So please keep this in mind when building, and some personal twists or alterations may be needed. With all of that, please enjoy my rework of this master-piece. From my understanding this was the first design of a 3D printed blaster that was considered accurate enough to be accepted by the 501st. Whether that still holds true, I have no idea. I am not affiliated with the group, nor do I know the original designer of this. I did enjoy printing it, and so far the entirety of the build is absolutely stunning. If you have questions or concerns regarding the object files, or build please do not hesitate to message me and I will do my best to respond in a timely fashion.
With this file you will be able to print Blastech E-11 with your 3D printer. Click on the button and save the file on your computer to work, edit or customize your design. You can also find more 3D designs for printers on Blastech E-11.