Bluetooth 2.1 Amplifier 2x50W+100W TPA3116D2
thingiverse
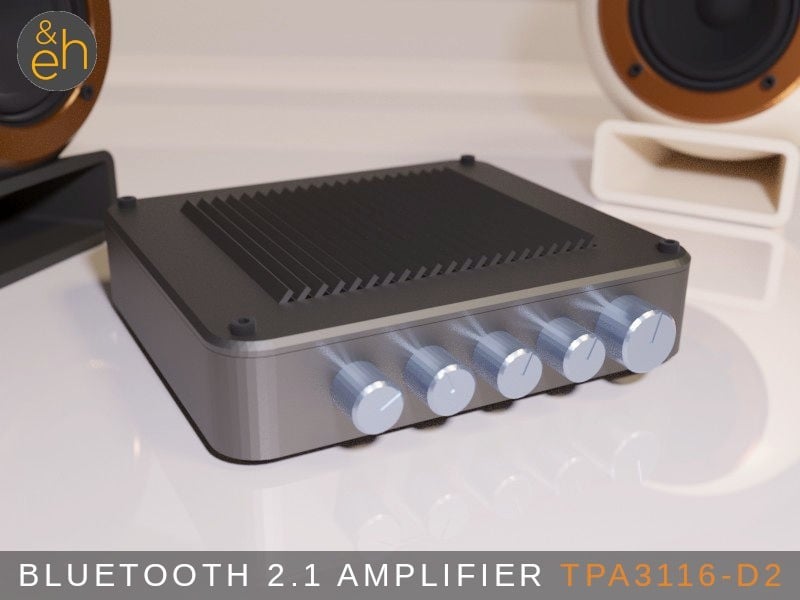
<img src="http://www.alpinehiking.eu/imgs/Speaker_Banner_640.jpg" alt=""> The full set of stereo components: https://www.thingiverse.com/guppyk/collections/my-stuff <b><font color="#850000">Bluetooth 2.1 Amplifier Enclosure</b> I recently posted an <a href="https://www.thingiverse.com/thing:4713469">enclosure for my favorite Bluetooth stereo (not 2.1) amplifier board</a>, which I am using with my JVC Zero 6 speakers and replacing my Marantz receiver (and a second board with my Heco speakers hooked up to my desktop computer). However, particularly printed speaker designs seem to work best in 2.1 setups (i.e. with a separate subwoofer). So here is the enclosure for the 2x50W+100W TPA3116D2 Bluetooth 2.1 amplifier board. As compared to the stereo version the design has a slightly more technical look (went back to the design I previously used for Raspberry and Orange Pis for the top cover). The amp board has BT 5.0, sounds great (my experience), has volume, bass, and treble plus frequency and volume controls for the woofer (which means it also works as a plain stereo amp if you don't want to connect a separate subwoofer). Currently connected to a pair of my <a href="https://www.thingiverse.com/thing:4731920">Back Horn V4.0 </a>speakers and an old 20 cm subwoofer (in a wooden enclosure). <b>First of all, here is what you will need for this project:</b> - The actual <a href="https://s.click.aliexpress.com/e/_AptVBs">amplifier board: ZK-TB21 Bluetooth 5.0 2x50W+100W Amplifier Board (around $ 25)</a>. Same brand as the one I used for the stereo amp enclosure but this time the 2.1 variant. Comes with a very basic top/bottom plate (which I am not using), connector, and shiny knobs (also not used in this project, but you can). - Plus a <a href="https://s.click.aliexpress.com/e/_9ikpVZ">12-24V switching power supply</a>. The TPA3116 operates on a wide range of voltage. However, I would definitely recommend a 24V/3A+ (72W) power supply to get the full output. <b>Filament.</b> As usual I use <a href="https://s.click.aliexpress.com/e/_Adj4eL">Sunlu Carbon Fiber PLA for the main body</a> (once again not so much because it needs the additional strength, mainly because it looks really good), the knobs in <a href="https://s.click.aliexpress.com/e/_AWaZ6T">Silk Silver PLA</a> (or gold/bronze, if you like them a little flashier), and the top panel in <a href="https://s.click.aliexpress.com/e/_AcHqYj">sparkly black/vertigo black PLA</a>, which is a slightly metallic looking dark grey (the one I use is actually Eryone, sorry, couldn't find a link for this one but this one seems to come close). <b>Printing and assembly.</b> Printing should be very straightforward. No supports or bed adhesion needed. I print everything in 0.2 mm resolution and with 30% infill (lines).<b>Print</b> one each of 1.) the main body 2.) the top panel 3.) the larger volume control knob 4.) four of the smaller bass/treble control knobs (you could of course use the shiny knobs that come with the amp instead) and finally 5.) four of the feet. Slide the board into the enclosure and fix with the 5 nuts of the volume controls. You can use the two small screws (they come with the board) to further secure the board (I have added screw holes to the enclosure) - but it works well without. Attach the feet (either with short M3 screws or a drop of glue). This time the top is mounted with 4 M3 screws. Insert 4 M3 nuts into the respective openings (see picture above) and heat fix or glue them in. Connect the speakers to the terminals and the 12-24V power to the corresponding connector, mount the top panel with the M3 screws and you are ready to go. <b>Some background</b>. TPA3116D2 is a Texas Instruments chip that has been around for a number of years and has turned into one of the most popular chips in compact amplifier boards. It is extremely power efficient and hence only requires small heatsinks (if any). These boards are also very popular among manufacturers of budget amps (the majority of those 50-100$ amps on the market are TPA3116 and some of these are really good). However, I currently own 6 different boards based on this chip and it seems sound quality (and particularly noise) very much depend on board design. This board is definitely my favorite, good sound, no noise... (just got the 2.1 board from the same manufacturer but didn’t get to try it yet - more in the future). <b>Even a little more more background (for those interested).</b> TPA3116D is a Class-D amplifier. They are particularly energy efficient, cheap and can produce excellent sound quality (although sometimes characterized as somewhat more sterile than Class AB amps). Frequently (falsely) translated as “digital” amplifier, a Class-D amp is actually a switching amp, i.e. an electronic amplifier in which the amplifying devices operate as electronic switches. The principle is actually pretty simple. A comparator compares a high frequency triangular wave with an analog audio input. This generates a PWM (i.e. a series of pulses of which the duty cycle is directly proportional to the input audio signal). The comparator then drives a MOS gate driver which in turn drives a pair of high-power switches and produces an amplified vesion of the original PWM signal. A simple low pass filter removes the high-frequency switching components of the PWM signal and produces an amplified version of the original input signal, which can be fed into an ordinary speaker. <h4><b>HOPE YOU LIKE IT AND IF YOU LIKE IT PLEASE LIKE IT!</b></h4> <h4>Enjoy.</h4>
With this file you will be able to print Bluetooth 2.1 Amplifier 2x50W+100W TPA3116D2 with your 3D printer. Click on the button and save the file on your computer to work, edit or customize your design. You can also find more 3D designs for printers on Bluetooth 2.1 Amplifier 2x50W+100W TPA3116D2.