Bluetooth Game Pad
thingiverse
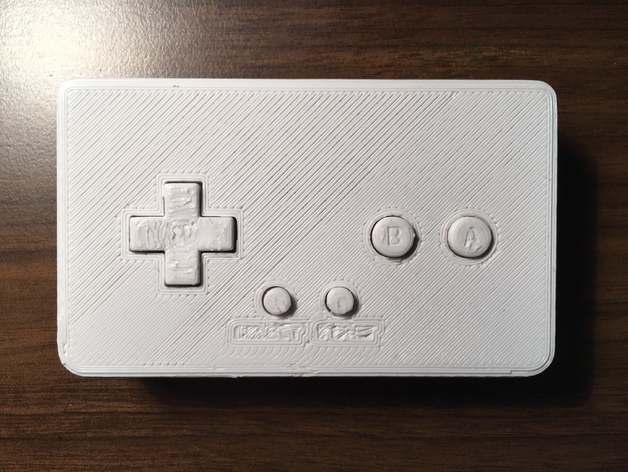
Bluetooth Game Pad (1.2)\n--- UPDATED VERSION! GET THE NEW FILES NOW. More space for buttons allows them to work properly without blocking even on faster print speeds. Several improvements have been made as well.\n--- UPDATE 1.2: The BottomShell has been modified, giving 1 mm more space for cables and other items. Shoulder button PCBs fit better and easier now too.\n\nInspired by Adafruit's DIY Bluetooth Gamepad, I created this one myself for the models.\n\nThis game pad features L/R shoulder buttons and curved edges, making it comfortable to hold in your hands. It has roughly the same size as Adafruit's game pad, but with additional features.\nWhat You Need\nAdafruit Bluefruit EZ-Key Bluetooth HID module\nLiPo Charger (I used this one, but you can use any that fits your area with appropriate voltage and amperage for charging the battery)\nLiPo Battery (again, I used this one, but you can use any that fits the case, potentially redesigning its inner structure may be needed)\n10 tactile switches (6x6x5 mm)\n1 on/off switch\nwire\nprototyping board/etched PCB\n3D Printer and filament or access to a service where you can order parts\nsoldering iron\nBuild\nYou need a prototyping board to mount the buttons, positions for them can be taken from the top shell (I may add a layout later).\nAll electronic parts are attached to the lower part of the case.\nMake sure to mount the EZ-Key upside down so the reset key is reachable through the reset hole in the bottom using a needle.\nThe charger goes to the central hole on the L/R buttons' side, and the on/off switch next to it.\nThe battery snaps into place if you have the same one as I do.\nSolder wires to EZ-Key pins 0-9 and one of the Gnds then connect them to button contacts and fit the boards in their places.\nMaybe you need to file buttons or holes a bit so they move freely. The last thing is to put the buttons into their holes in the upper part of the case and assemble everything.\nIf you're lucky, you might not even need glue for the case halves.\nWhen finished, have fun playing!\nPrint Settings\nPrinter: RepRap\nRafts: Doesn't Matter\nSupports: No\nResolution: 0.1-0.3 mm\nInfill: 15-25%\nNotes: I had a problem with low printing speeds (20 mm/s), but it could be my printer, where it would print shifted by about 2 mm from a layer somewhere in the middle to the last layer.Printing was fine at 40 mm/s, though. However, Slic3r has an issue slicing BottomShell.stl, I used Cura for that part and printed the rest using Slic3r and Pronterface again.I used a raft for BottomShell but got worse results than for TopShell where I used none. I recommend using a skirt at least.\nPost-Printing\nYou might want to smoothen the edges and remove printing patterns on planes with sandpaper, though it's not required.Clean your print of any excess material especially around buttons' places so they can move freely.\nHow This Was Designed\n123D Design
With this file you will be able to print Bluetooth Game Pad with your 3D printer. Click on the button and save the file on your computer to work, edit or customize your design. You can also find more 3D designs for printers on Bluetooth Game Pad.