BlueTooth Speaker Enclosure for TDA7492P INSMA BT Board
thingiverse
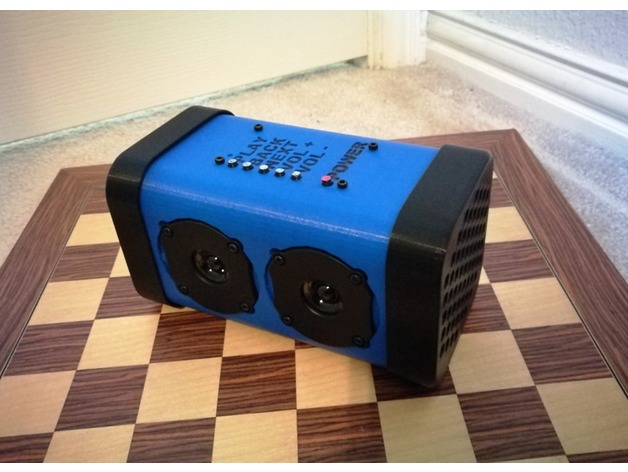
3/9/2018 - Added a 22mm optional Spacer to better fit 4" speakers with bigger magnets. 3/5/2018 - Added two optional front grills for those that want to build with only 4" speakers (a good option) BlueTooth_OptionalFrontgrill01_flat.STL - This is an easy to print option that will allow sound to pass through front. BlueTooth_OptionalFrontgrill01_dome.STL - Rotate Y 180 degrees to print flat or use supports. The Domes go inside the bluetooth box to help direct some sound forward (untested - but I mean to). 12/03/2017 - Added an updated speaker grill 12/18/2017 - Added a 12mm Spacer with Camfer for certain 4" speakers that need more clearance. This is a build based on a $12 2x50 Watt Bluetooth 4.0 Stereo Audio Board: https://www.amazon.com/TDA7492P-Amplifier-Wireless-Bluetooth-Receiver/dp/B01BTJZFY6/ref=sr_1_1?ie=UTF8&qid=1483680968&sr=8-1&keywords=insma 11/21/2017 Update - This appears to be a closer match to my board:https://www.amazon.com/INSMA-Hifi-Mini-Bluetooth-Audio/dp/B01KFZN6Y6/ *Power toggle button was removed on the originally linked design. (the first link above). ** let me know if you have a similar card and need a small tweak to make your card work in this case. This little $12 (now sells for $15-25 on average) board is fantastically loud and sounds great to me. Well suited for the Good'Nuff audio hackers. This project is not recommended for audiophiles - the rest of us don't understand the concept of $50,000 speakers :) To build this my son and I salvaged an old rear channel Stereo speaker set each with a 4" mid range speaker and a 2" tweeter. Supplies you'll need: The TDA7492P Audio Board linked above. Two 4" (101.6mm) speakers with the 4 screw holes spaced square 80mm apart. Two 2" (50.8mm) tweeters with the 4 screw holes spaced square 44mm apart. *I Recommend adding High-Pass capacitors to the tweeters for better sound (many have filters included). More info on High-Pass filters here: http://www.carstereo.com/help/Articles.cfm?id=1 and on google. A 12V DC Power supply. A soldering Iron qty 12 M3 machine screws about 10mm to 12mm long. qty 12 nyloc M3 nuts qty 8 wood screws ~2.7mm to ~3.5mm diameter and ~20mm to ~25mm long. (redrill pilot holes if you have larger wood screws. These are used to fasten the 4" speakers on the ends. Speaker wire. Give each speaker about 12" slack to make the system easier to work on (better clearance). qty 4 15mm M3 Standoffs Build Instructions: Print one "BlueToothBox02.slt" main tube. If you have 4" speakers with giant magnets (the 50W ones that I used did) you'll also need to print two spacers "BluetoothSpeaker_Spacer12cm_01.stl" to put on the ends (for larger magnet clearance). Print the button set "Buttons_4_BlueTooth01.stl" Optionally print two Grills, and two tuning ports. *Full Disclaimer - I did not science the tuning ports. So audiophiles rage away :) Wire up the speakers and power to the board first and test it out. Turn tube upside down and carefully place the buttons in the pre-drilled holes on top. The Short button is the power button. Put Tape on the buttons (on top outside of main enclosure) to hold them in place for step 8. Screw 4 Standoffs and Nuts into Audio Board with Standoffs pointing upward. Disconnect speakers and leave wiring connected to Audio board and attach Audio board to top of tube with Standoffs aligning with screwholes on top, while making sure that you slide the board under the taped buttons. Screw in the 4 M3 screws through the Main Chassis Tube and into the standoffs on the Audio Board. Once Audio Board is screwed in you can remove the tape. The buttons should now work and will be a little loose. Screw in the tweeters with M3 screws and Nyloc nuts. Connect tweeter speaker wires to Audio Board. Feed the DC power supply wire through the little hole centered on the back of the main tube. I suggest that you purchase (or salvage) an optional female DC power supply port and mount it on the back. I salvaged mine from some random electronics that I was throwing out. Connect the 4" speakers and fasten them with the wood screws. If you are having issues with the speaker magnet hitting internal parts then use the optional 12mm spacers (mentioned in step 2). If you need even more space either print a pair of 12mm spacers or scale the Z axis (non-uniform) to 200% for 24mm spacers. Slide on the grills if you want them. - Print one pair of the two designs posted. Optionally use a Sharpie to color in the buttons and corresponding words on top. Plug it in, power it up, and play some music. Final Tweak: Drill a 2 to 3 mm diameter hole just above (about 4mm) the "P" in PLAY to be able to see the LED light inside. Updating the design with this hole built in is on my 3D Printing ToDo Stack. I am considering chopping/dremeling a clear toothbrush neck to make a cheap light channel for this. Print Settings Printer: Maker Select i3 and PowerSpec Ultra Rafts: No Supports: No Resolution: 0.20 Infill: 20% Notes: Comment if you have questions or suggestions or get stuck on any steps. Have fun.
With this file you will be able to print BlueTooth Speaker Enclosure for TDA7492P INSMA BT Board with your 3D printer. Click on the button and save the file on your computer to work, edit or customize your design. You can also find more 3D designs for printers on BlueTooth Speaker Enclosure for TDA7492P INSMA BT Board.