Bluetooth Wireless Editable Gcode Sender (Remote control for your 3D Printer)
thingiverse
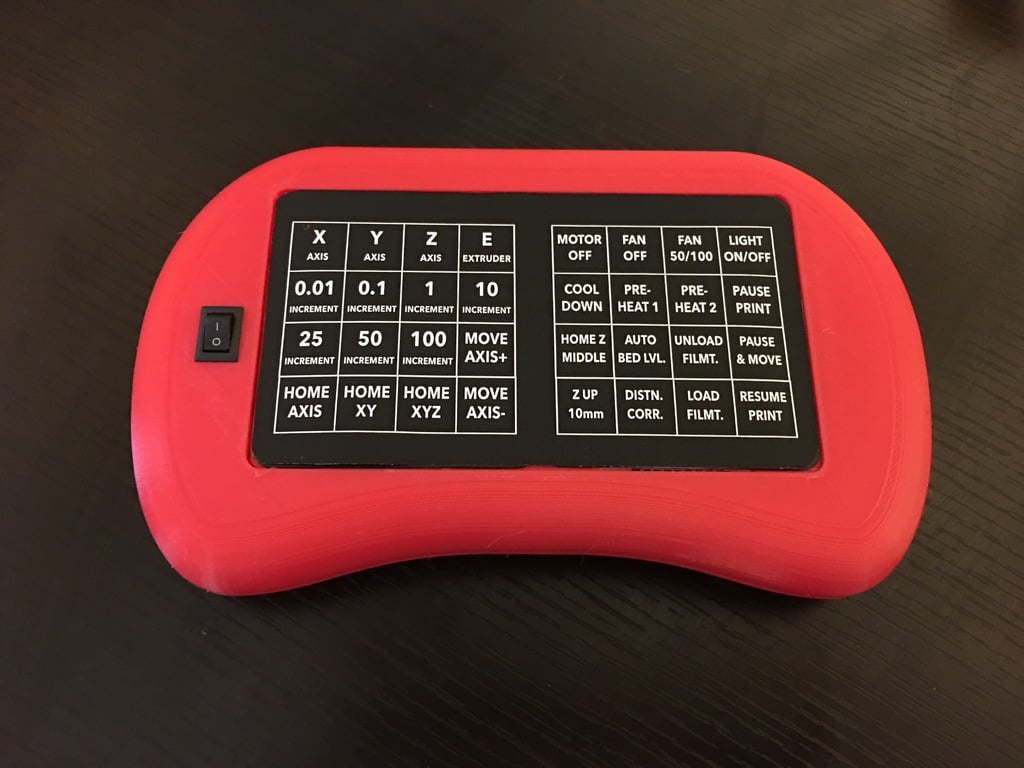
Update 6/3/2017: Updated Arduino Sketch file to correct feedrates of axis movements. Now, Z, Y, Z, and E feedrates are set independently, especially Extruder feedrate. This project is similar to using Pronterface or Repetier Host manual control to send gcode instructions to a printer via USB cable, but instead uses a programmable wireless Bluetooth remote. Note: The older wired version can be found here. http://www.thingiverse.com/thing:2105847 The remote consists of an Arduino Nano connected to two small 16-button keypads (32 keys total) and a serial Bluetooth adapter/interface. Each button sends a single line of gcode or a script of multiple lines. A Zip file contains the Arduino sketch, wiring diagrams, and setup guides for system components. Gcode sender is designed to work with 3D printers, CNC mills, and laser engravers - any machine that uses gcode. This setup allows highly customized gcode scripts/macros to be sent to the printer with a push of a button. Scripts in the sketch have been tested; they can be replaced, moved, or edited. The sketch includes many comments to make it easier to tweak the code for individual needs. Communication between Gcode Sender and printer is through serial communication (Tx, Rx) using serial Bluetooth adapters (no cables). On RAMPS-style boards, the AUX-1 port can be used on the printer side. Specifics on wiring are found in the Zip file. In Repetier firmware, Bluetooth serial port must be enabled to use the AUX-1 port. The STLs print without support. Note: The STLs were designed with low infill. Low infill keeps the body's shape while printing; keep it low to avoid wasting filament. Once assembled, the Arduino Nano board is hidden inside the STL body in a cavity under the keypads. Keyboards have sticky backing attached to an insert STL. The insert can be removed if needed for reprogramming. Fusion 360 file is provided for tweaking keypad holder parts. Please let me know if alternative designs are created for Gcode Sender. BOM: - (2x) 16-key 4x4 membrane keypads - (1x) Arduino Nano Development Board (selected because it has enough i/o pins for two keypads without additional shields; Pro Mini does not) - Jumper cables to connect keypads to the Arduino nano board and Bluetooth adapters. 8 pins per keypad, 4 pins per Bluetooth module. - (2x) Serial Bluetooth Modules. HC-05. Search Aliexpress.com for "HC-05". One will be set up as master, the other as slave. Note: HC-06 can replace one of the HC-05; it is only a slave, whereas HC-05 can be either master or slave. - (1x) Mini rocker on/off switch, 2 pins - DIY vinyl adhesive label. Custom label to put over buttons. Sample file included. - Power pack of your choosing. Various suggestions include: 4x rechargeable AA/AAA cells, a small 5v power bank, or a 18650 battery pack. Left keypad Explained (Keypad 1): The idea is to first select which axis to work with (e.g., x, y, z, e) then select the movement resolution amount (e.g., 0.1, 1, 10, etc.), and finally select the movement direction button (+ or -).
With this file you will be able to print Bluetooth Wireless Editable Gcode Sender (Remote control for your 3D Printer) with your 3D printer. Click on the button and save the file on your computer to work, edit or customize your design. You can also find more 3D designs for printers on Bluetooth Wireless Editable Gcode Sender (Remote control for your 3D Printer).