BMO in Adventure time, powered by raspberry pi 3 and google assistant
thingiverse
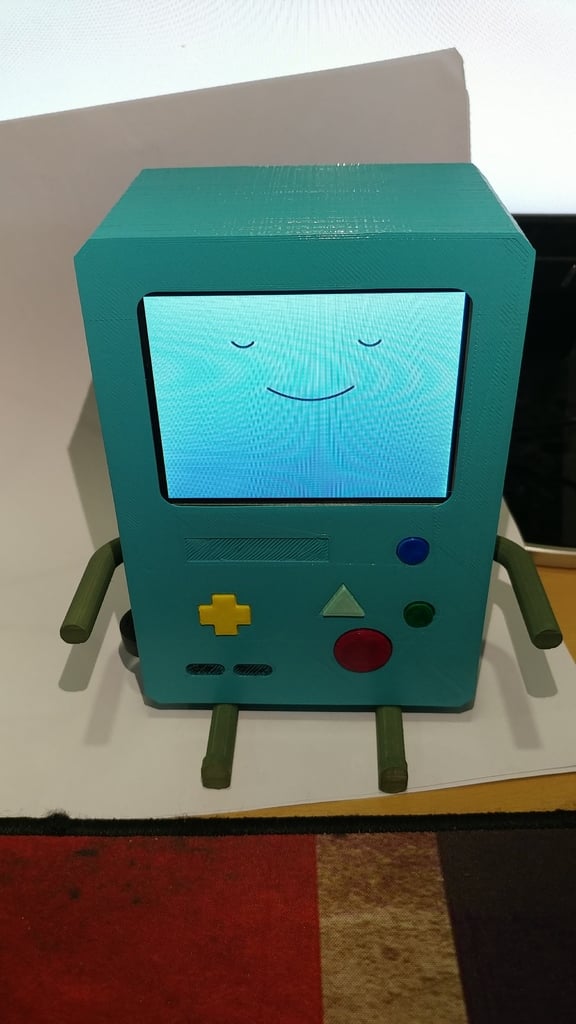
3D printed BMO for Raspberry pi 2, raspberry pi 3 BMO is a very attractive character shaped in adventure time: the animation from Cartoon Networks. I made a game console powered by retropie before (https://www.thingiverse.com/thing:2404673), and decided to make the advanced version of BMO with RPi2 & 3 for better performance. But this time I made BMO Assistant speaker with google assistant instead of a game console. Same as before, the screen that has an RCA input is used for this project. (You can use any 3.5 inch screen w/ RCA input for this project, or if you don't want the animated face, you just can design and attach the face panel instead of using the screen. The screen from the link has the voltage regulator(4-13V to 5V) inside, So it works with RPi's 5V output, too.) https://www.aliexpress.com/item/3-5-Inch-Pocket-sized-TFT-LCD-Color-Car-Rear-View-Monitor-Rearview-Parking-Monitor-2/32235404646.html?spm=a2g0s.9042311.0.0.2R0z7x For audio output, 2-channel amplifier with PAM8403 with volume control potentiometer and 2 4ohm 3W speakers are used (or any amplifier-speaker combination can be used). https://www.aliexpress.com/item/Super-Mini-PAM8403-DC-5V-2-Channel-USB-Digital-Audio-Amplifier-Board-Module-2-3W-Volume/32753590149.html For audio input, mini usb microphone is used. You can use any different usb audio hardware, or implement by using extra PWM audio input/output hardware. https://www.aliexpress.com/item/Overfly-Super-Mini-USB-2-0-Microphone-Portable-Studio-Speech-Mic-Audio-Adapter-Driver-Free-for/32835259347.html For the connection of RPi's 3.5pi audio and video output, please refer the image here: http://4.bp.blogspot.com/-U6UDlBzBcbg/VWSg9x6vlcI/AAAAAAAAA7o/EDeERYuxhA0/s1600/11218708_1638229279732407_7952221400904068770_n.jpg I soldered wires directly on the bottom of the RPi board. If you do not want to solder directly on the board, just use 4-polar cable for A/V output, But I don't recommend this way. It will make BMO's back look ugly. The reference open source project for this AI speaker is GassistPi on github by shivasiddharth (https://github.com/shivasiddharth/GassistPi). I modified the project for showing face animation and Youtube thumbnail. To implement these functionalites, Pygame python library is used. Modified source code will be uploaded soon. The triangle Button on BMO's front face is used for stop button configuration explained in the GassistPi project. If you are not using the button as the stop button, you can also use the button for any function: As I used the button for power and reset in my previous project. To fix the board on the bottom panel, M2.5 screw with 4-6mm length can be used. all other holes has 2.9mm diameter, M3 4mm can be used for all other holes. Refer the Gassistpi's readme description for Setting up Google assist. Modifications and source code for BMO's face will be updated with source code soon. See working videos here. https://youtu.be/jgEbc8pMZ9k https://youtu.be/qHsGePOe33o This is still working project, any suggestions and questions are welcomed. If you have any suggestion or question, don't hesitate to ask. Thanks.
With this file you will be able to print BMO in Adventure time, powered by raspberry pi 3 and google assistant with your 3D printer. Click on the button and save the file on your computer to work, edit or customize your design. You can also find more 3D designs for printers on BMO in Adventure time, powered by raspberry pi 3 and google assistant .