Bob Marley Picture Multicolor
prusaprinters
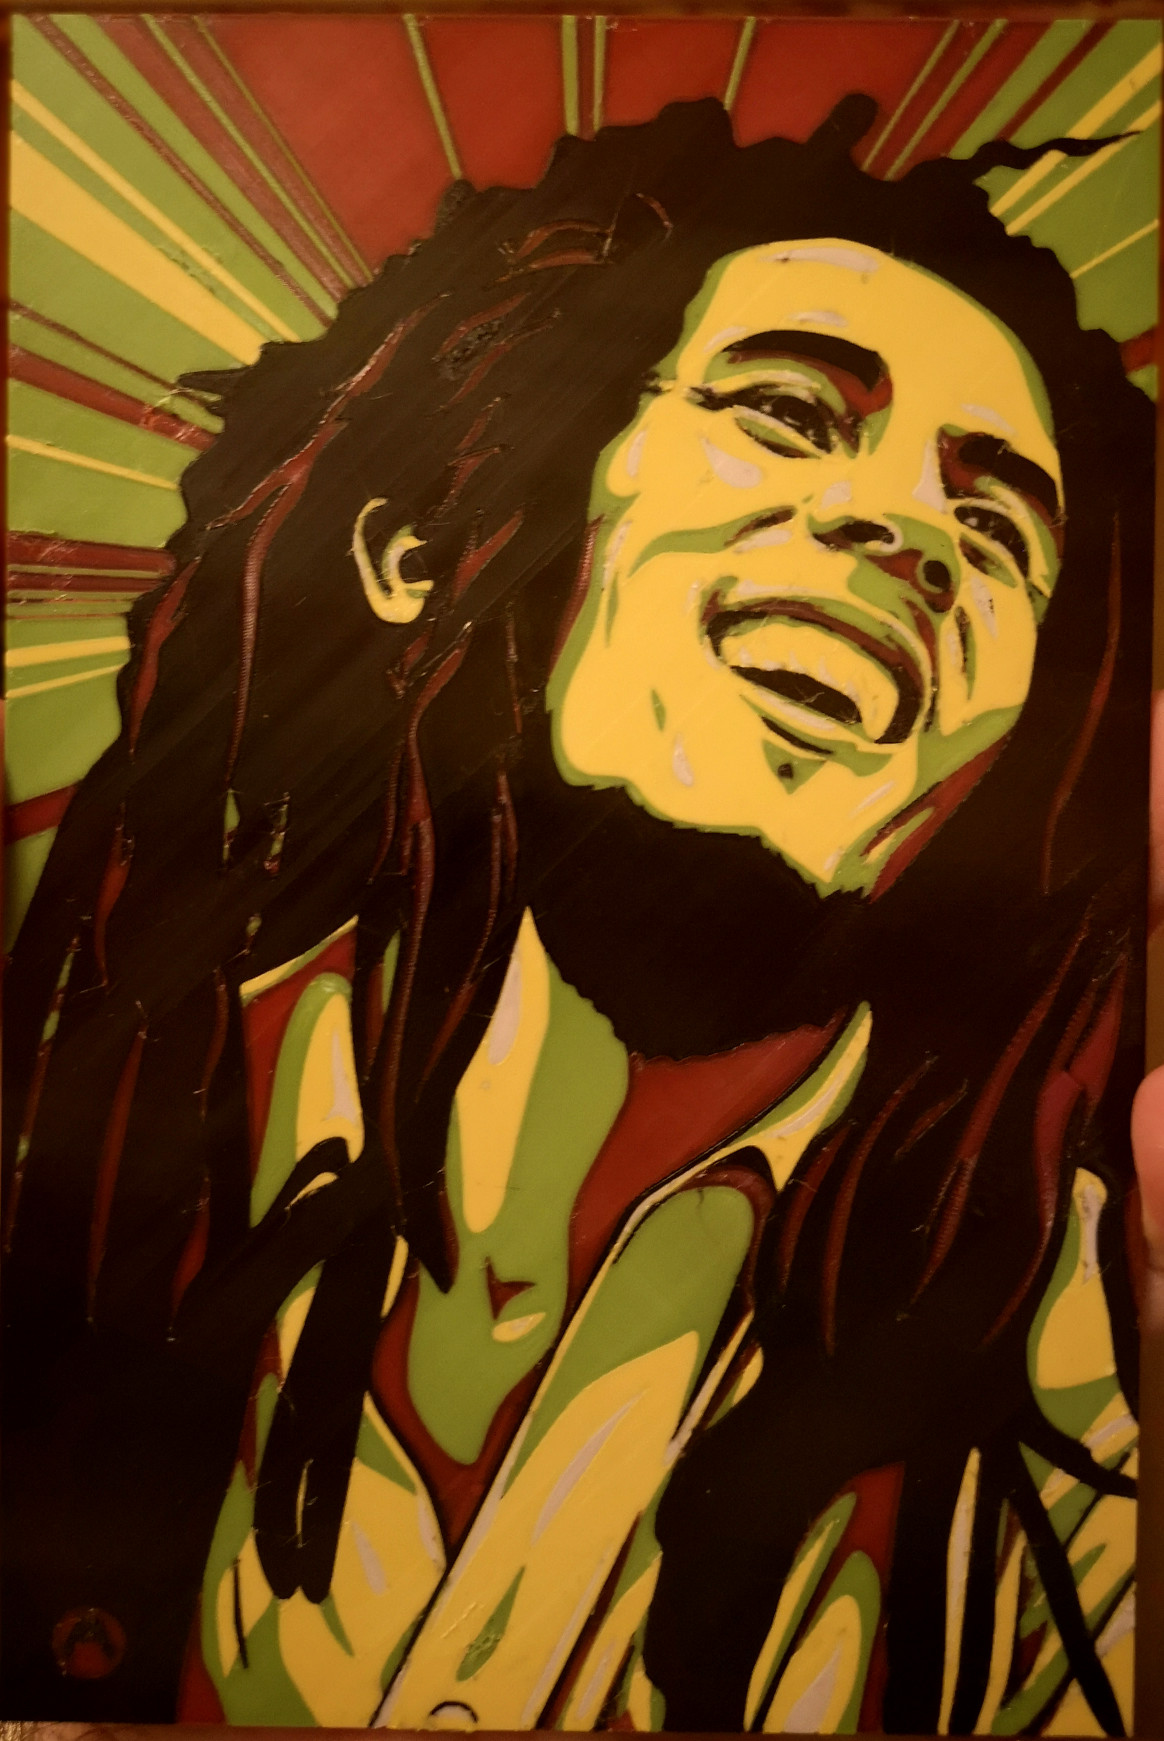
<h3>3D printable multi-color picture of Bob Marley.</h3><p>For my first multi-color print without MMU experiment, I've found this nice image on the internet and heavily re-worked it in it's details to make it as good as printable as I could. It's not 100% perfect due to all the little details, but it came out quite nicely. </p><p>You definitely want to print it with a small nozzle - I've used a 0.25mm - and you can manually change the filament while printing. But be aware that, depending on the size you're going to print it, you have to stay with the printer for a lot of hours in order to manually change the colors. Using a MMU obviously makes that an much easier task. :-)</p><p>I've provided two variants, one thicker one (2mm) and a slightly thinner one (1.55mm). The thicker one has more color layers (6), in case your filament isn't super opaque. The thinner one uses 3 color layers, which is more than enough for Prusament.<br><br>I've also included the project files with everything set up and the STLs.</p><h4>My print settings:</h4><figure class="table"><table><tbody><tr><td>Nozzle</td><td>0.25mm</td></tr><tr><td>Layer height</td><td>Thick version:<br>0-1.4mm: 0.15mm<br>1.5-2mm: 0.1mm<br><br>Thin version:<br>0-1.25mm: 0.15mm<br>1.25-2mm: 0.1</td></tr><tr><td>Extrusion width:</td><td>Thick version:<br>0-1.4mm: default<br>1.5-2mm: 0.15mm<br><br>Thin version:<br>0-1.25: default<br>1.25-2mm: 0.1</td></tr><tr><td>Colors:</td><td>1: Black<br>2: Green<br>3: Red<br>4: Yellow<br>5: White</td></tr><tr><td>Infill:</td><td>10%</td></tr><tr><td>Supports:</td><td>No</td></tr><tr><td>Brim:</td><td>No</td></tr><tr><td>Filament:</td><td>PETG<br>Mix of Prusament and others.<br>Don't use transparent colors.</td></tr></tbody></table></figure><h4><br>Multi-Color print without MMU:</h4><ul><li>Go to “Printer Settings” → “General” → “Capabilities” and set “Extruders” to 5 and check “Single Extruder Multi Material”.</li><li>Also on “Printer Settings” → “Custom G-Code” add this to “Color Change G-Code”:<br>M600</li><li>Add the 6 STL files to the slicer, when asked to make a combined object out of it, select “yes”. Set up the 5 Filament colors in the 3D View and assign them to the STL files according to their name, where the bottom should be black.<br><br>NOTE: I've opted for a black foundation to hide minor imperfections in the print, but in hindsight I don't think this is a necessity. It all depends on how opaque the filaments are that you are using. The Prusament ones are really good, you can get away with 2-3 layers easily, use the “Thin” version for those. For not so super-opaque filament go with the thick version, but don't use transparent filament - if you do, maybe use a white foundation to make the colors pop.</li><li>Set up the layer modifier for the variable layer height and extrusion width as defined in the print settings above.</li><li>Scale the image to the size you'd like. Make sure you scale it on the X and Y axis only!</li><li>Slice it</li><li>Use the slicer Preview to go through the layers 10-15 and for each layer use the horizontal slider at the bottom to preview in which order the colors will be printed for each layer - write that down.</li><li>Start printing</li><li>Change the filament colors according to the notes you've taken.</li><li>If you are using my project or g-code files, this is the order of the filament changes.<br>The first three are the same for both provided files (note that the thinner one starts at layer 9, the thick one on 10), the other ones are for the thick version only.<br><ul><li>Start with black</li><li>Layer 9/10:<ul><li>Black</li><li>Green</li><li>Red</li><li>Yellow</li><li>White</li></ul></li><li>Layer 10/11:<ul><li>White</li><li>Black</li><li>Green</li><li>Red</li><li>Yellow</li></ul></li><li>Layer 11/12:<ul><li>Yellow</li><li>Black</li><li>Green</li><li>Red</li><li>White<br> </li></ul></li><li>Layer 13:<ul><li>White</li><li>Black</li><li>Green</li><li>Red</li><li>Yellow</li></ul></li><li>Layer 14:<ul><li>Yellow</li><li>Black</li><li>Green</li><li>Red</li><li>White</li></ul></li><li>Layer 15:<ul><li>White</li><li>Black</li><li>Green</li><li>Red</li><li>Yellow</li></ul></li></ul></li><li><strong>IMPORTANT</strong>:<br>When you slice on your own and do NOT have an MMU, you <strong>have to</strong> edit the generated gcode manually and remove the blocks for <code>CP TOOLCHANGE LOAD</code> and while you are at it, remove all mentioning of T0, T1, T2, …<br>The <code>CP TOOLCHANGE LOAD</code> code will create huge blobs on the wipe tower in combination with manual feeding, which we are using, leading to all sorts of headaches. The <code>T</code> commands are for the MMU only and will produce errors in e.g. Octoprint, which you can ignore, but why not remove them, while you are at it.<br><br>Here's some regex for search-replace:<br>Search: <code>(; CP TOOLCHANGE LOAD[^;]+);</code><br>Replace: <code>;</code><br>Search: <code>^(T[0-9]\n)</code><br>Replace: <code>“”</code><br> </li></ul><h5>Words of advise:</h5><p>This is a huge time- and nerve consuming print without using an MMU. Get some good sleep before you start, maybe start the print, wait for the first layer and then let it print the foundation layers and set your alarm clock to wake you up before the first filament change. From start to the first filament change you have about 7.5h (thick version) / 7h (thin version) when using my g-code or project file (minus the time you watch out for the first layer) to get some sleep. :)<br>Make yourself a note with the color changes for each layer and have your spools prepared.</p><p>At points you might be tempted to fiddle with the print while it is printing. <strong>Please don't</strong>. But if you do (always use tools, not your hands!!!) and manage to block the extruder and get a layer shift, like I managed it, this is how you can fix it:</p><ul><li>Immediately pause print</li><li>Move up the print head and remember by how much</li><li>Issue a “<code>G28 X Y</code>” command in a terminal</li><li>Issue a “<code>RESTORE_LEVELING_AFTER_G28</code>” command in the terminal</li><li>Move down print head by the amount you have moved it up</li><li>Resume print</li></ul><p> </p><p>I hope you enjoy this print. :-)<br>Please share an image and/or leave a comment if you liked it!</p><p><br>Author of original image: <br><a href="https://www.deviantart.com/silverhornet29/">https://www.deviantart.com/silverhornet29/</a><br>Please do not distribute without mentioning the author.</p>
With this file you will be able to print Bob Marley Picture Multicolor with your 3D printer. Click on the button and save the file on your computer to work, edit or customize your design. You can also find more 3D designs for printers on Bob Marley Picture Multicolor.