Bobble to the next level!
prusaprinters
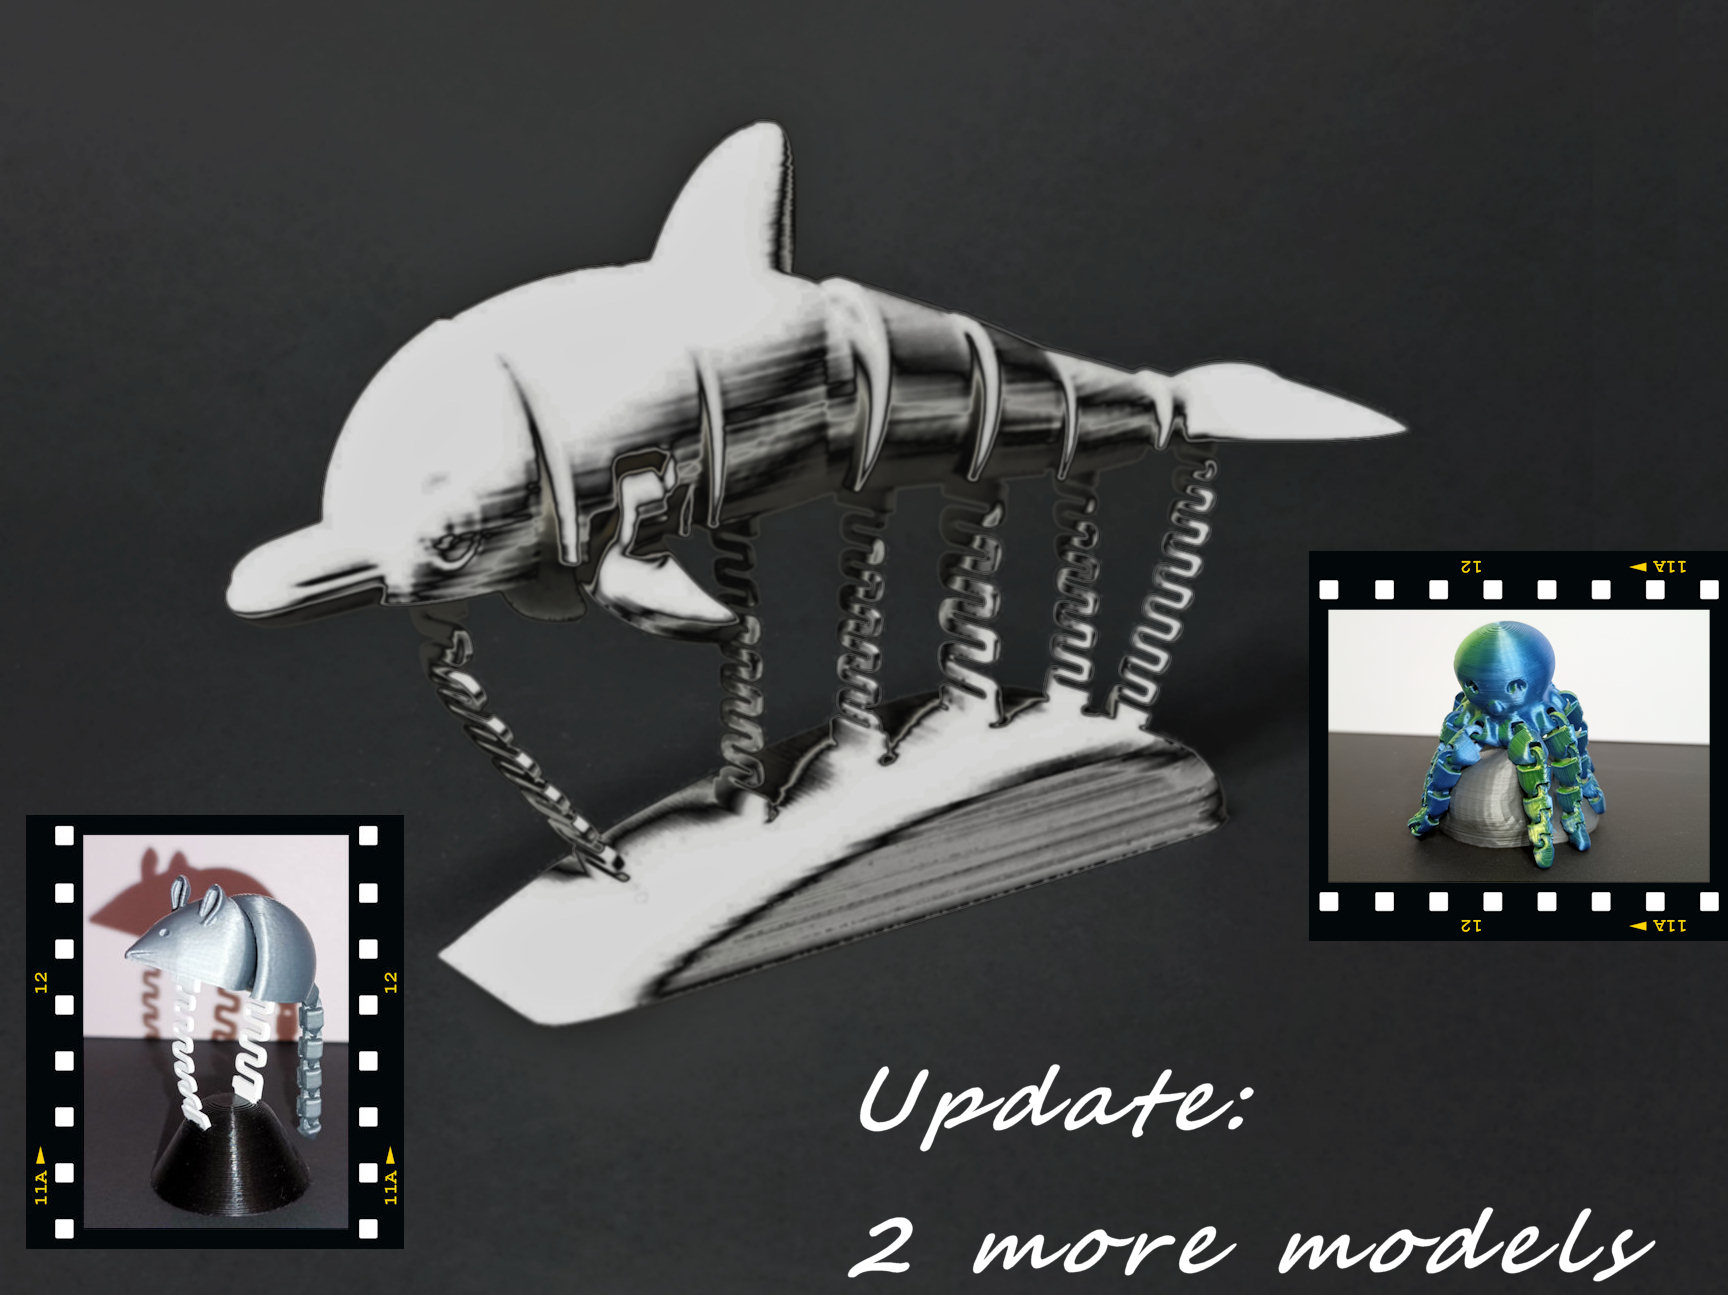
<p><i>Update 13/14 Nov:</i></p><p><i>I still had a pile of springs from the try-outs, and could not resist preparing 2 more models. It's the mentioned Mouse (75% scale, short print time!) and a newly added Octopus. I have added the projects in the downloads. I added a couple of springs for try-outs. The cutouts in the models and the bases are on the original scale. So if you want to use (other than in the project supplied) scaled springs you need to add the "Add-onn Part for Spring End" to the ends of the springs. See photos en video added..</i></p><p> </p><h4><strong>Articulated Models "Bobbled"</strong></h4><p> </p><p>With the new contest Bobble Heads my initial reaction was: well, that's simple.. grab a model and place it on a foot with a spring in between and you're done...! </p><p>After letting it sink in for a while, my brain kept spinning. I have printed many models, but the articulated models still had a special place in my heart. However, the downside to these models is that if you don't have them in your hands, the moving function is of no real use. </p><p>How awesome would it be to have your favorite articulated model move like, or even better than a Bobble Head does? Well, the possibilities of PrusaSlicer <i>(and probably other slicers too)</i> give you the tools to realize this yourself, with a good dose of creativity!</p><p><strong>Principle.</strong></p><p>The articulated model is supported at several points with printed springs which in turn are attached to a base. Everything is done through press fits <i>(by doing so, you can always detach the model and use it separately).</i> Alternatively, they can be glued. By choosing springs of different lengths and/or different sizes, there are endless possibilities to give the model a basic posture and to influence the degree of movement.</p><figure class="media"><oembed url="https://youtu.be/AyOUpNKHh5M"></oembed></figure><figure class="media"><oembed url="https://youtu.be/GuZfAXAOtmE"></oembed></figure><h4> </h4><h4><strong>What do you need?</strong></h4><p> </p><p><strong>1) Model.</strong></p><p>Most importantly: the articulated model! Not all articulated models are suitable. The different parts of the model that you want to support must have enough space to make a recess to attach a spring. So, make sure of this before proceeding.</p><p>To give a few examples, here are some links to suitable models (determined without preference):</p><ul><li><a href="https://www.printables.com/model/277094-cute-articulated-dolphin"><strong>Cute Articulated Dolphin</strong></a><strong> </strong>(by<strong> </strong><a href="https://www.printables.com/social/204571-johnny-b-mac"><strong>Johnny B Mac</strong></a>) -<strong> </strong><i>This is the one I used in the showed model</i></li><li><a href="https://www.printables.com/model/178034-articulated-lizard-v2"><strong>Articulated Lizard v2</strong></a><strong> </strong>(by <a href="https://www.printables.com/social/144822-mcgybeer"><strong>McGybeer</strong></a>)</li><li><a href="https://www.printables.com/model/178032-articulated-shark"><strong>Articulated Shark</strong></a>(by <a href="https://www.printables.com/social/144822-mcgybeer"><strong>McGybeer</strong></a>)</li><li><a href="https://www.printables.com/model/215182-articulated-mouse-adjusted-tail"><strong>Articulated mouse (adjusted tail)</strong></a> (by <a href="https://www.printables.com/social/238230-tuncay"><strong>tuncay</strong></a>) - <i>Just let the tail hang, to flutter freely! (original model by </i><a href="https://www.thingiverse.com/thing:5268216"><i><strong>Olgigi</strong></i></a><i><strong> </strong>on thingiverse)</i></li><li><strong>NEW 13/11 </strong><a href="https://www.printables.com/model/110561-cute-flexi-octopus-short-nose-no-supports"><strong>Cute Flexi Octopus - Short Nose (No Supports)</strong></a> (by <a href="https://www.printables.com/social/197160-qjake"><strong>qJake</strong></a>) - mounted on <a href="https://www.printables.com/model/201553-rock-geocache-container"><strong>Rock Geocache container</strong></a> (by <a href="https://www.printables.com/social/267222-squidgyplastic"><strong>SquidgyPlastic</strong></a>)</li></ul><p><strong>2) Base for springs.</strong></p><p>Look for a suitable model as a base. This can be a symmetrical shape or, for example, a rock. You can "mold" it in the Slicer afterwards, but more on that later. The only requirements are that the base is high enough to accommodate the attachment of the springs and that the base has sufficient mass compared to the chosen model (alternatively, the base can of course be attached to a surface by means of double-sided tape or the like in which case the mass don't matter so much).</p><p>I've added some basic shapes for a base under the STL files for a quick start.</p><p><strong>3) Springs.</strong></p><p>There are now plenty of examples of these on Printables, but the important thing is that they should have attachment points at both ends.</p><p>The basic principle for the springs is that with an increasing number of spring elements, the spring becomes more flexible. If the spring becomes thinner, the flexibility also increases. By using longer or shorter springs, the articulated model can be given a basic posture.</p><figure class="image image-style-align-right image_resized" style="width:33.39%;"><img src="https://media.printables.com/media/prints/315779/rich_content/7fc7f8b3-6d35-4ab5-b3f3-f7fa727cee53/springs.jpg#%7B%22uuid%22%3A%2219b6ea12-d6d5-4c15-b041-3c1479bd1ab3%22%2C%22w%22%3A400%2C%22h%22%3A175%7D"></figure><p>The thickness of the springs determines the ultimate mobility. You can "play" with this endlessly until the model moves to your satisfaction. The advantage here is that the printing of the springs is done in the blink of an eye because so little material is needed.</p><p>I've added some basic shaped springs with 2-12 spring elements for a quick start. The basic springs are 1.6mm wide (=4 print lines with a 0.4mm nozzle). This allows these springs to be scaled by 75% and 50% without any problems, creating a wide range of choices. To keep an overview of the total number of available lengths for the different versions, I have added an overview (see below). <i><strong>The reason I added my own designed spring is that they are as flat as possible, because the available space in the segments from articulated models is mostly very thin..</strong></i><br>Also added are two inserts which can serve as a negative volume to make the attachment points for the springs in the model and the base. One is oriented from the bottom (to use with the model) and the other is oriented from the top (to use with the base).</p><p> </p><h4><strong>How to proceed...</strong></h4><p> </p><p>You should now have everything you need to get started. So let's explain how to proceed...</p><p>First decide how high you want to place the articulated model, how many support points you want to use and where you want them. Place the articulated model on the plate. Add the correct insert as negative volume. Place it clearly visible above the centerline of the model so that you can easily find it. Then copy it as many times as you need. Then place the separate inserts in the correct position in the model (the bevel on the insert should just fall into it).</p><p>Place the base on the plate.</p><blockquote><p>tip: BEFORE moving on, shape the base to the length of the model by scaling in all necessary/desirable directions. For this you have to export the base as a new STL and retrieve it again. This is because otherwise the negative volumes will also be scaled the same! (you learn as you go along...)</p></blockquote><p>Repeat the above steps for the model also for the base.</p><p><strong>If you use scaled springs, you should also scale the used inserts the same!</strong></p><p>* If you use the unscaled springs, you can also use down-scaled springs afterwards. For this you have to add the unscaled inserts to the ends of the springs via [add part]. <i>(see above tip, always save as new STL before adding the ends, otherwise they will be scaled also!)</i></p><p> </p><h4>The example model</h4><p>I used the following method for the model shown:</p><p>As a base I used the "Rounded Wedge" which I scaled in both length and width.</p><p>As a model I chose the referenced dolphin. Initially I wanted to use four 100% springs and 2x a spring at 75% (for the tail so that it moved more).</p><p>I ended up replacing 2 100% springs for 2 scaled at 75% because the movements were not to my liking. I had to add unscaled insert to both springs as described above. </p><p>As a final refinement, I slightly deformed the front spring by warming up (hot water) because the dolphin's head pointed too far down for my liking. You can certainly see this method as an addition to optimize the base posture of the model!</p><p>The final result is stored in the project that has been added so that you can copy it 1 on 1.</p><p> </p><h4>Final words:</h4><p>Have fun creating your own Bobbled Articulated Model! I hope this inspired you and would love to see your creations as makes here! Please make a reference (or double the make) to the makers of the articulated models you used to give credit to them also….</p><p> </p><h4>Reference table for spring lengths:</h4><figure class="table" style="width:426pt;"><table><tbody><tr><td style="border-right:1.0pt solid black;height:30.75pt;width:142pt;" colspan="2">100%: 1,6 mm spring coil thickness</td><td style="border-left-style:none;border-right:1.0pt solid black;width:142pt;" colspan="2">75%: 1,2 mm spring coil thickness</td><td style="border-left-style:none;border-right:1.0pt solid black;width:142pt;" colspan="2">50%: 0,8 mm spring coil thickness</td></tr><tr><td style="height:17.25pt;">Insert Heigth</td><td>4</td><td>Insert Heigth</td><td>3</td><td>Insert Heigth</td><td>2</td></tr><tr><td style="height:17.25pt;">Insert Width</td><td>8</td><td>Insert Width</td><td>6</td><td>Insert Width</td><td>4</td></tr><tr><td style="height:17.25pt;">Thickness</td><td>1,6</td><td>Thickness</td><td>1,2</td><td>Thickness</td><td>0,8</td></tr><tr><td style="height:57.75pt;width:72pt;">Number of coils*</td><td style="border-left-style:none;width:70pt;">Total Usable Spring Length</td><td style="border-left-style:none;width:72pt;">Number of coils*</td><td style="border-left-style:none;width:70pt;">Total Usable Spring Length</td><td style="border-left-style:none;width:72pt;">Number of coils*</td><td style="border-left-style:none;width:70pt;">Total Usable Spring Length</td></tr><tr><td style="border-top-style:none;height:17.25pt;">2</td><td style="border-left-style:none;border-top-style:none;">20,8</td><td style="border-left-style:none;border-top-style:none;">2</td><td style="border-left-style:none;border-top-style:none;">15,6</td><td style="border-left-style:none;border-top-style:none;">2</td><td style="border-left-style:none;border-top-style:none;">10,4</td></tr><tr><td style="border-top-style:none;height:17.25pt;">3</td><td style="border-left-style:none;border-top-style:none;">27,2</td><td style="border-left-style:none;border-top-style:none;">3</td><td style="border-left-style:none;border-top-style:none;">20,4</td><td style="border-left-style:none;border-top-style:none;">3</td><td style="border-left-style:none;border-top-style:none;">13,6</td></tr><tr><td style="border-top-style:none;height:17.25pt;">4</td><td style="border-left-style:none;border-top-style:none;">33,6</td><td style="border-left-style:none;border-top-style:none;">4</td><td style="border-left-style:none;border-top-style:none;">25,2</td><td style="border-left-style:none;border-top-style:none;">4</td><td style="border-left-style:none;border-top-style:none;">16,8</td></tr><tr><td style="border-top-style:none;height:17.25pt;">5</td><td style="border-left-style:none;border-top-style:none;">40</td><td style="border-left-style:none;border-top-style:none;">5</td><td style="border-left-style:none;border-top-style:none;">30</td><td style="border-left-style:none;border-top-style:none;">5</td><td style="border-left-style:none;border-top-style:none;">20</td></tr><tr><td style="border-top-style:none;height:17.25pt;">6</td><td style="border-left-style:none;border-top-style:none;">46,4</td><td style="border-left-style:none;border-top-style:none;">6</td><td style="border-left-style:none;border-top-style:none;">34,8</td><td style="border-left-style:none;border-top-style:none;">6</td><td style="border-left-style:none;border-top-style:none;">23,2</td></tr><tr><td style="border-top-style:none;height:17.25pt;">7</td><td style="border-left-style:none;border-top-style:none;">52,8</td><td style="border-left-style:none;border-top-style:none;">7</td><td style="border-left-style:none;border-top-style:none;">39,6</td><td style="border-left-style:none;border-top-style:none;">7</td><td style="border-left-style:none;border-top-style:none;">26,4</td></tr><tr><td style="border-top-style:none;height:17.25pt;">8</td><td style="border-left-style:none;border-top-style:none;">59,2</td><td style="border-left-style:none;border-top-style:none;">8</td><td style="border-left-style:none;border-top-style:none;">44,4</td><td style="border-left-style:none;border-top-style:none;">8</td><td style="border-left-style:none;border-top-style:none;">29,6</td></tr><tr><td style="border-top-style:none;height:17.25pt;">9</td><td style="border-left-style:none;border-top-style:none;">65,6</td><td style="border-left-style:none;border-top-style:none;">9</td><td style="border-left-style:none;border-top-style:none;">49,2</td><td style="border-left-style:none;border-top-style:none;">9</td><td style="border-left-style:none;border-top-style:none;">32,8</td></tr><tr><td style="border-top-style:none;height:17.25pt;">10</td><td style="border-left-style:none;border-top-style:none;">72</td><td style="border-left-style:none;border-top-style:none;">10</td><td style="border-left-style:none;border-top-style:none;">54</td><td style="border-left-style:none;border-top-style:none;">10</td><td style="border-left-style:none;border-top-style:none;">36</td></tr><tr><td style="border-top-style:none;height:17.25pt;">11</td><td style="border-left-style:none;border-top-style:none;">78,4</td><td style="border-left-style:none;border-top-style:none;">11</td><td style="border-left-style:none;border-top-style:none;">58,8</td><td style="border-left-style:none;border-top-style:none;">11</td><td style="border-left-style:none;border-top-style:none;">39,2</td></tr><tr><td style="border-top-style:none;height:17.25pt;">12</td><td style="border-left-style:none;border-top-style:none;">84,8</td><td style="border-left-style:none;border-top-style:none;">12</td><td style="border-left-style:none;border-top-style:none;">63,6</td><td style="border-left-style:none;border-top-style:none;">12</td><td style="border-left-style:none;border-top-style:none;">42,4</td></tr><tr><td style="height:15.75pt;" colspan="6">* Coils as in spring elements</td></tr></tbody></table></figure><p> </p><p><i><strong>* </strong>If you've made your awesome model, why not display it on my </i><a href="https://www.printables.com/model/313316-display-cube-with-floating-shelf"><i><strong>Display Cube with Floating Shelf</strong></i></a></p>
With this file you will be able to print Bobble to the next level! with your 3D printer. Click on the button and save the file on your computer to work, edit or customize your design. You can also find more 3D designs for printers on Bobble to the next level!.